Welcome to the Lichtblick Documentation!
Lichtblick is an open-source application designed to streamline the workflow of automotive engineers and robotics users, helping them achieve engineering excellence with ease.
What is Lichtblick?
Built as a fork of Foxglove Studio, Lichtblick simplifies data visualization and debugging for robotics and automotive applications.
Documentation
We are actively working on new features! User documentation for recent updates will be added soon - Stay Tuned!
Lichtblick empowers robotics teams to efficiently explore, collaborate on, and interpret their robots' data, leading to smarter iterations and faster development cycles.
Workflows
Lichtblick offers a comprehensive suite of developer tools tailored for each phase of the robotics development lifecycle:
Recording
- Capture multimodal data across various supported encoding formats, including MCAP, ROS 1, ROS 2, Protobuf, and more.
Ingestion
- Import recordings from local devices and Edge Sites into a centralized cloud repository for streamlined access.
Processing
- Organize imported data recordings by device, timestamp, and topic for structured analysis.
- Implement retention policies to effectively manage your team's data storage.
- Set up webhooks to seamlessly integrate with your existing data pipeline.
Visualization
- Stream imported data to Lichtblick and third-party tools like Jupyter Notebooks for comprehensive analysis.
- Configure panels to gain insights into your robots' sensory inputs, decision-making processes, and actions.
- Develop shared layouts to facilitate recurring visualization and debugging tasks.
Collaboration
- Enhance logs with metadata and events to simplify search and discovery.
- Leverage collective expertise to triage incidents and conduct root cause analyses.
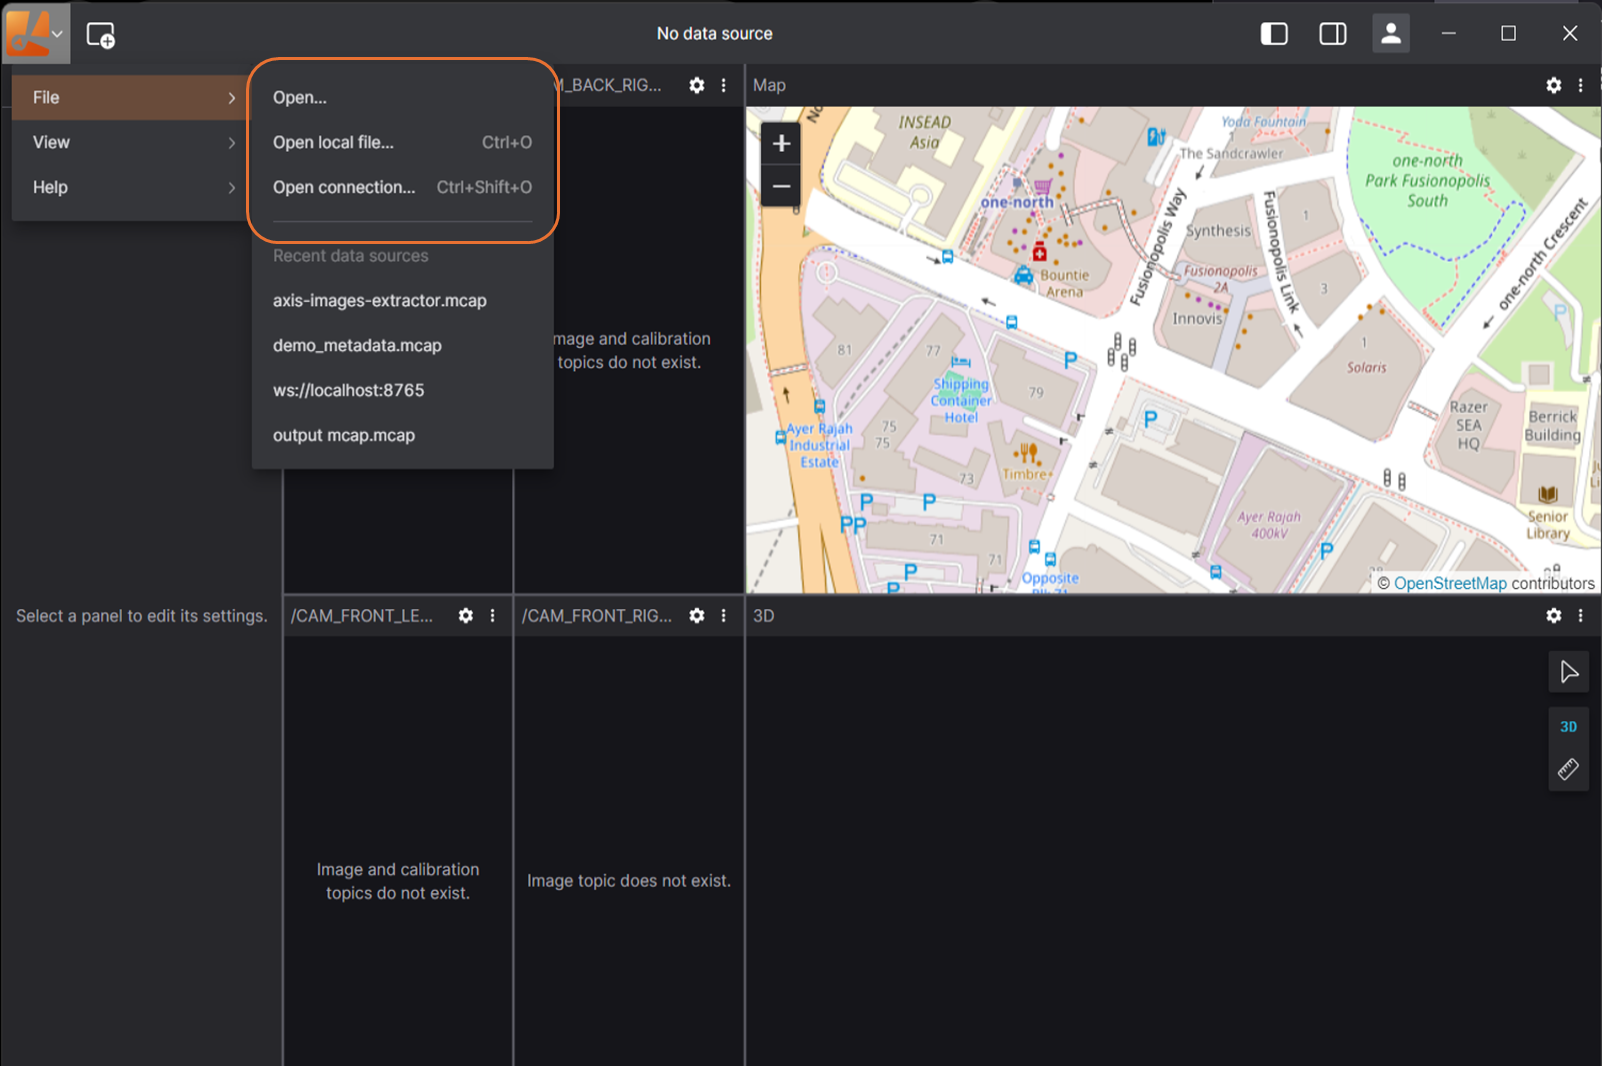
Connecting to Data
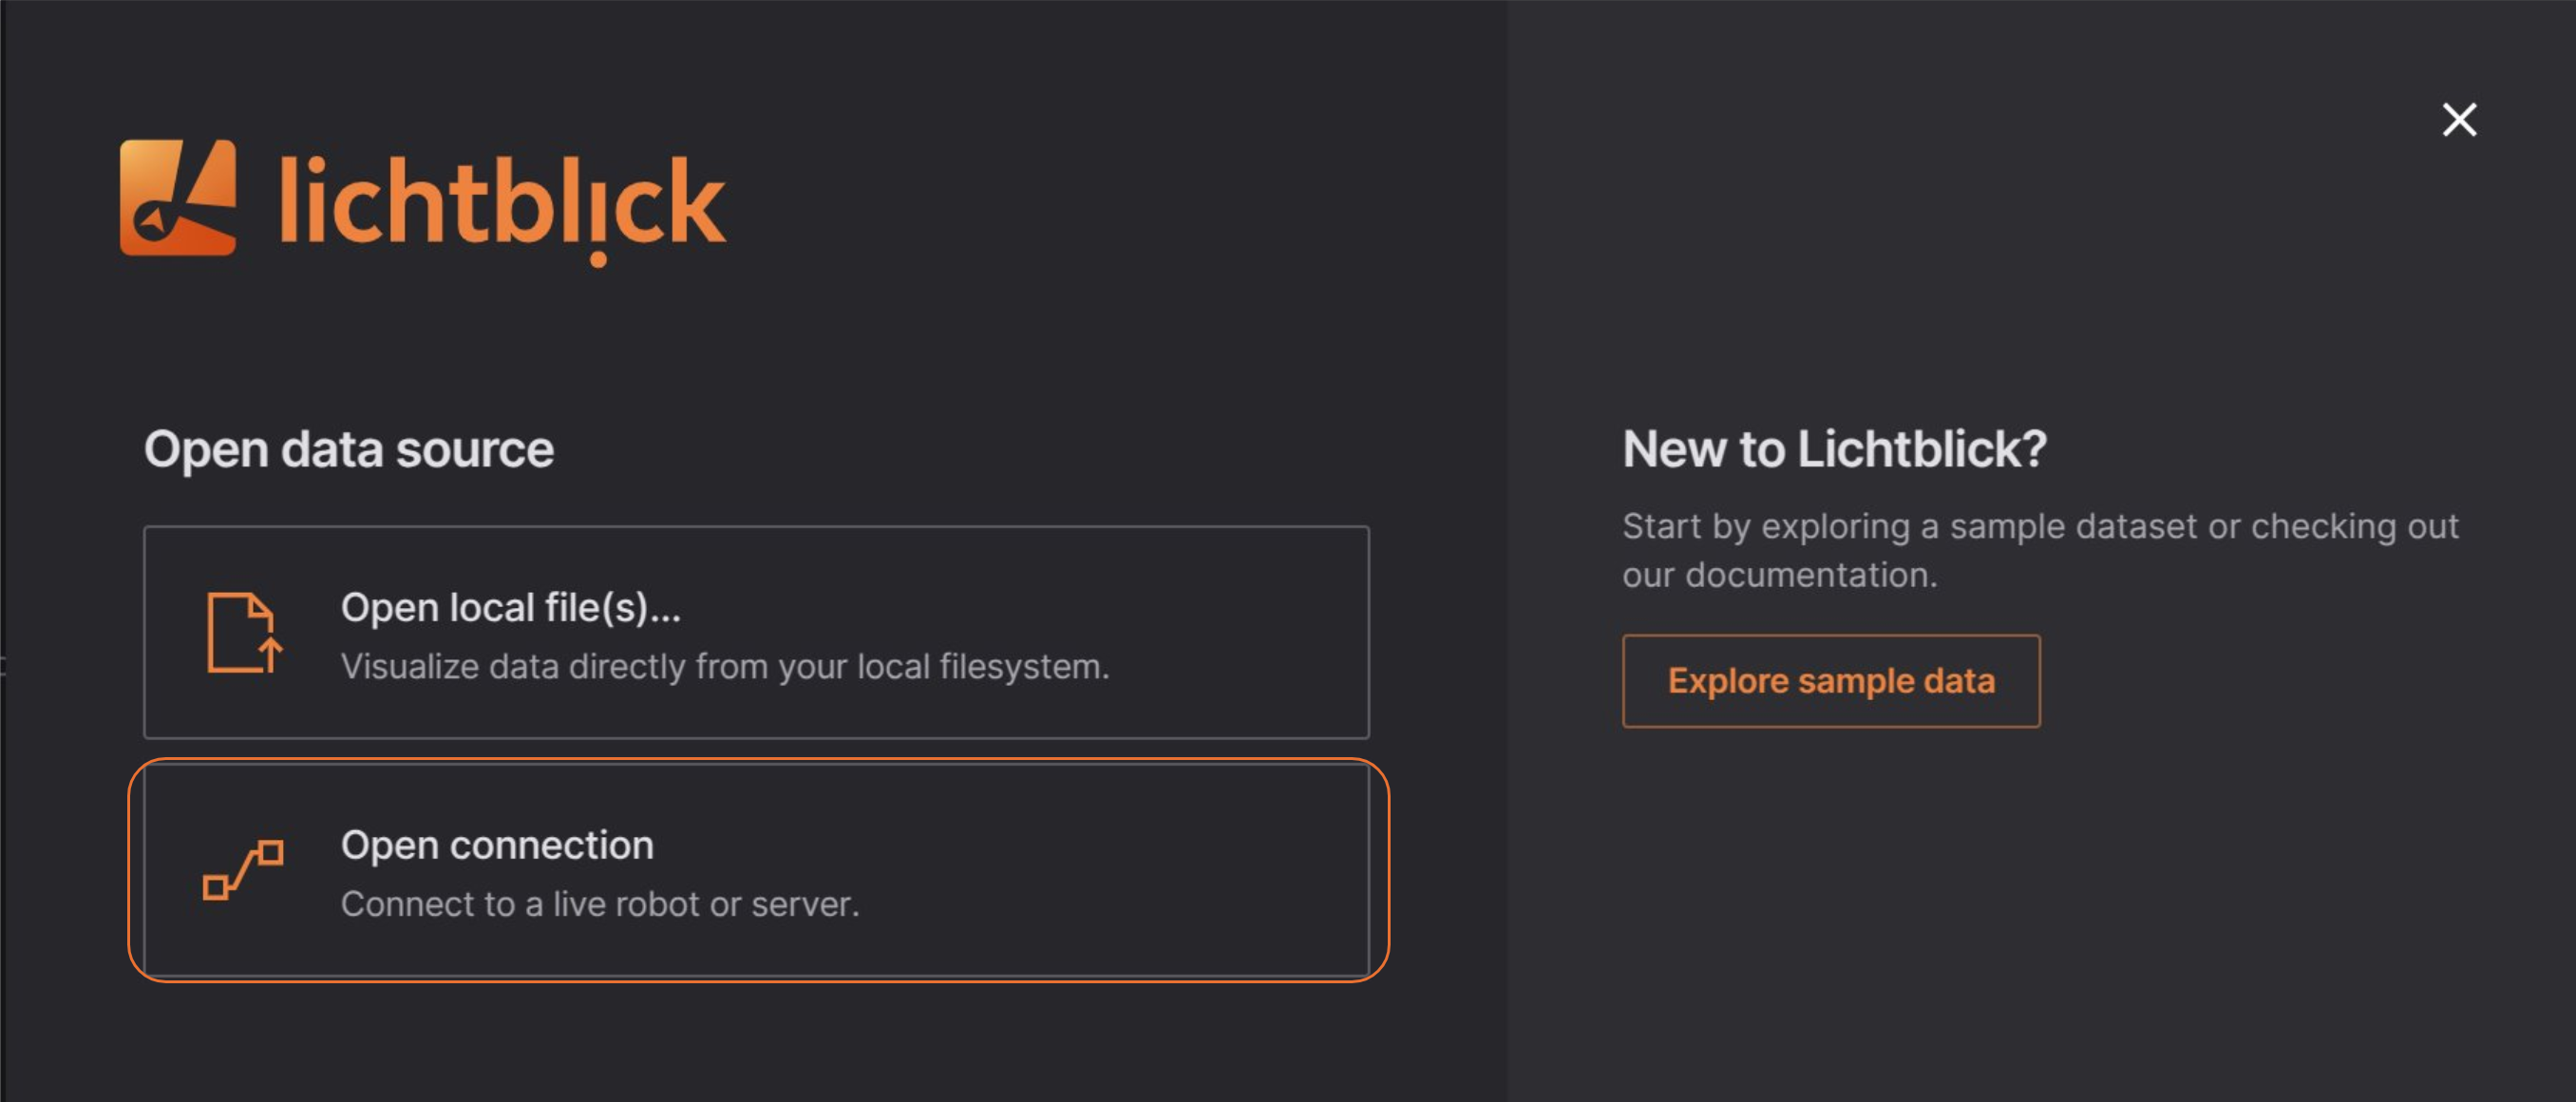
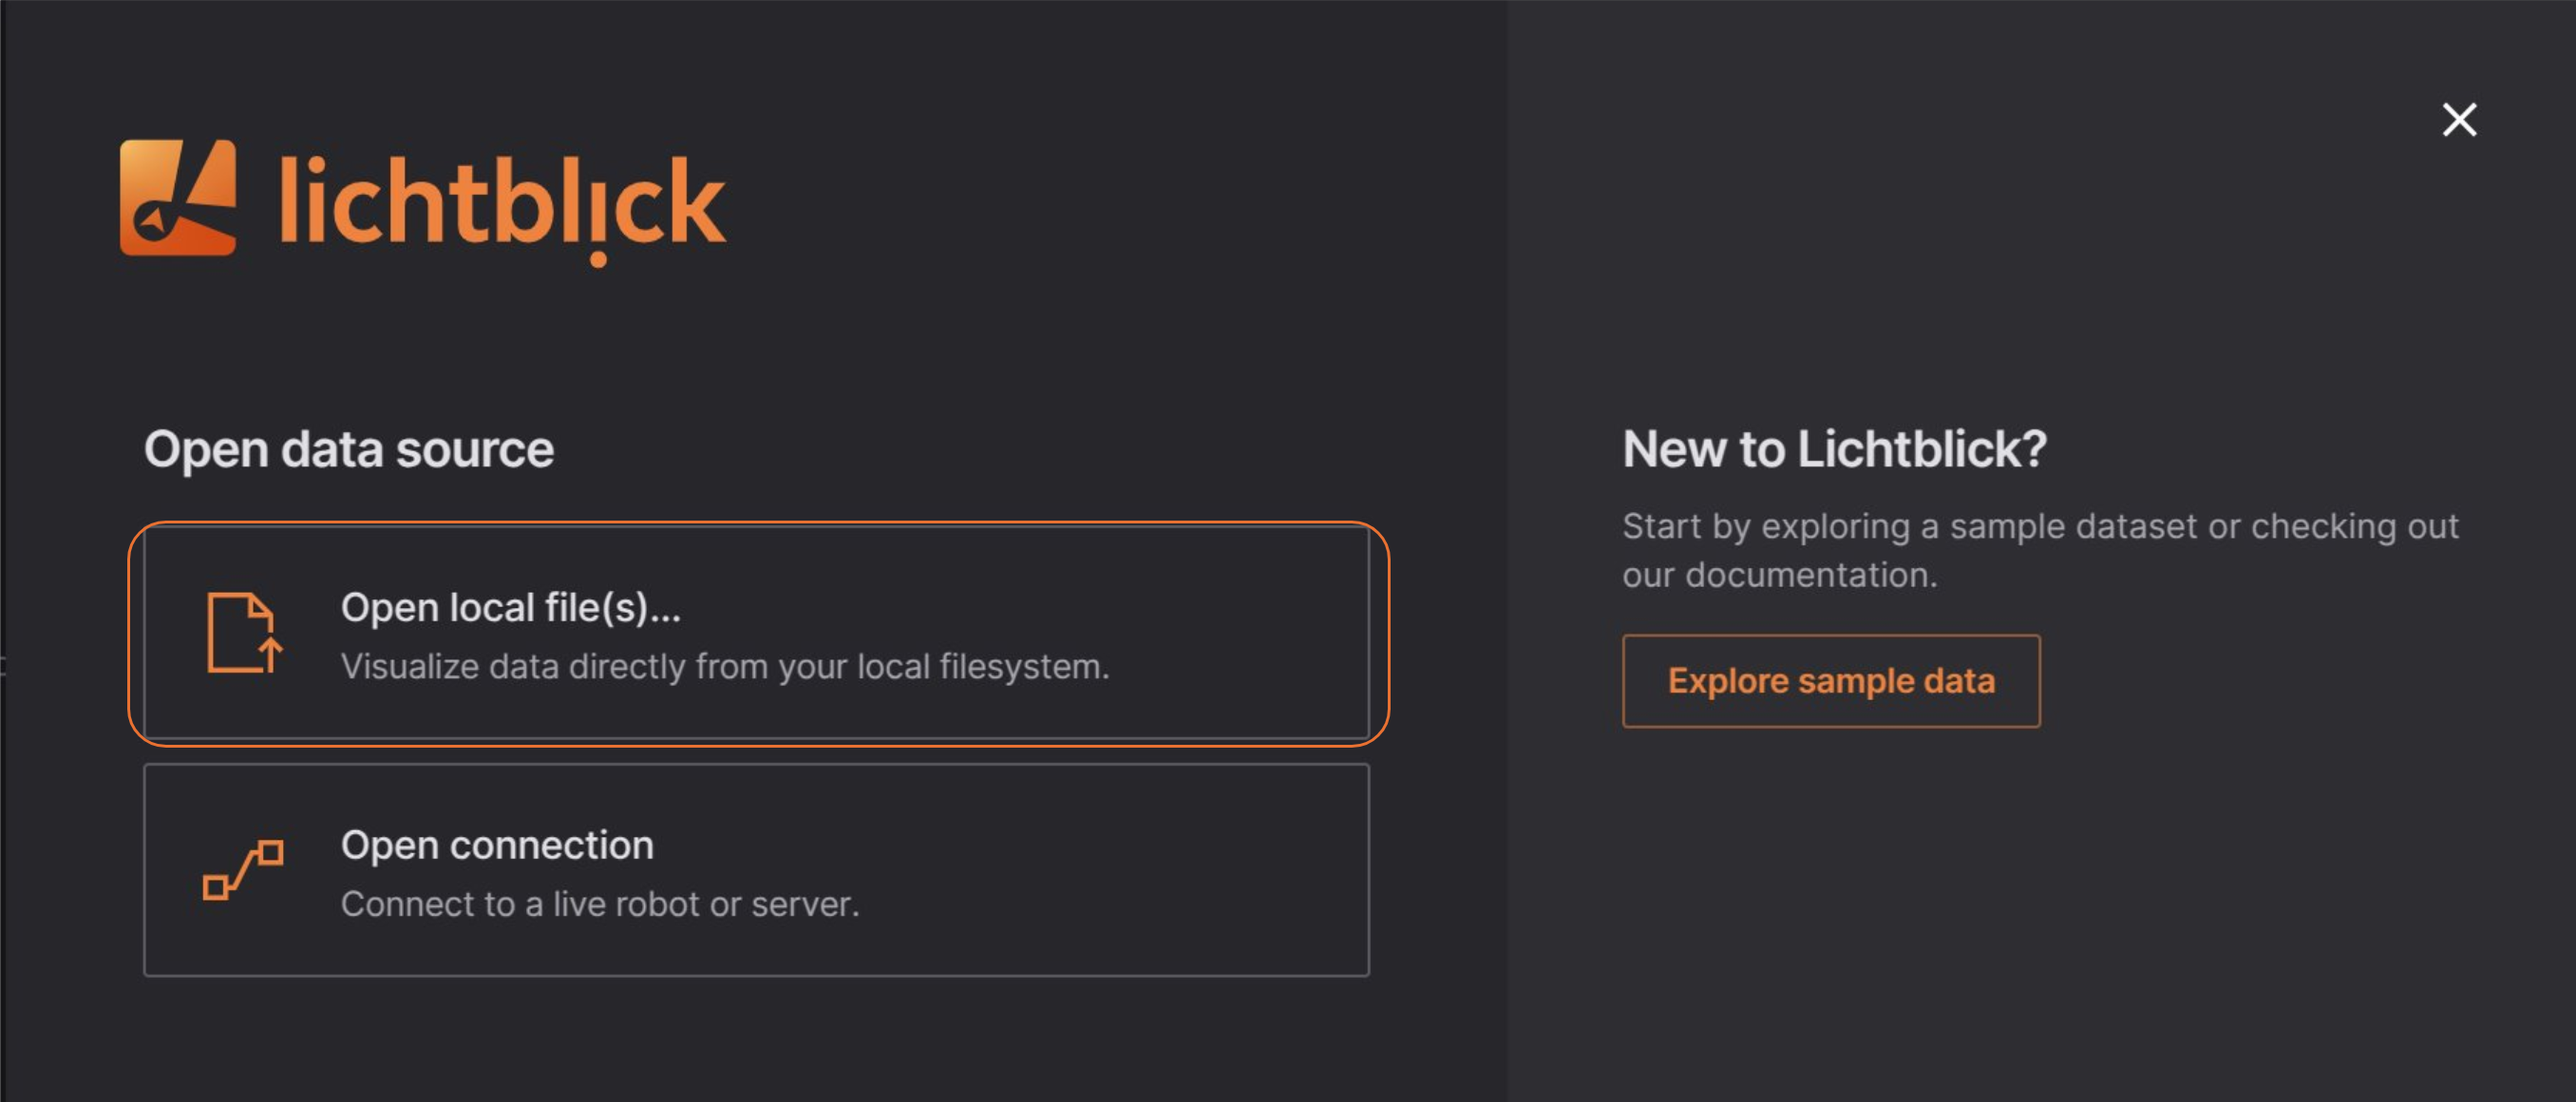
To begin visualizing data, navigate to the Lichtblick dashboard and select a data source option.
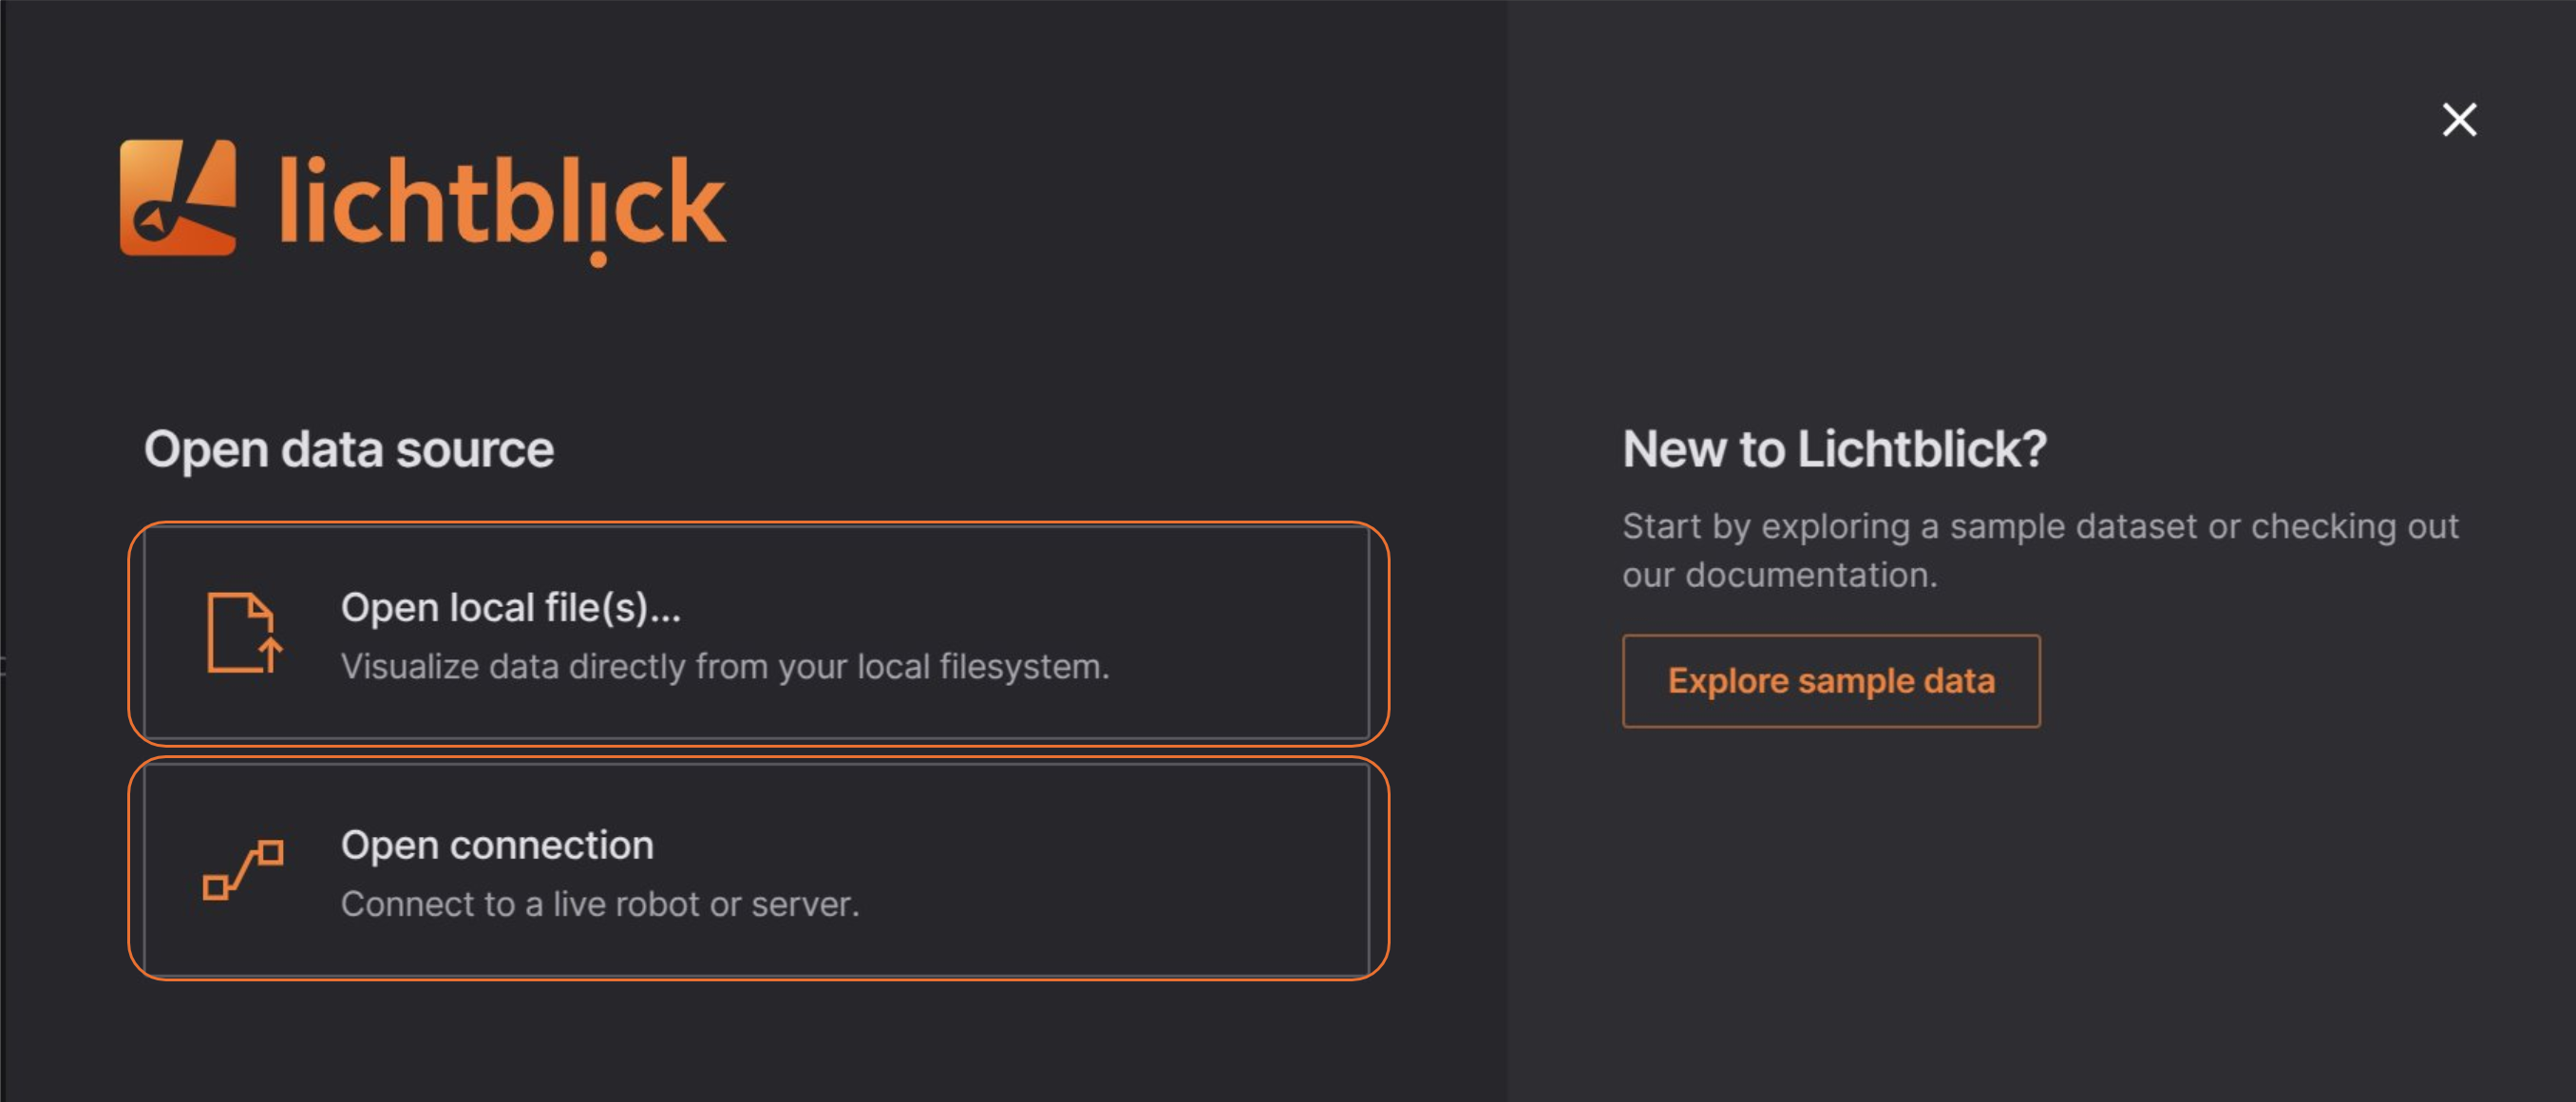
Data Source
Lichtblick allows its users to open data via two options, either a local data source or a live data source.
| Use Case | Supported Formats | |
|---|---|---|
Local Data Open local file(s)... | Allows to open and inspect data saved locally | |
Live Data Open connection | Inspect real-time incoming data |
Live Data
Connect to live data sources using Lichtblick's WebSocket, Rosbridge, and Velodyne Lidar integrations for real-time streaming. You can also load remote data files via URL for easy access and processing.
Supported formats
| Supported formats | Configuration options | |
|---|---|---|
| Foxglove WebSocket | WebSocket URL | |
| Rosbridge | WebSocket URL | |
| ROS 1 | ROS 1 Desktop only | ROS_MASTER_URI and ROS_HOSTNAME |
| Velodyne Lidar | Velydone Desktop only | UDP port |
| Remote file | Requires CORS setup |
Limitations
When connecting to a live robotics stack, each connection will have different capabilities.
| Feature | Foxglove WebSocket | Rosbridge | ROS 1 |
|---|---|---|---|
| Stream ROS 1 data | ✓ | ✓ | ✓ |
| Stream ROS 2 data | ✓ | ✓ | |
| Stream custom data | ✓ | ||
| Custom message schemas | ✓ | ✓ | ✓ |
| Publish messages | ✓ (ROS 1, ROS 2, JSON) | ✓ | ✓ |
| Call services | ✓ | ✓ | |
| Call actions | |||
| Read and set parameters | ✓ | ✓ |
Cross-Origin Resource Sharing (CORS) setup
To load remote data files, they must be hosted on a server or cloud provider that supports Cross-Origin Resource Sharing (CORS) and range requests.
For seamless playback and analysis in Lichtblick, we recommend using cloud providers like Amazon S3, Google Cloud Storage (GCS), or Azure Storage. While you can host files on your own server, setting up CORS and range request support can be complex and time-consuming.
Handling Sensitive Data
If your data is sensitive, use a signed URL to securely grant temporary access. Ensure that the URL points directly to the resource, as redirects will not work with CORS.
- S3 – Sharing objects using presigned URLs
- GCS – Signed URLs
- Azure Storage – Grant limited access with SAS
Since signed URLs expire after a set time, consider configuring your server to generate them dynamically for authenticated users.
Configuring CORS
To enable remote data loading, you need to properly configure CORS. For example, if you're using Amazon S3, you can define CORS settings using Terraform or another infrastructure-as-code tool. Check out the following example of a Terraform config for an S3 bucket:
cors_rule {
  allowed_methods = ["GET", "HEAD", "OPTIONS"]
  allowed_origins = ["https://yourdomain.com"]
  allowed_headers = ["*"]
  expose_headers = ["ETag", "Content-Type", "Accept-Ranges", "Content-Length"]
}
And a Terraform config for a GCS bucket:
cors {
  origin = ["https://yourdomain.com"]
  method = ["GET", "HEAD", "OPTIONS"]
  response_header = ["ETag", "Content-Type", "Accept-Ranges", "Content-Length"]
}
Local Data
Lichtblick enables you to load local data files for visualization.
Supported formats
Getting started
To visualize local files, follow these steps:
- Click
"Open local file(s)…"from the dashboard or left-hand menu to browse and select files. - Open files directly or drag-and-drop them from your OS file manager for quick access.

Frameworks
This section of the documentation provides a guide on how to connect Lichtblick to various data sources and understand the supported data formats and schema encodings. Whether you are working with live sensor data or recorded files, Lichtblick offers flexible options to integrate and visualize your information.
The pages within this section cover the following key areas:
-
Connecting to Live Data Sources: Learn how to establish real-time connections with platforms like ROS 1 and ROS 2, as well as specialized sensors like Velodyne.
-
Loading Recorded Data: Discover how to load and work with data from various file formats, including ROS 1
.bagfiles, ROS 2 MCAP files, and PX4 ULog files. Both local and remote file loading options are explained. -
Utilizing Rosbridge: Understand how Rosbridge facilitates communication between ROS environments (ROS 1 and ROS 2) and external applications like Lichtblick via websockets.
-
Supported Schema Encodings: Get details on the different message and schema encodings that Lichtblick supports for MCAP-based and websocket data sources, including JSON, Protobuf, FlatBuffers, ROS 1, ROS 2, and OMG IDL.
By exploring these topics, you will gain a comprehensive understanding of how to bring your data into Lichtblick for analysis and visualization.
ROS 1
Load local and remote ROS 1 (.bag) files, or connect directly to a live ROS 1 stack.
Live data
Install ROS 1, and make sure you're connected to the same network as the robot.
Then, in Lichtblick, select "Open connection", either on the initial welcome pop up or via the app bar menu.
Live connections
You can use Rosbridge or Ros foxglove bridge to establish a live connection between Lichtblick and ROS. This enables real-time data streaming, allowing you to interact with ROS topics, services, and parameters directly from Lichtblick.
Native
For direct access to your ROS master and nodes, connect using a native TCP (Transmission Control Protocol) connection.
Ensure you have a working ROS 1 setup and then run roscore in your terminal.
Select "ROS 1" in the "Open data source" dialog, and enter your ROS_MASTER_URI (ROS master's IP and port) and ROS_HOSTNAME:
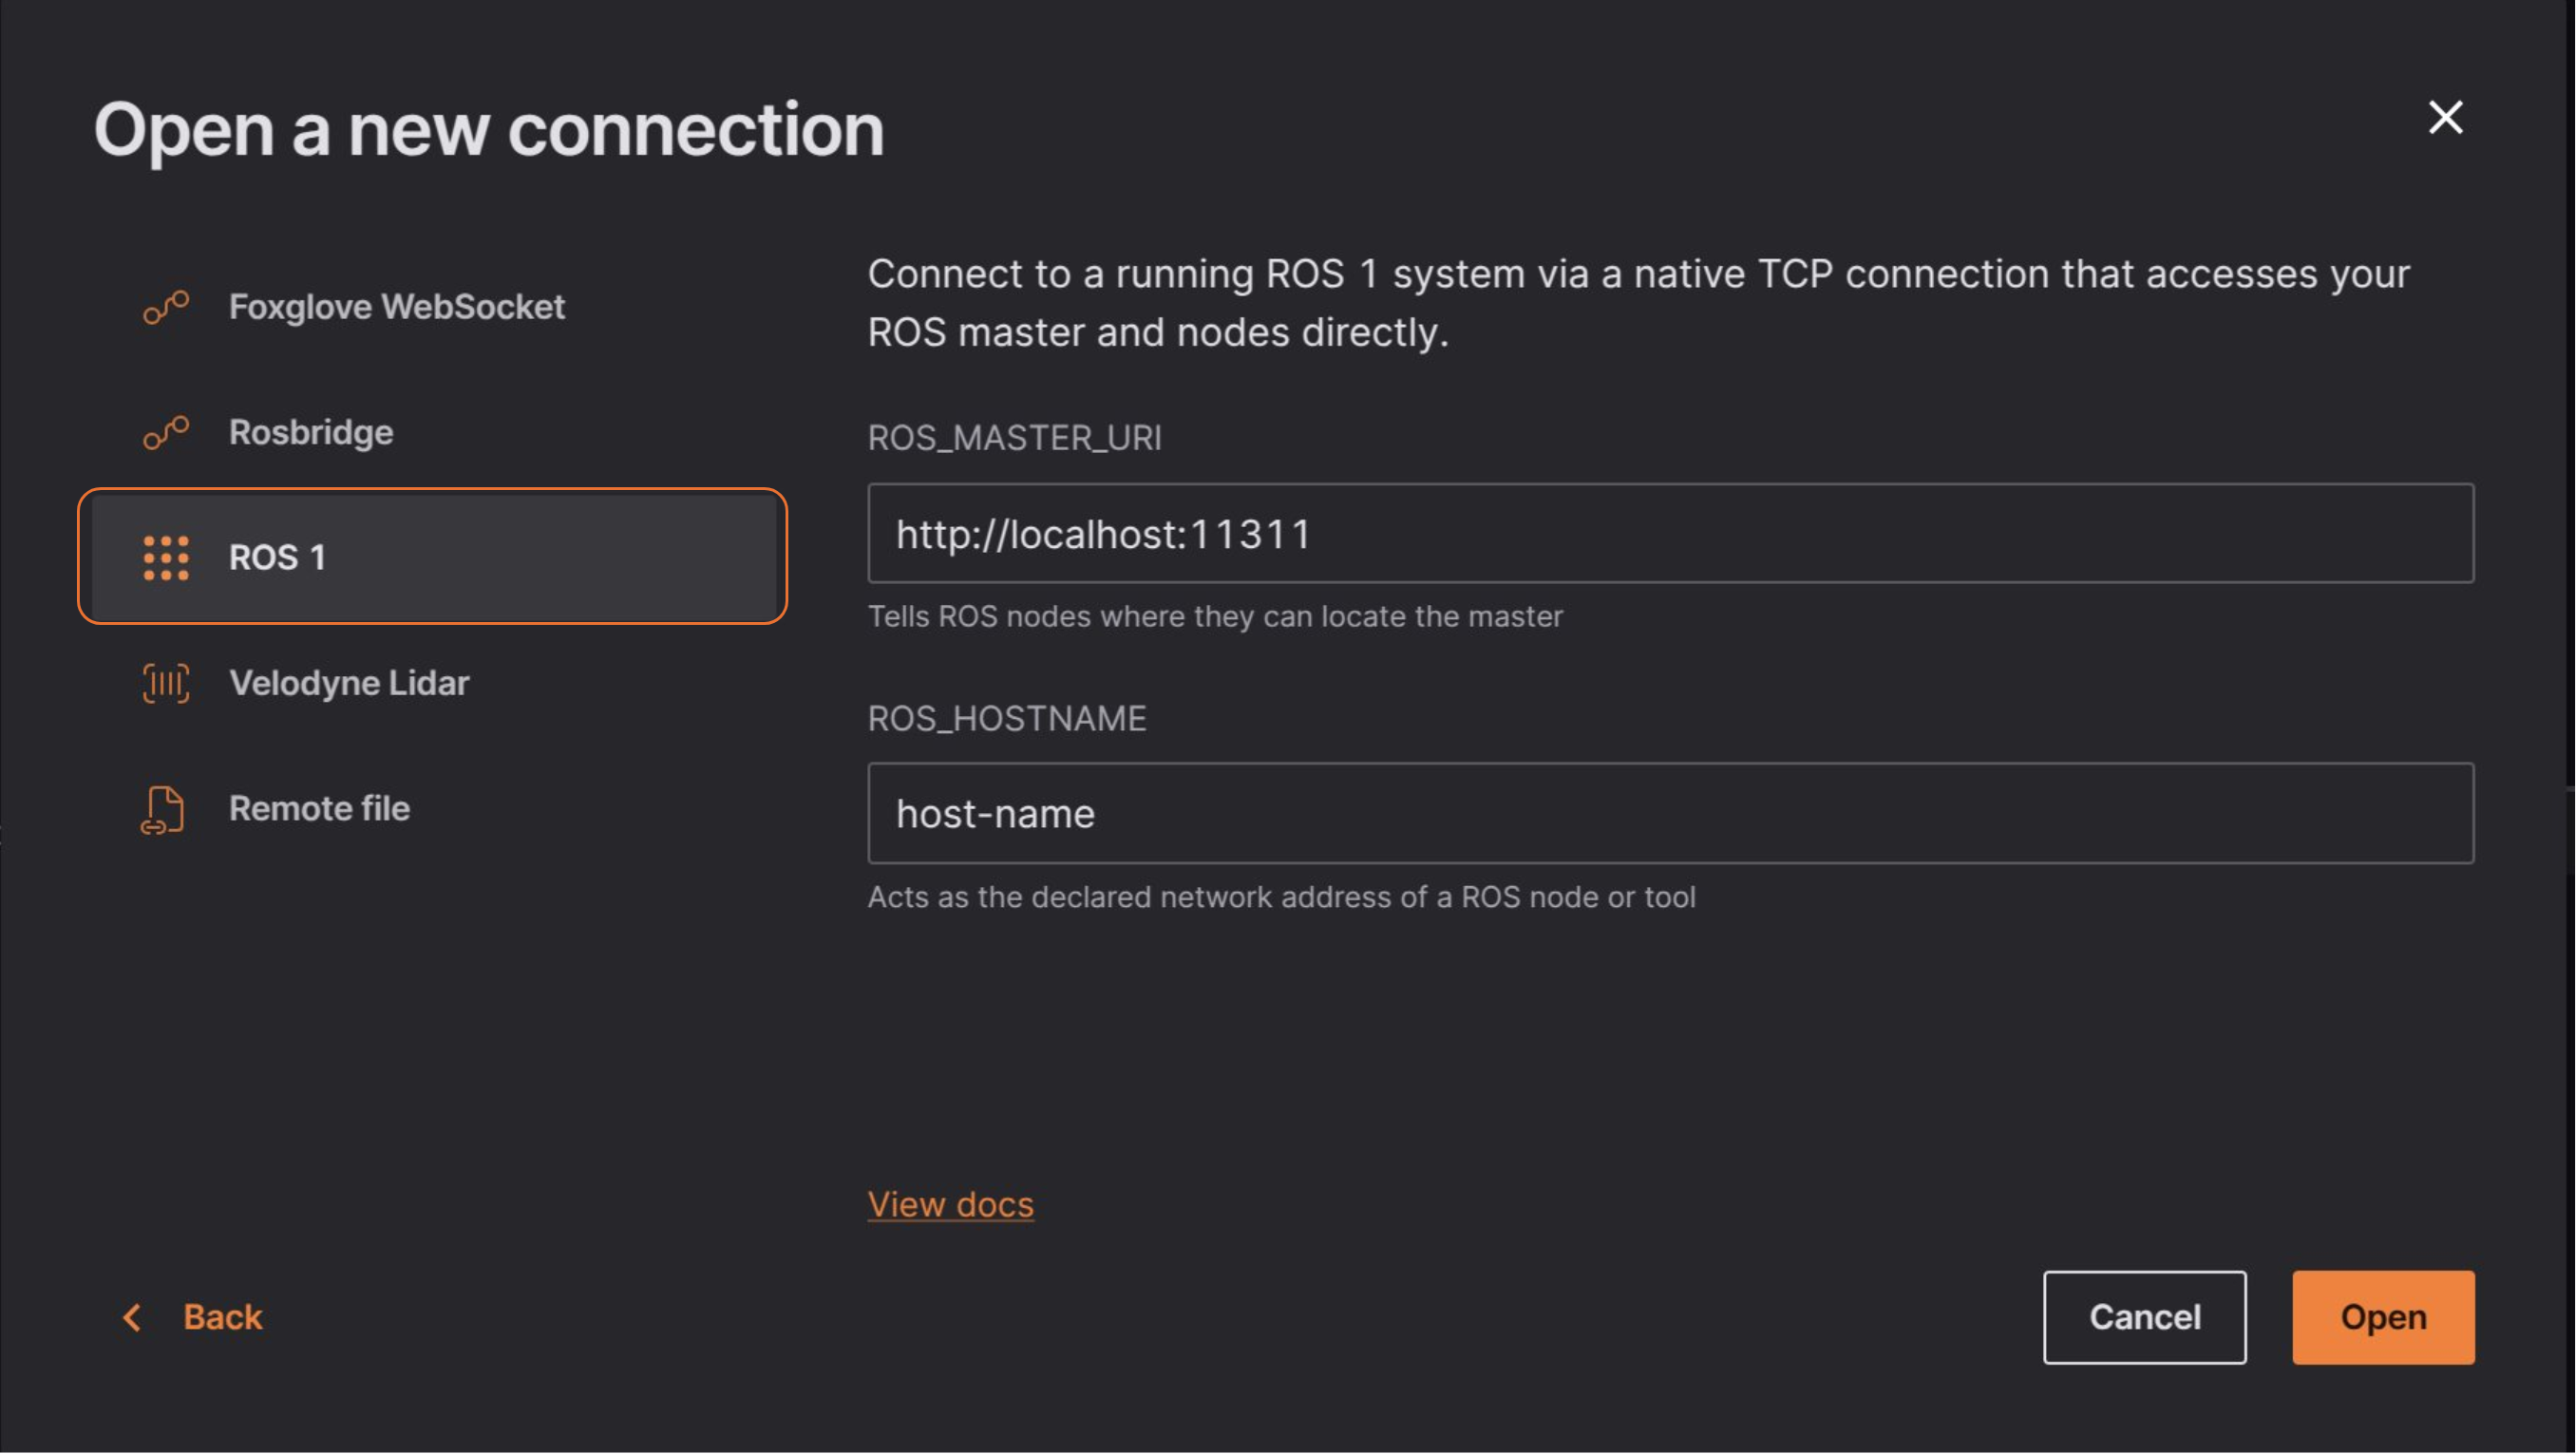
If you encounter connectivity issues, verify that your ROS stack and Lichtblick have unrestricted network access, as ROS communicates over multiple ports.
If ROS and Lichtblick are running on different machines, refer to the ROS 1 Network Setup documentation to properly configure your environment.
Remote File
For this option just select the "Remote file" in the "Open connection" option and enter the URL to your remote .bag file.
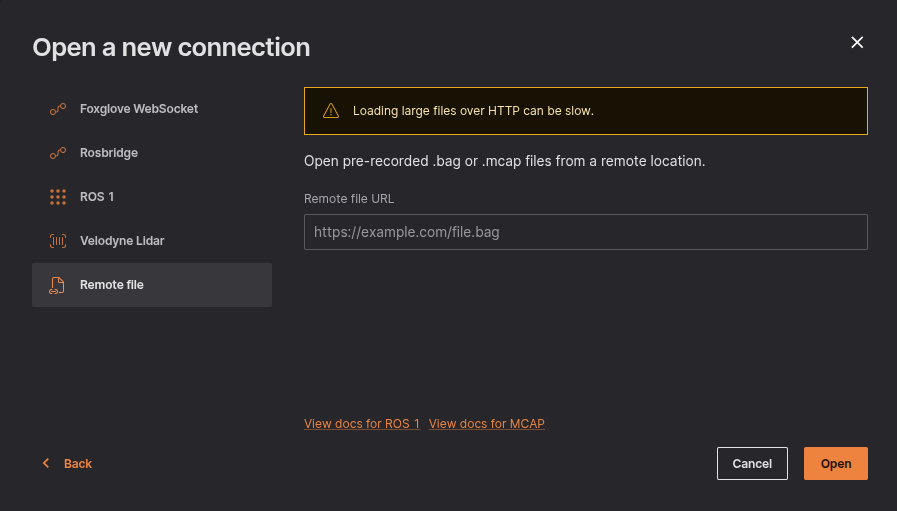
Don't forget to set up CORS if you intend to host the files yourself and load them into Lichtblick.
Local Data
You can load local files for visualization by:
- The "Open local file(s)..." in the initial pop up or the menu on the top left;
- You can drag'n drop the files from your OS file manager;
In some parts of the documentation and codebase, you may still encounter references to Foxglove or Foxglove packages. These references are remnants of Lichtblick's origins as a fork of the Foxglove project. While Lichtblick is actively working to remove dependencies on Foxglove code and replace these references, this effort is still ongoing.
We appreciate your patience as we continue to refine and align the platform with Lichtblick's independent development goals. If you have any questions or encounter issues related to these references, please reach out to our support team for assistance.
ROS 2
Load local and remote MCAP files containing ROS 2 data, or connect directly to a live ROS 2 stack.
Live data
Install ROS 2, and make sure you're connected to the same network as the robot.
Then, in Lichtblick, select "Open connection", either on the initial welcome pop up or via the app bar menu.
Live connections
You can use Rosbridge or Ros foxglove bridge to establish a live connection between Lichtblick and ROS. This enables real-time data streaming, allowing you to interact with ROS topics, services, and parameters directly from Lichtblick.
Local Data
You can load local files for visualization by:
- The "Open local file(s)..." in the initial pop up or the menu on the top left;
- You can drag'n drop the files from your OS file manager;
In some parts of the documentation and codebase, you may still encounter references to Foxglove or Foxglove packages. These references are remnants of Lichtblick's origins as a fork of the Foxglove project. While Lichtblick is actively working to remove dependencies on Foxglove code and replace these references, this effort is still ongoing.
We appreciate your patience as we continue to refine and align the platform with Lichtblick's independent development goals. If you have any questions or encounter issues related to these references, please reach out to our support team for assistance.
MCAP
Load local and remote MCAP files.
Live Data
In Lichtblick select "Open connection" in the initial pop up or the menu on the top left.
Remote File
For this option just select the "Remote file" in the "Open connection" option and enter the URL to your remote .mcap file.
If you intend to open more than one .mcap file via URL you'll need to change the URL manually, you can check how to do it on this page of our documentation.
Local Data
You can load local files for visualization by:
- The "Open local file(s)..." in the initial pop up or the menu on the top left;
- You can drag'n drop the files from your OS file manager;
When dealing with multiple files, Lichtblick will merge them into a single playback timeline. It's important that they all come from the same data source to avoid potencial data loss or erros during playtime.
PX 4
Load local PX 4 ULog (ulg) files for visualization.
Local Data
You can load local files for visualization by:
- The "Open local file(s)..." in the initial pop up or the menu on the top left;
- You can drag'n drop the files from your OS file manager;
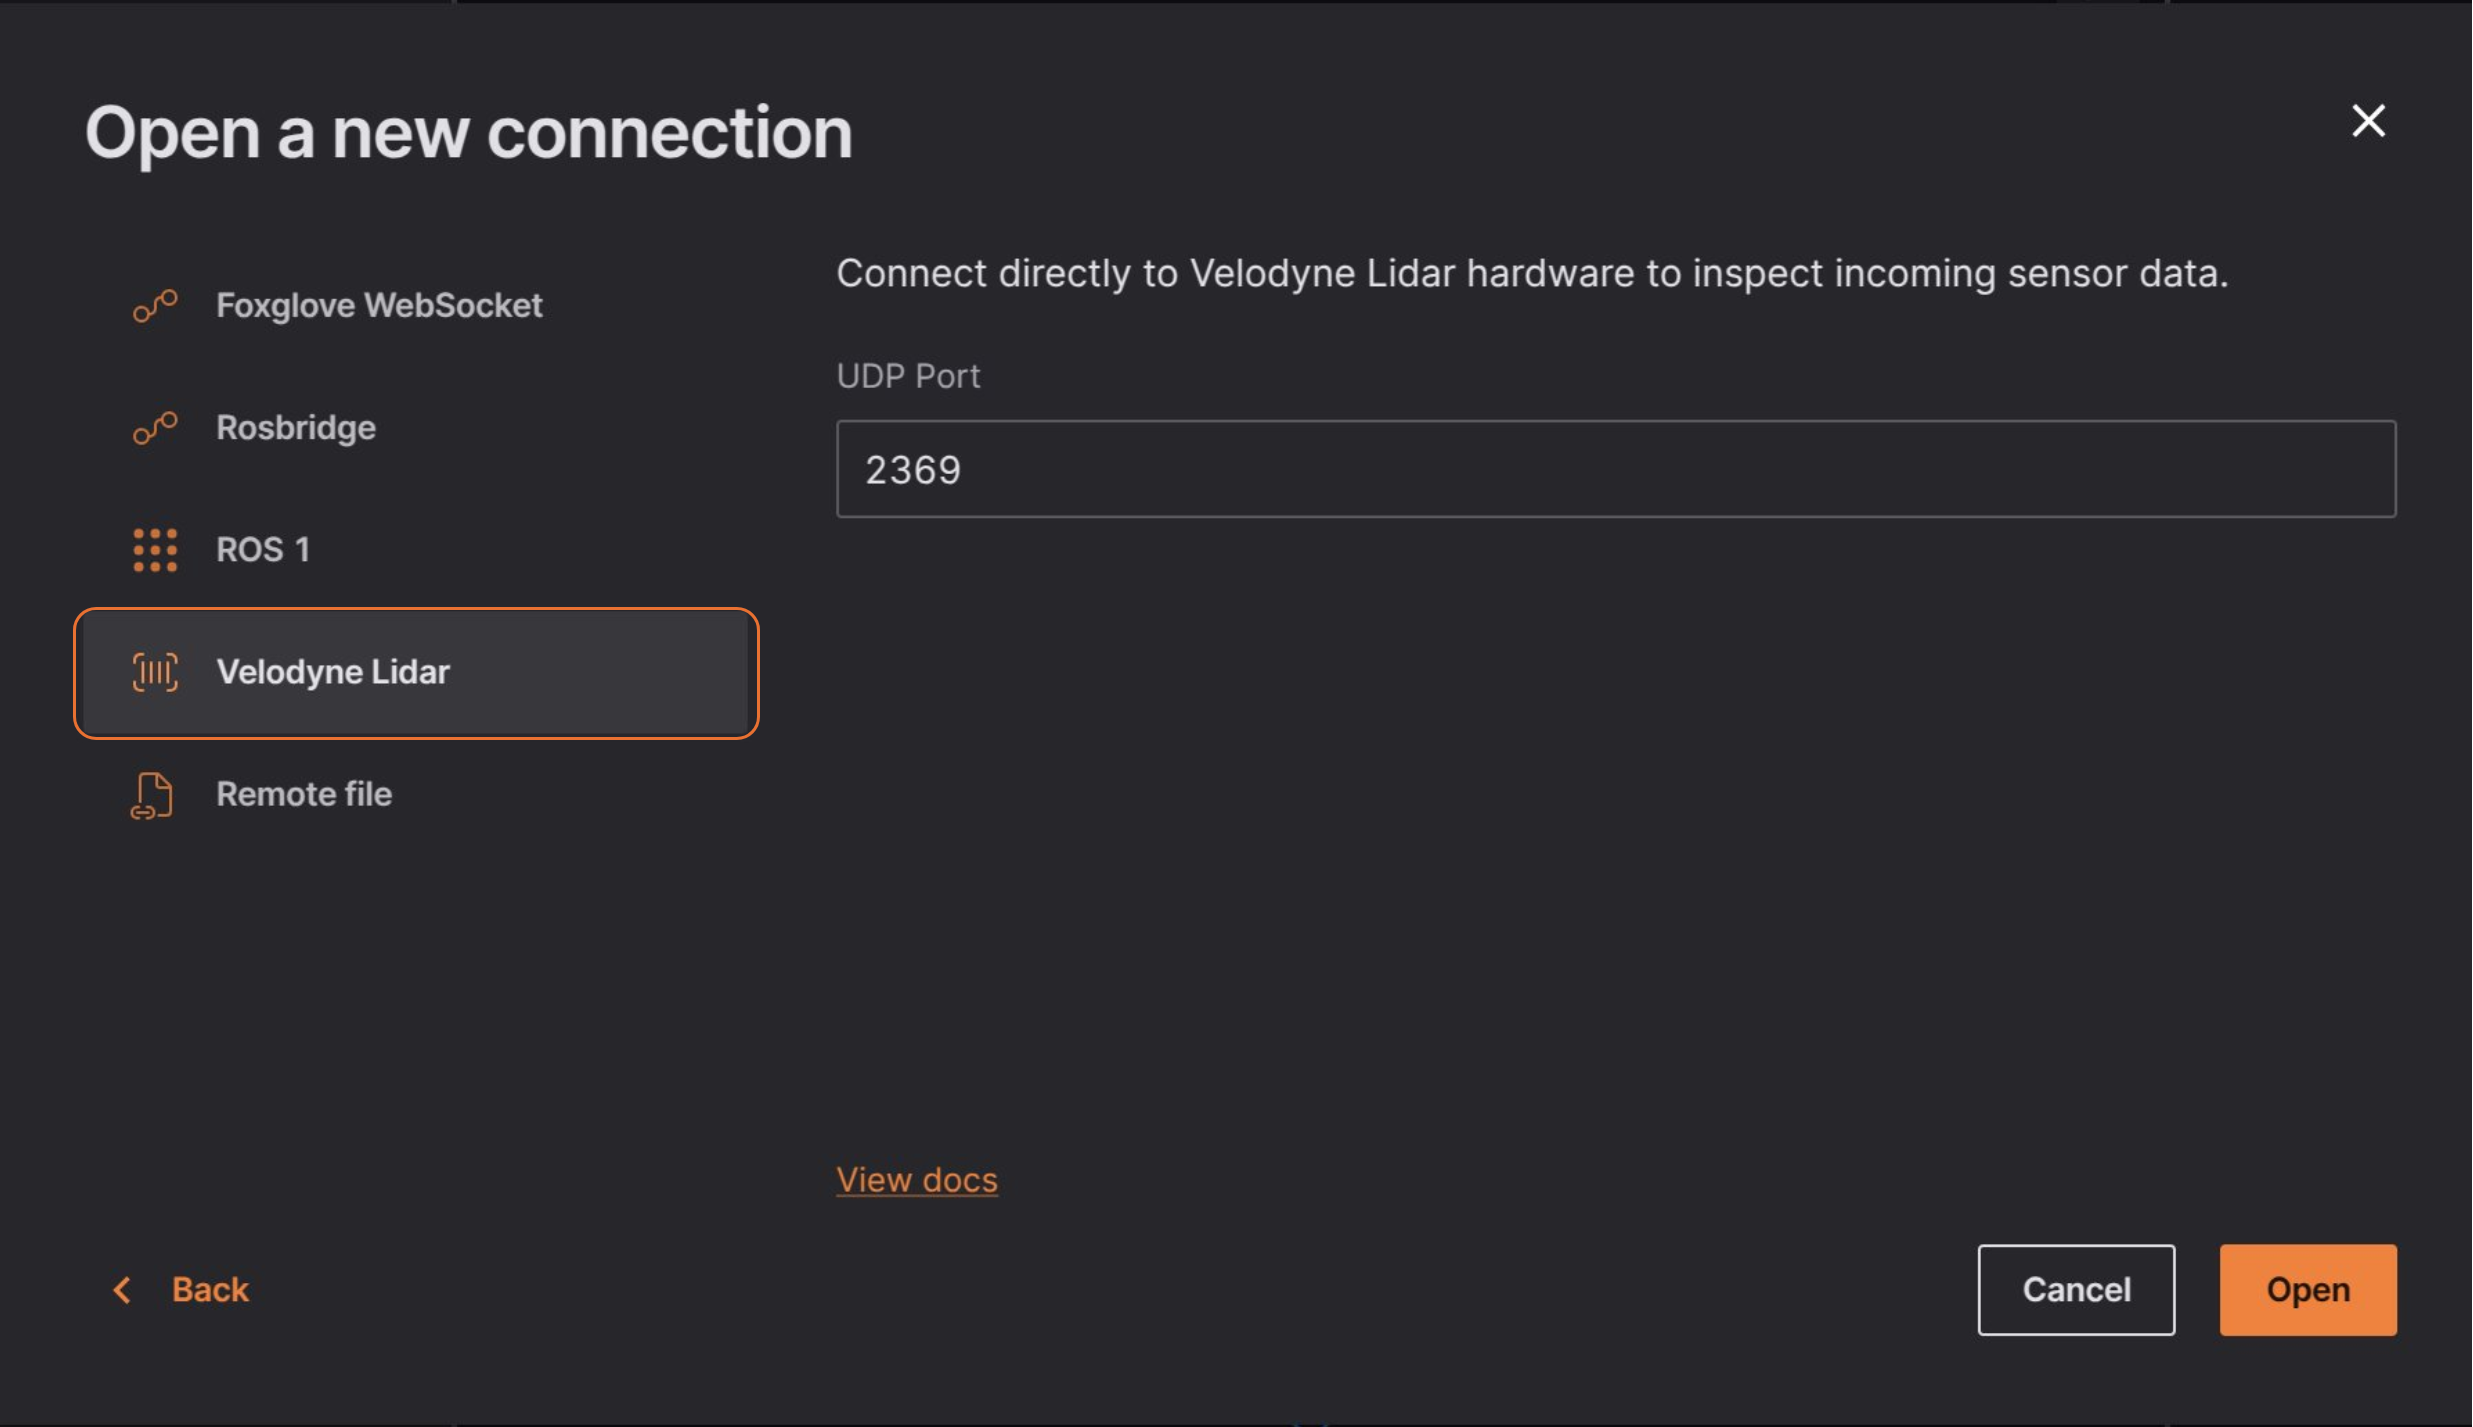
Velodyne
Velodyne sensors communicate using UDP sockets, which are not supported by web browsers. To establish a connection with a Velodyne sensor, please use our desktop application, which is designed to handle UDP communication reliably.
Connect to Velodyne Lidar to load live incoming data.
Select "Open connection" in the "Open data source" menu, and select the "Velodyne Lidar" option.
Enter the local UDP port on which you want to listen for Velodyne packets:
To test your connection, add a 3D panel to your layout, and open your panel settings to toggle on the velodyne topic. You should now see an interactive representation of your Lidar scan in a 3D scene.
Rosbridge
The rosbridge package enables communication between ROS 1 or ROS 2 and external applications via a websocket connection. It allows non-ROS systems, including web applications, to interact with ROS topics, services, and parameters.
Overview
Rosbridge provides a websocket-based API for sending and receiving ROS messages over the network. It is designed for general-purpose communication, enabling integration with web applications, cloud services, and custom remote interfaces.
Key features:
-
Supports ROS 1 and ROS 2
-
Implements the rosbridge_protocol for structured websocket communication
-
Enables non-ROS clients to subscribe, publish, and call services
-
Allows remote monitoring and control of ROS systems from web applications
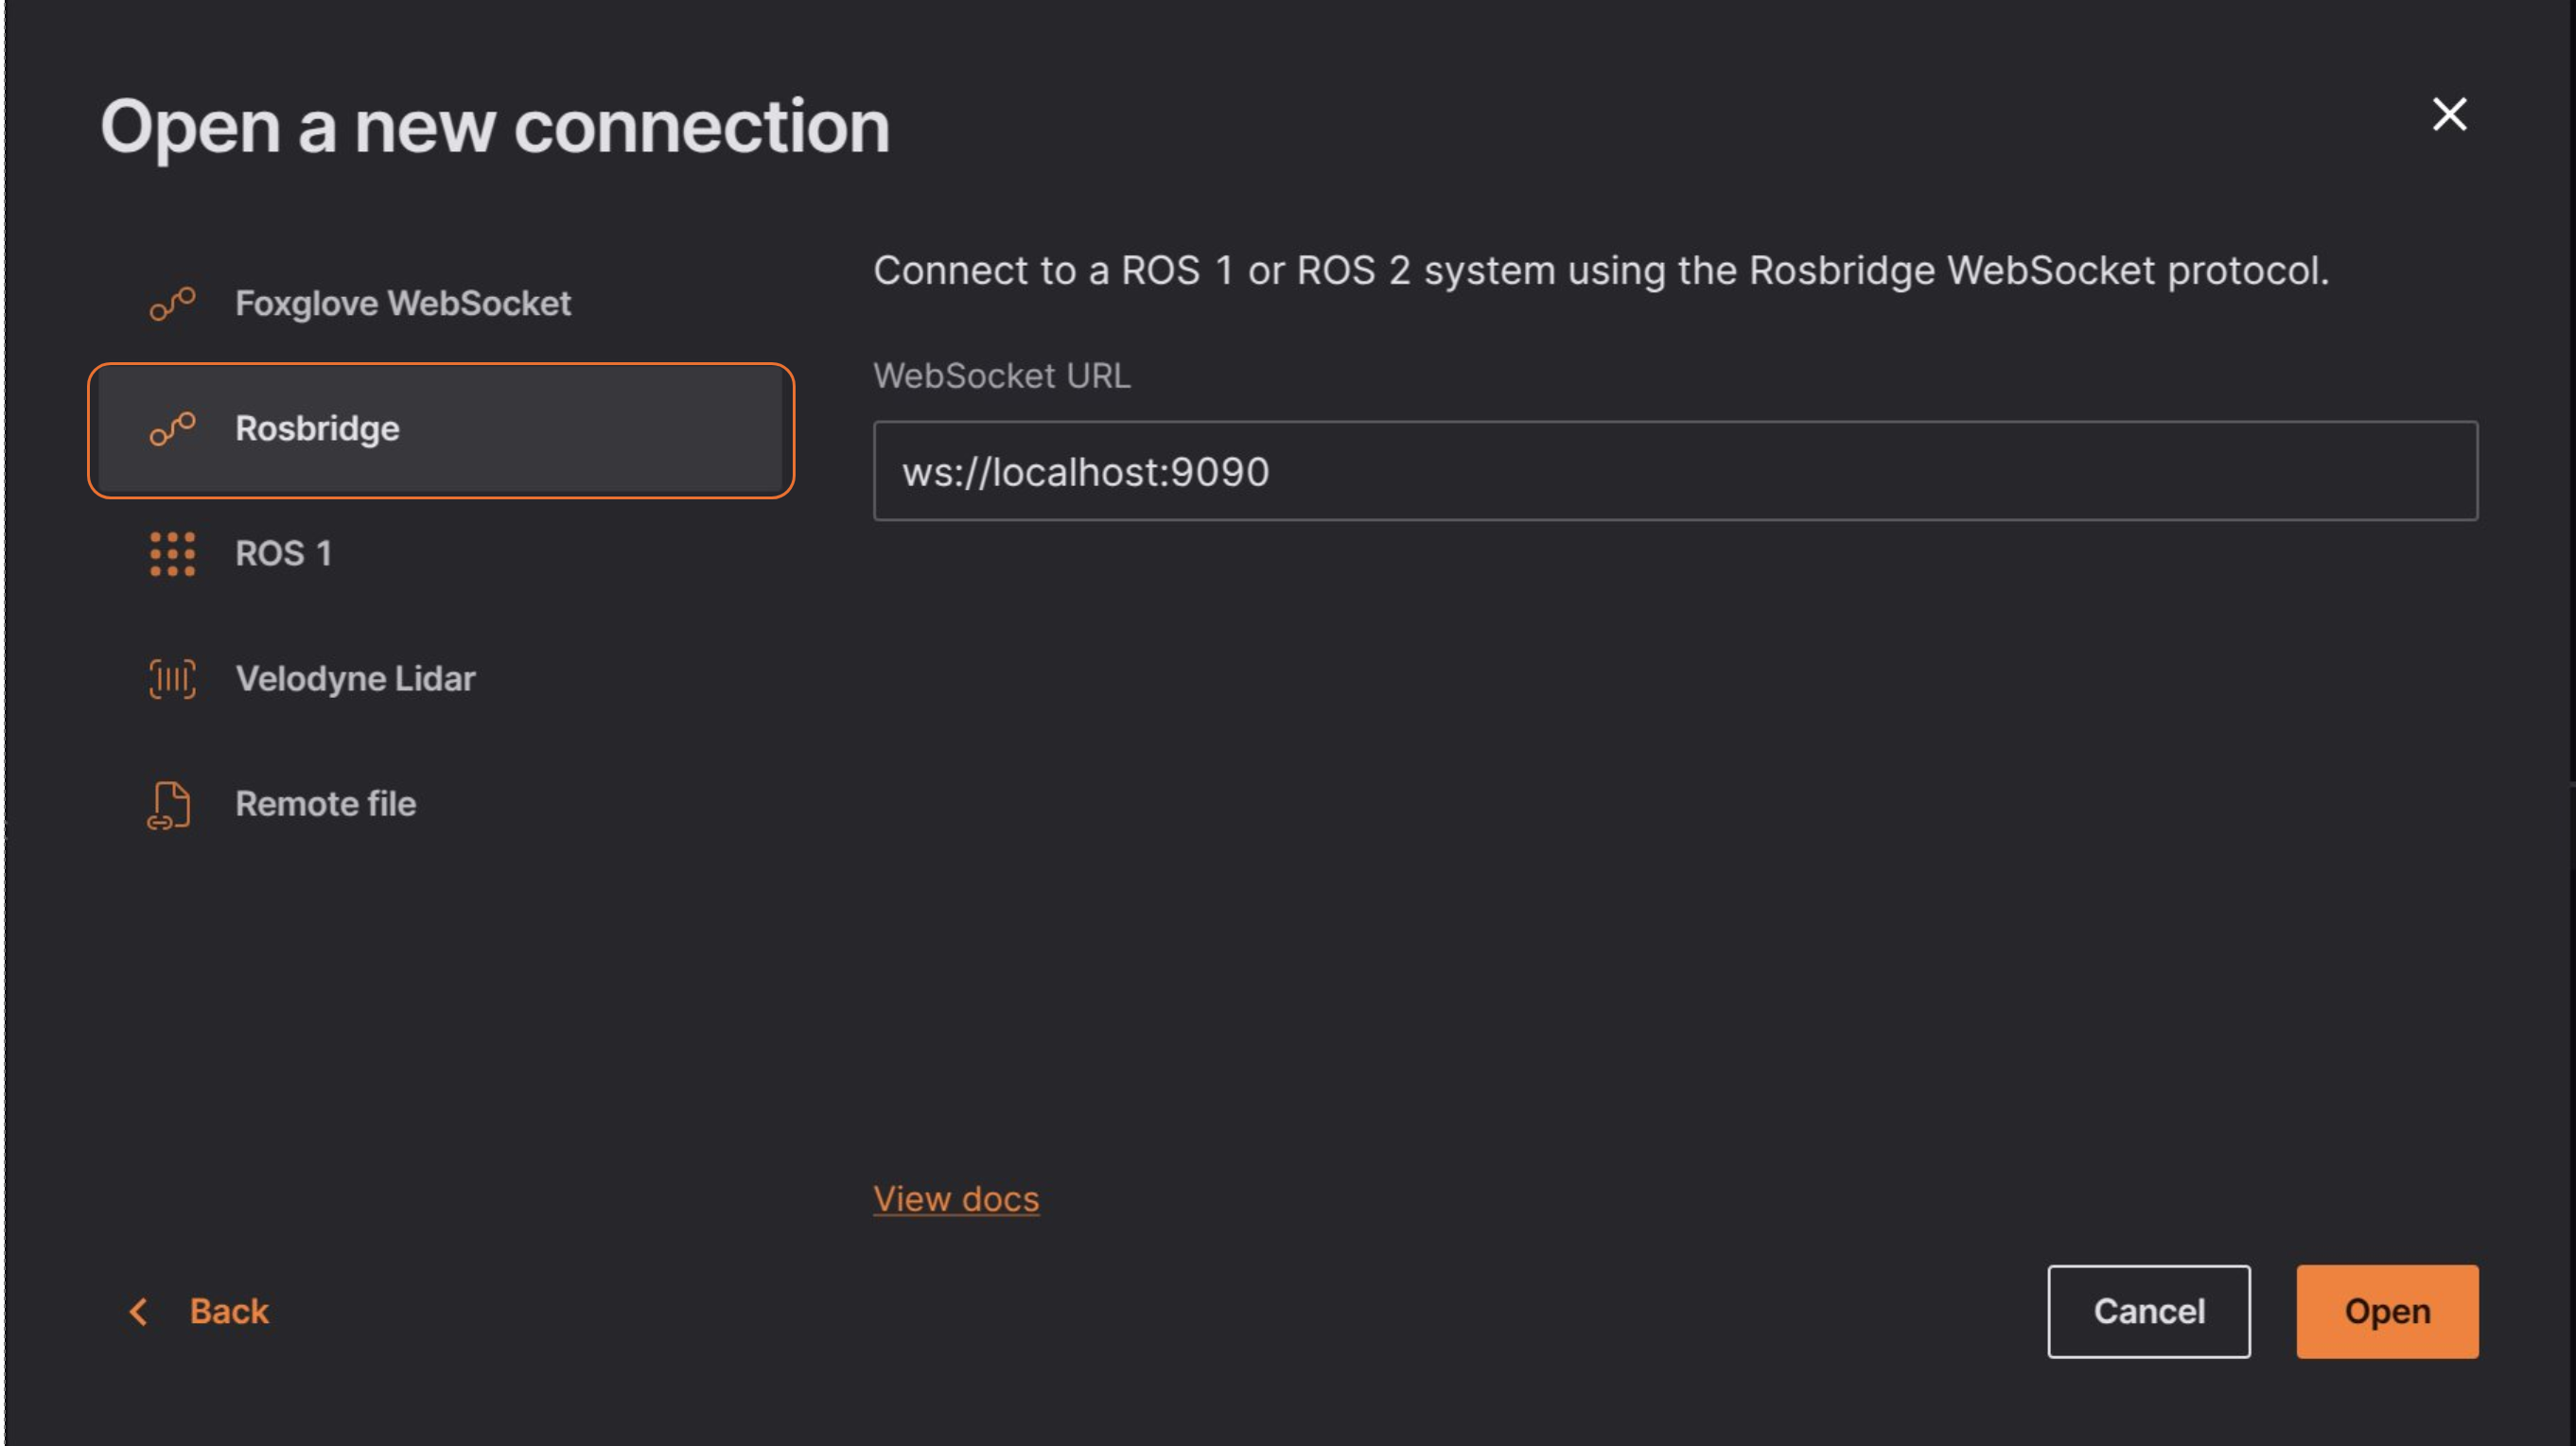
Connecting
A Rosbridge connection uses a standardized protocol to link Lichtblick with your ROS master over websockets. While it does require running an additional ROS node rosbridge_server, it is a good option if a network firewall separates ROS and Lichtblick, as it minimizes port exposure.
To open a Rosbridge connection, you need to have installed rosbridge-suite:
$ sudo apt install ros-noetic-rosbridge-suite
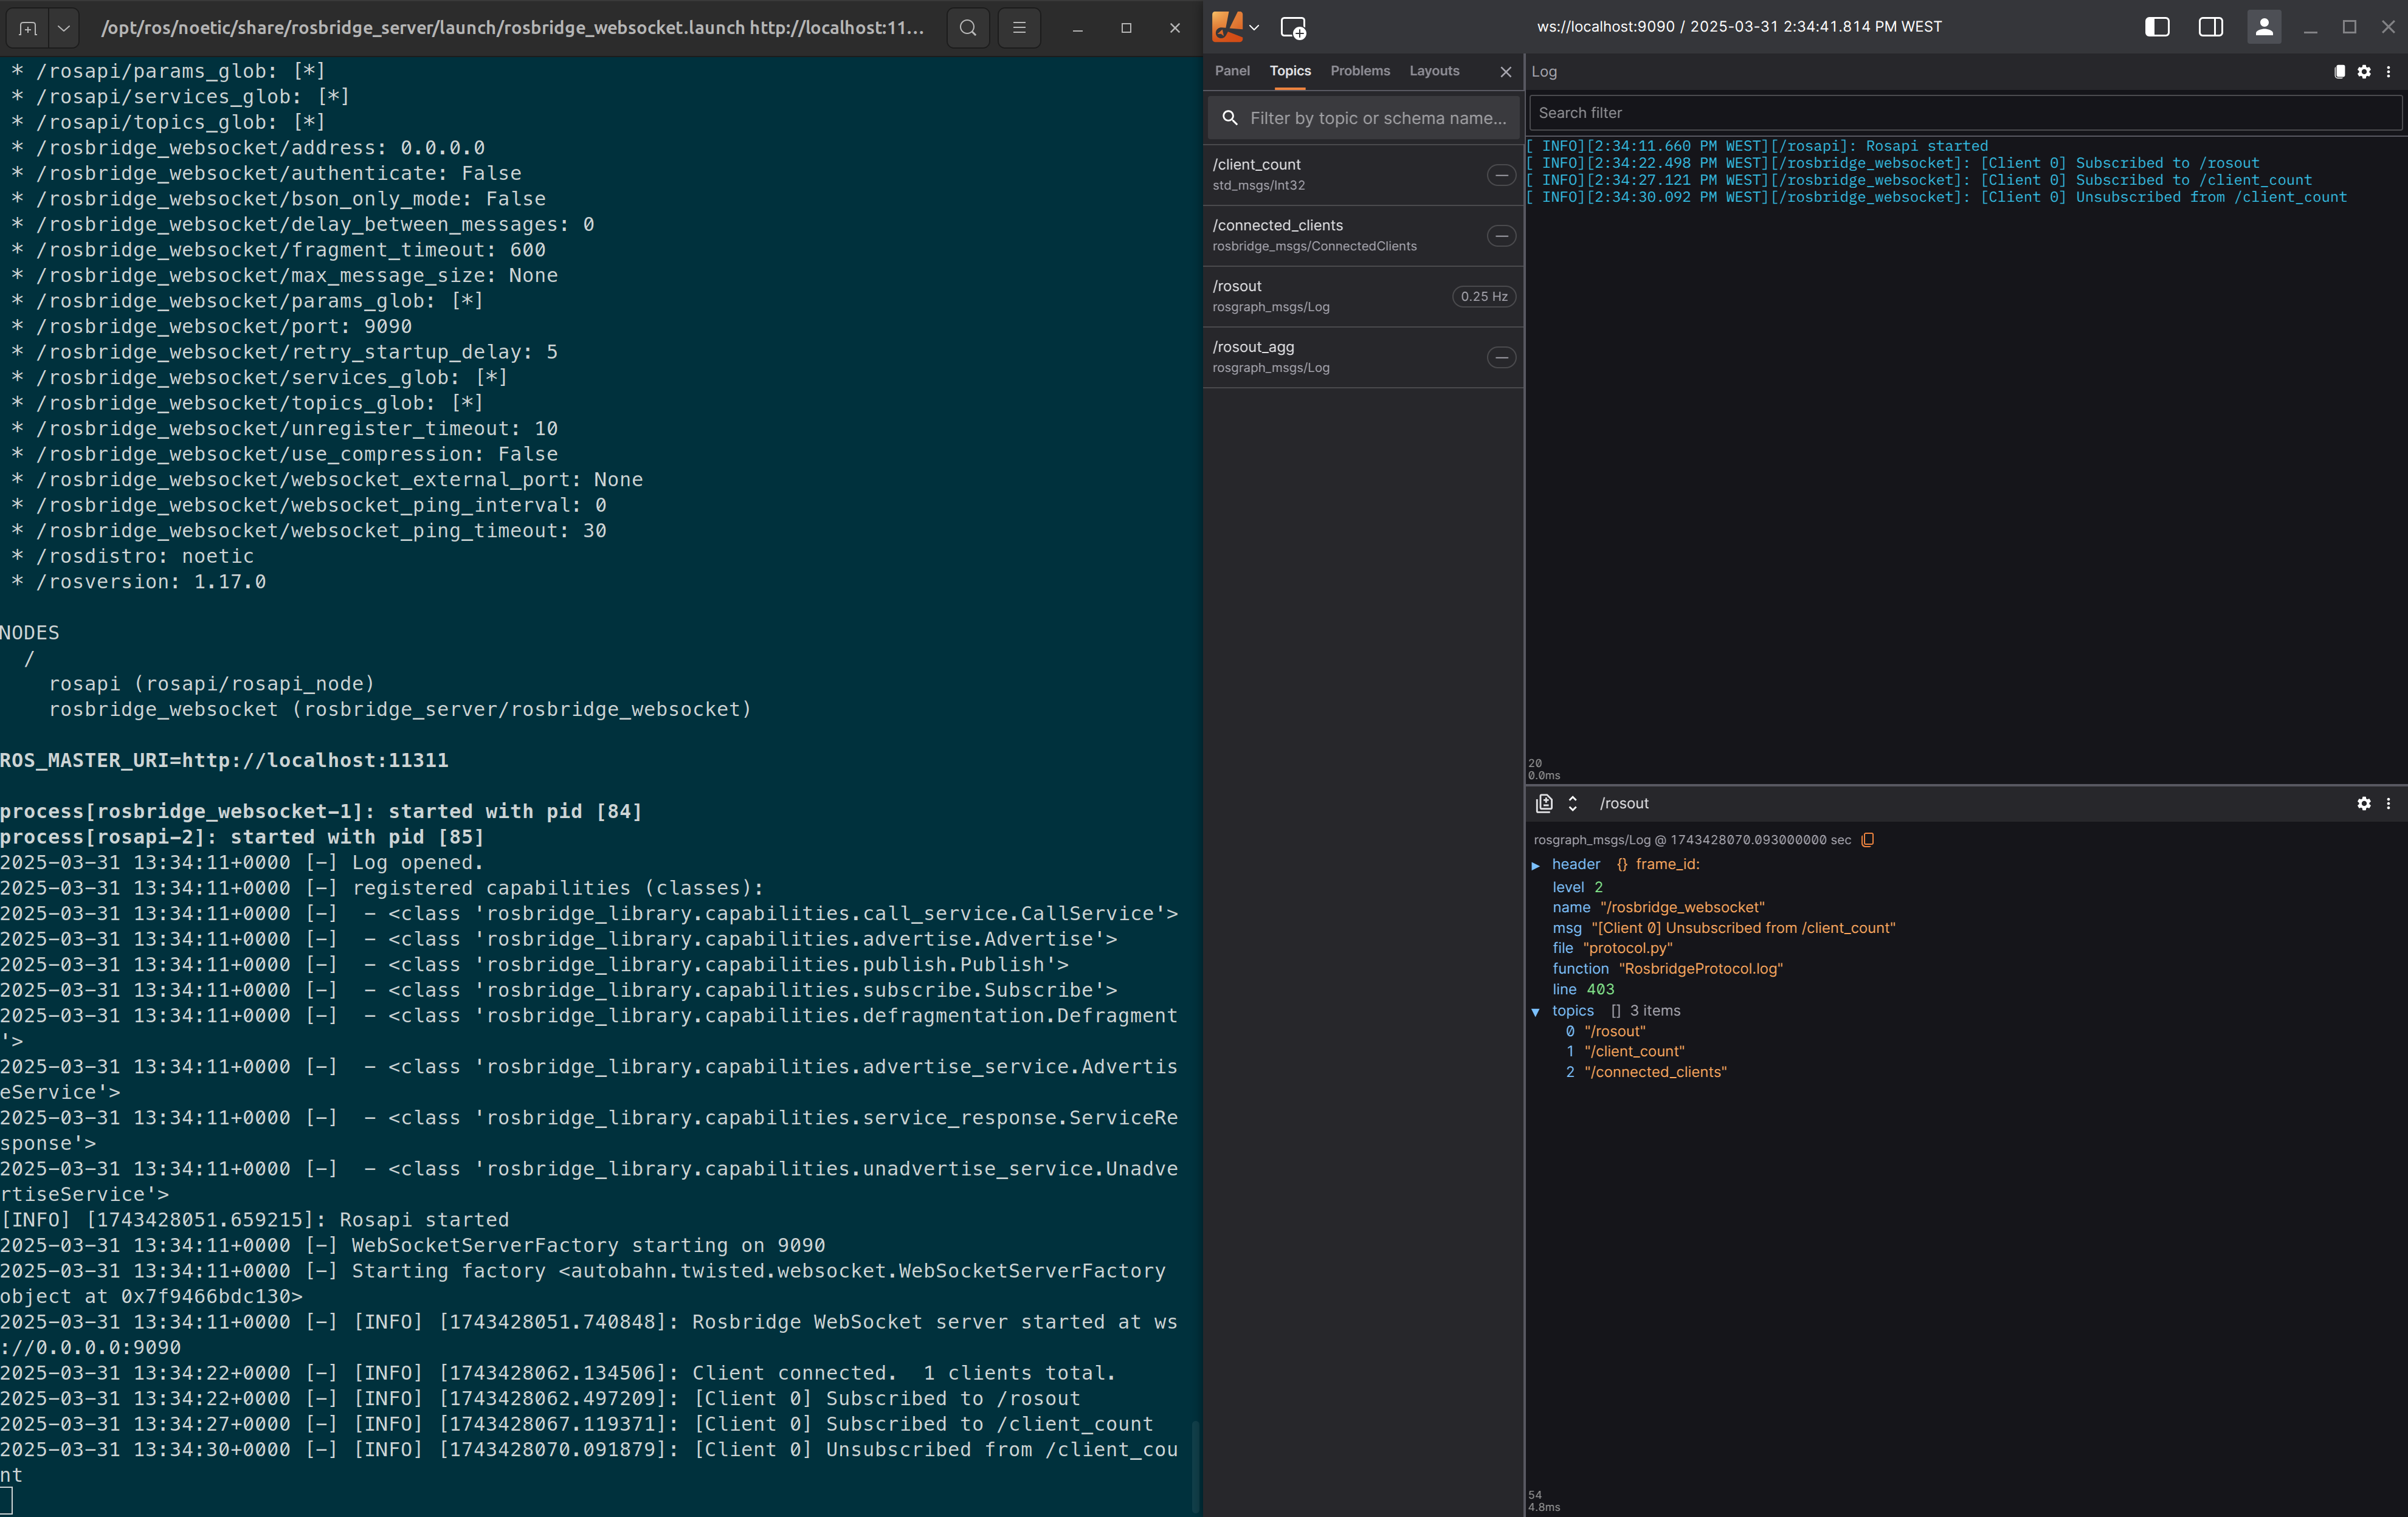
Next, start the websocket server, and review the command printout to determine the port it is listening on (e.g. ws://0.0.0.0:9090):
$ roslaunch rosbridge_server rosbridge_websocket.launch
Finally "Open connection" in the "Open data source" dialog, select "Rosbridge" and then enter the URL to your Rosbridge server:
To test if everything is working well, you can check the topics tab on the left sidebar.
Example connection
As you can see below this enables real-time communication between ROS and Lichtblick using rosridge websocket.
In the example, the ROSBridge server runs inside a Docker container, exposing a websocket interface that Lichtblick can connect to. Data is exchanged by publishing and subscribing to ROS topics via websocket messages, allowing seamless integration between ROS and external applications.
Schema encodings
Both MCAP-based and websockets sources support several message and schema encodings.
JSON
For JSON data, use schema encoding "jsonschema" and message encoding "json".
Connections via websocket require schemas to be JSON Schema definitions with "type": "object".
Each message must be UTF-8 encoded JSON representing an object. Any binary data should be encoded as a base64 string within the JSON object. The schema should specify this using "contentEncoding": "base64" (e.g., { "type": "string", "contentEncoding": "base64" }).
Protobuf
For Protobuf data, use schema encoding "protobuf" and message encoding "protobuf".
Lichtblick requires the schema data to be a binary FileDescriptorSet. For websocket connections, this binary data must also be base64-encoded since it is represented as a string.
Lichtblick also expects schemaName to be one of the message types defined in the FileDescriptorSet.
FlatBuffers
For FlatBuffers data, set the schema encoding to flatbuffer and the message encoding to flatbuffer.
Lichtblick requires the schema data to be a binary-encoded FlatBuffers schema (.bfbs) file, generated from the source FlatBuffers schema (.fbs) file. For websocket connections, this schema must be base64-encoded since it is represented as a string.
Use the FlatBuffers schema compiler to generate .bfbs files:
flatc --schema -b -o <PATH_TO_BFBS_OUTPUT_DIR> <PATH_TO_FBS_INPUT_DIR>
ROS 1 and ROS 2
For ROS 1 data, use the schema encoding ros1msg and the message encoding ros1.
For ROS 2 data, use the schema encoding ros2msg or ros2idl and the message encoding cdr.
Lichtblick requires the schema data to be a concatenation of the referenced .msg or .idl file along with its dependencies. For details on the concatenated format, refer to the MCAP specific documentation.
OMG IDL
For IDL schemas with CDR data, use the schema encoding omgidl and the message encoding cdr.
To encode OMG IDL schemas into MCAP, follow the conventions outlined in the MCAP Format Registry.
Multiple files
.mcap files only. Support for aditional file types may be added in future releases.
Starting with version 1.10.0 Lichtblick introduced support for opening multiple files simultaneously, an important feature that enhances the user experience and streamlines the visualization and analyzing process using Lichtblick.
In this section, we'll guide you through how to use this feature, discuss its behavior and share a few tips to get the most out of it.
A Lichtblick session with multiple files opened will look like this:

How to open multiple files
Just like with single files, Lichtblick allows users to open multiple files, whether they are stored locally or accessed remotely.
Opening multiple local files
To open local files, as described in our local data documentation, you can either select the files using "Open local file(s)…" option or simply drag-and-drop them into Lichtblick.
Alternatively, you can open multiple files before launching the application by using our CLI commands. To learn more about how this works, see this section of our documentation.
Opening multiple files from remote sources
To open multiple files from remote sources, you'll need to manually construct the URL that includes references to each file source. Below is an explanation of how Lichtblick handles multiple files via URL
A link that opens multiple files uses two specific query parameters:
ds: Short for datasource, this parameter identifies the type of data source. In the case of remote files, it'll always be:
?ds=remote-file
ds.url: This parameter contains the actual URL of the remote file to be opened. For example:
&ds.url=http://localhost:8081/MCAP_1.mcap
To open multiple files you can repeat the ds.url parameter for each file, Lichtblick will parse them all and load the correspoding files. So, for instance, an URL that opens three files will look like:
http://localhost:8080/?ds=remote-file&ds.url=http://localhost:8081/MCAP_1.mcap&ds.url=http://localhost:8081/MCAP_2.mcap&ds.url=http://localhost:8081/MCAP_3.mcap
Don't forget to set up CORS if you intend to host the files yourself.
Behavior
The current implementation aims to deliver the capability to load multiple .mcap files when they originate from the same source file.
When handling multiple files, Lichtblick organizes messages based on their timestamps (log time), maintaining chronological order across all files. If any gaps are detected in the timeline, they will be visually reflected in the UI, preserving the integrity of the data stream.
From the same source origin
When multiple files originate from the same data source, with identical structures (e.g., topics, schemas), Lichtblick will merge them into a single timeline, as if they were one continuous recording.
This is the most stable and recommended usage for multiple files in Lichtblick. It works especially well when files are split by time (e.g., consecutive recordings), allowing for seamless chronological playback and analysis.
From different sources
Lichtblick will attempt to load and render all data, even if the files have different topics, schemas, or structures and it will try to merge all data into a unified view.
While this is possible, it's less stable than working with files from the same source. Mismatches in structure or overlapping content can lead to visual inconsistencies or data interpretation issues.
Limitations
When dealing with multiple files, there are some important limitations to be aware of:
-
Messages that share the exact same timestamp across files can lead to unexpected behavior. While Lichtblick will attempt to render all messages, panels that rely on a single value at each moment, such as the Raw Message panel, will only display the last-loaded message for that timestamp. On the other hand, panels that support cumulative data, like the Map, Plot, or 3D panels, will try to render everything available at that moment in time.
-
It's also important to understand that Lichtblick merges all loaded files as if they came from a single source. Because of this, there is no way to distinguish which file a particular message originated from once the data is loaded. The interface treats the merged data as a unified timeline.
-
Schema consistency is another critical factor. Lichtblick expects schema definitions to be unique across all files. If multiple files define schemas with the same name but different structures, only the first definition encountered will be used. This can cause panels to misinterpret the data, leading to incorrect rendering or visual glitches. To avoid this, we strongly recommend using consistent and non-conflicting schema definitions across all files.
Finally, Lichtblick includes built-in alerts to notify users of conflicting scenarios, such as duplicate schemas or ambiguous timestamps, that could impact the accuracy or integrity of the data.
Settings
General
Here you can find the general settings that allows you to configure core preferences, such as language, appearance, and default behaviors. These settings help customize your experience to better fit your needs.
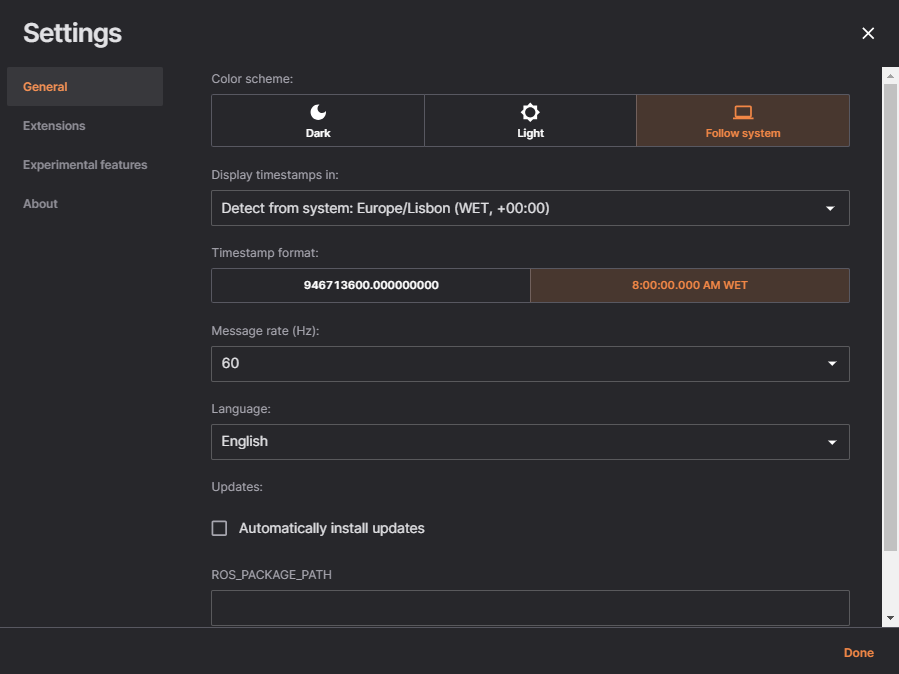
Below is a list of all available options and their purposes:
| Option | Description |
|---|---|
| Color scheme | Allows the user to swith Lichtblick's appearance between light or dark mode, or to follow the user's OS settings |
| Time zone | Dropdown menu to select the time zone for displaying timestamps. |
| Timestamp format | Formatting options use to display timestamps (12-hour, seconds) |
| Message rate | Controls the update rate of the message pipeline. Lowering this can reduce CPU/GPU usage and power consumption while keeping the UI smooth at 60 FPS. |
| Step Size | Customize the default step size on the player (jump in time when clicking the arrow keys, more info here). The default value is 100ms. |
| Language | Menu to select the app's language |
| Automatic updates | If selected allows the application to search and install updates (macOS and Windows only) |
| ROS_PACKAGE_PATH | Paths to search for ROS packages (local file paths or package:// URLs); separate paths with standard OS path separator (e.g. ':' on Unix). |
| Advanced | Enables features to debugg the app |
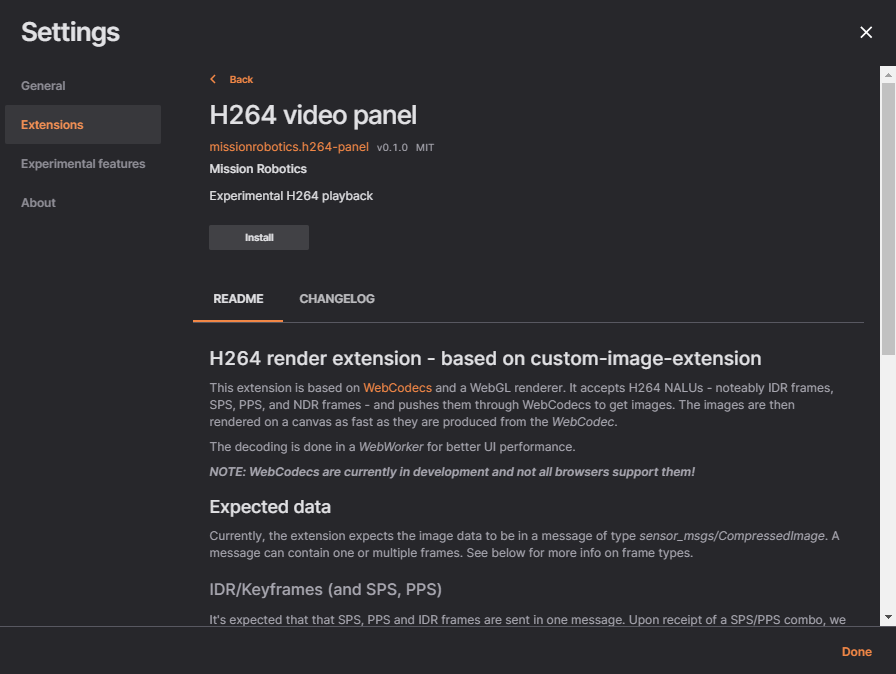
Extensions
The Extensions menu allows users to manage and install additional features to Lichtblick. Under the LOCAL section, you’ll find extensions that are already installed. The DEFAULT section lists available extensions that can be installed to enhance functionality.
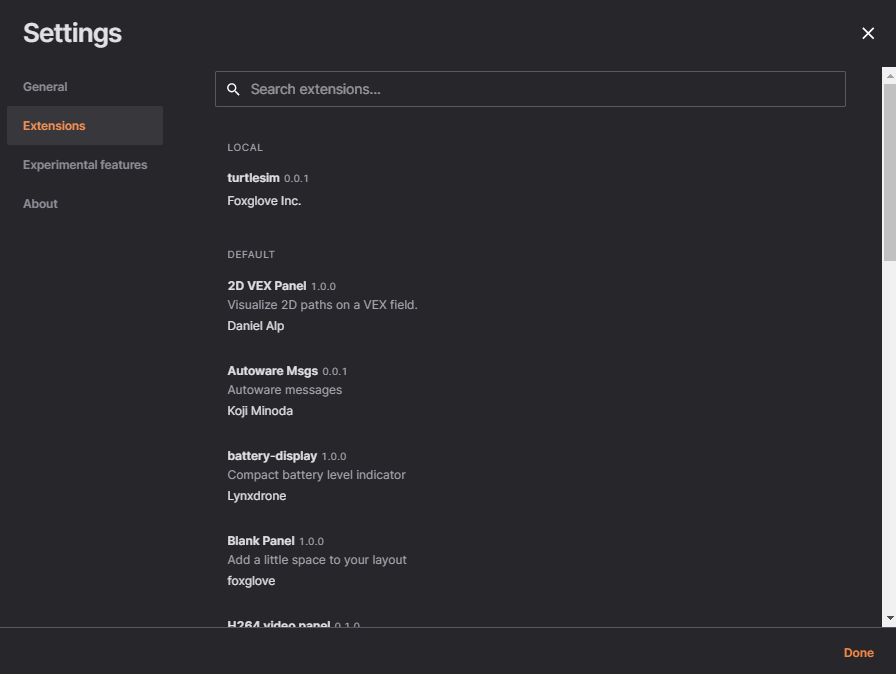
Recently we added a search bar to the extensions menu to facilitate the experience when managing extensions.
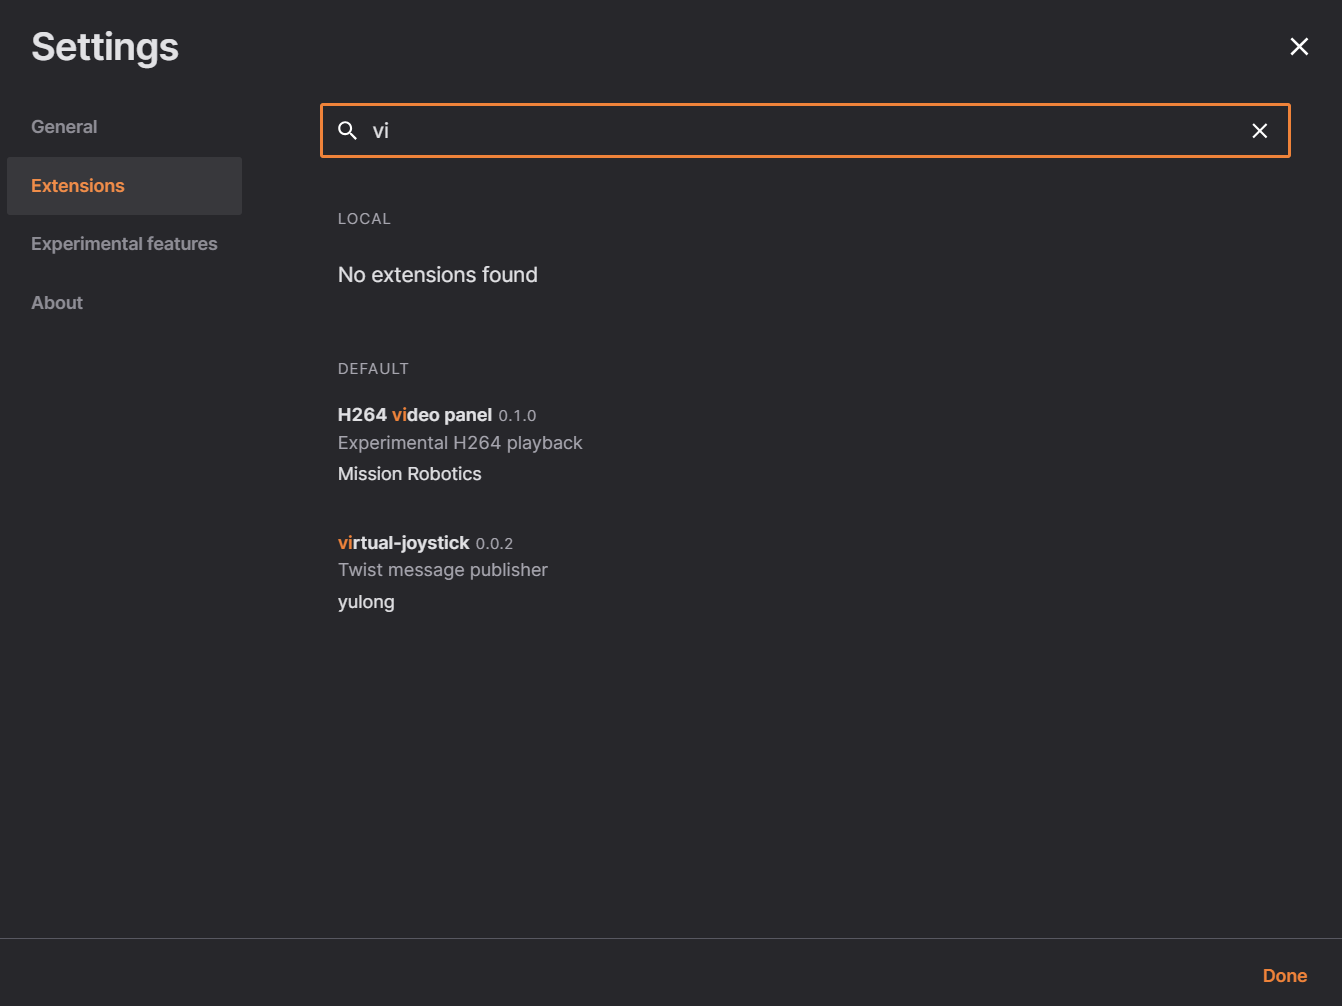
When an extension is selected, a menu opens with options to install or uninstall the extension. This menu also allows users to view the extension's README and Changelog.
Experimental features
The Experimental Features section includes early-stage functionalities that could be unstable and are not recommended for daily use. Options here allow users to test new capabilities, such as memory usage indicators, before they become part of the stable release. Use with caution, as these features may impact performance or cause unexpected behavior.
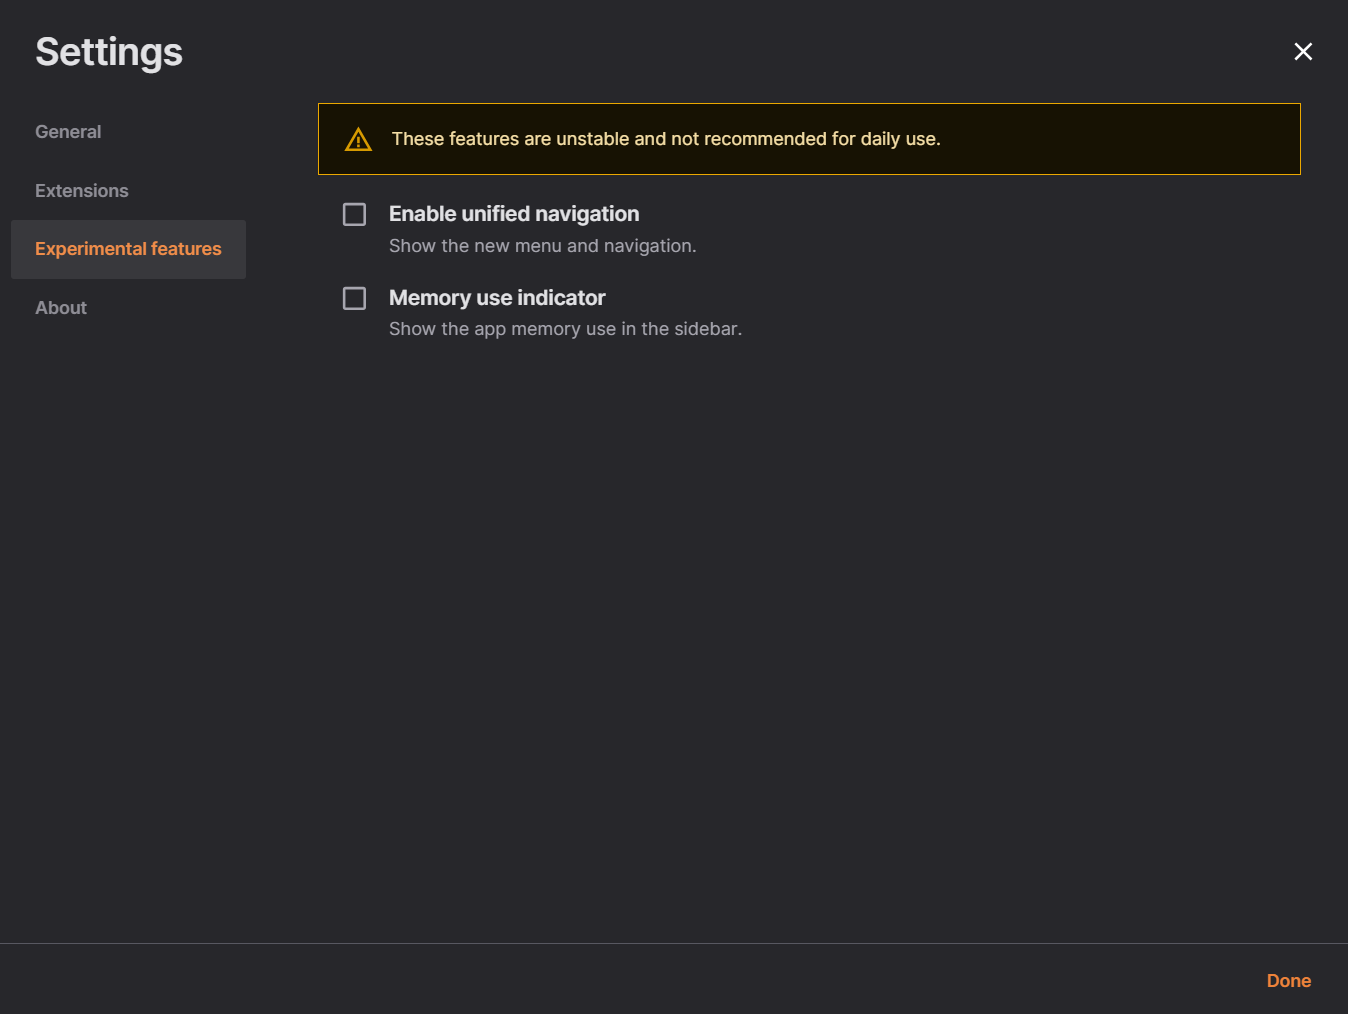
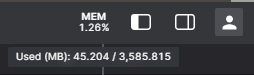
- When the
Memory usage indicatorcheckbox is selected, an indicator appears on the top bar showing the percentage of memory in use. Hovering over the indicator displays the actual memory usage in MB.
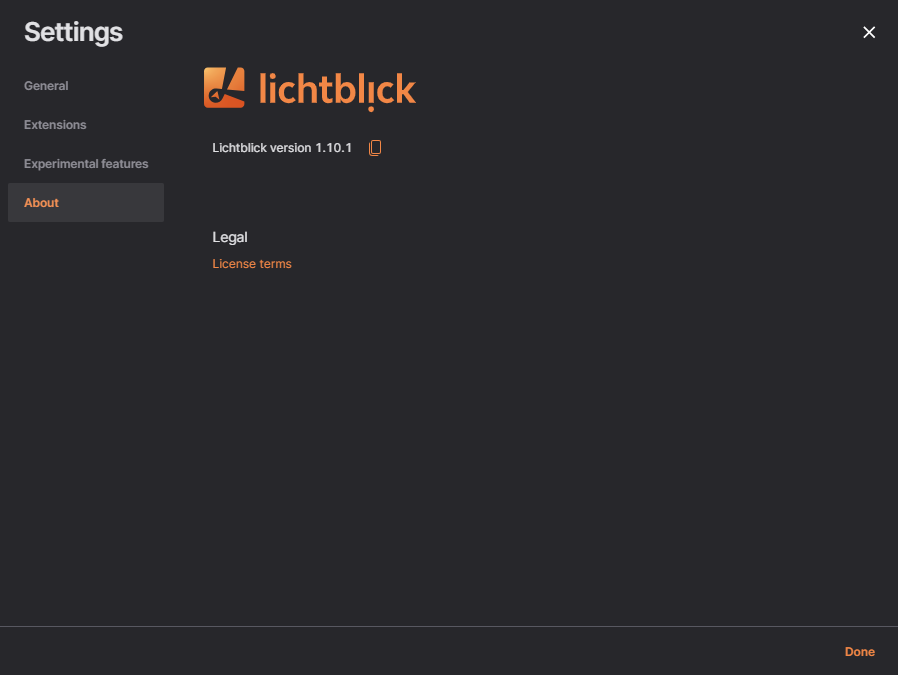
About
This section provides information about the software version and legal details. Here, you can check the current version and access the license terms
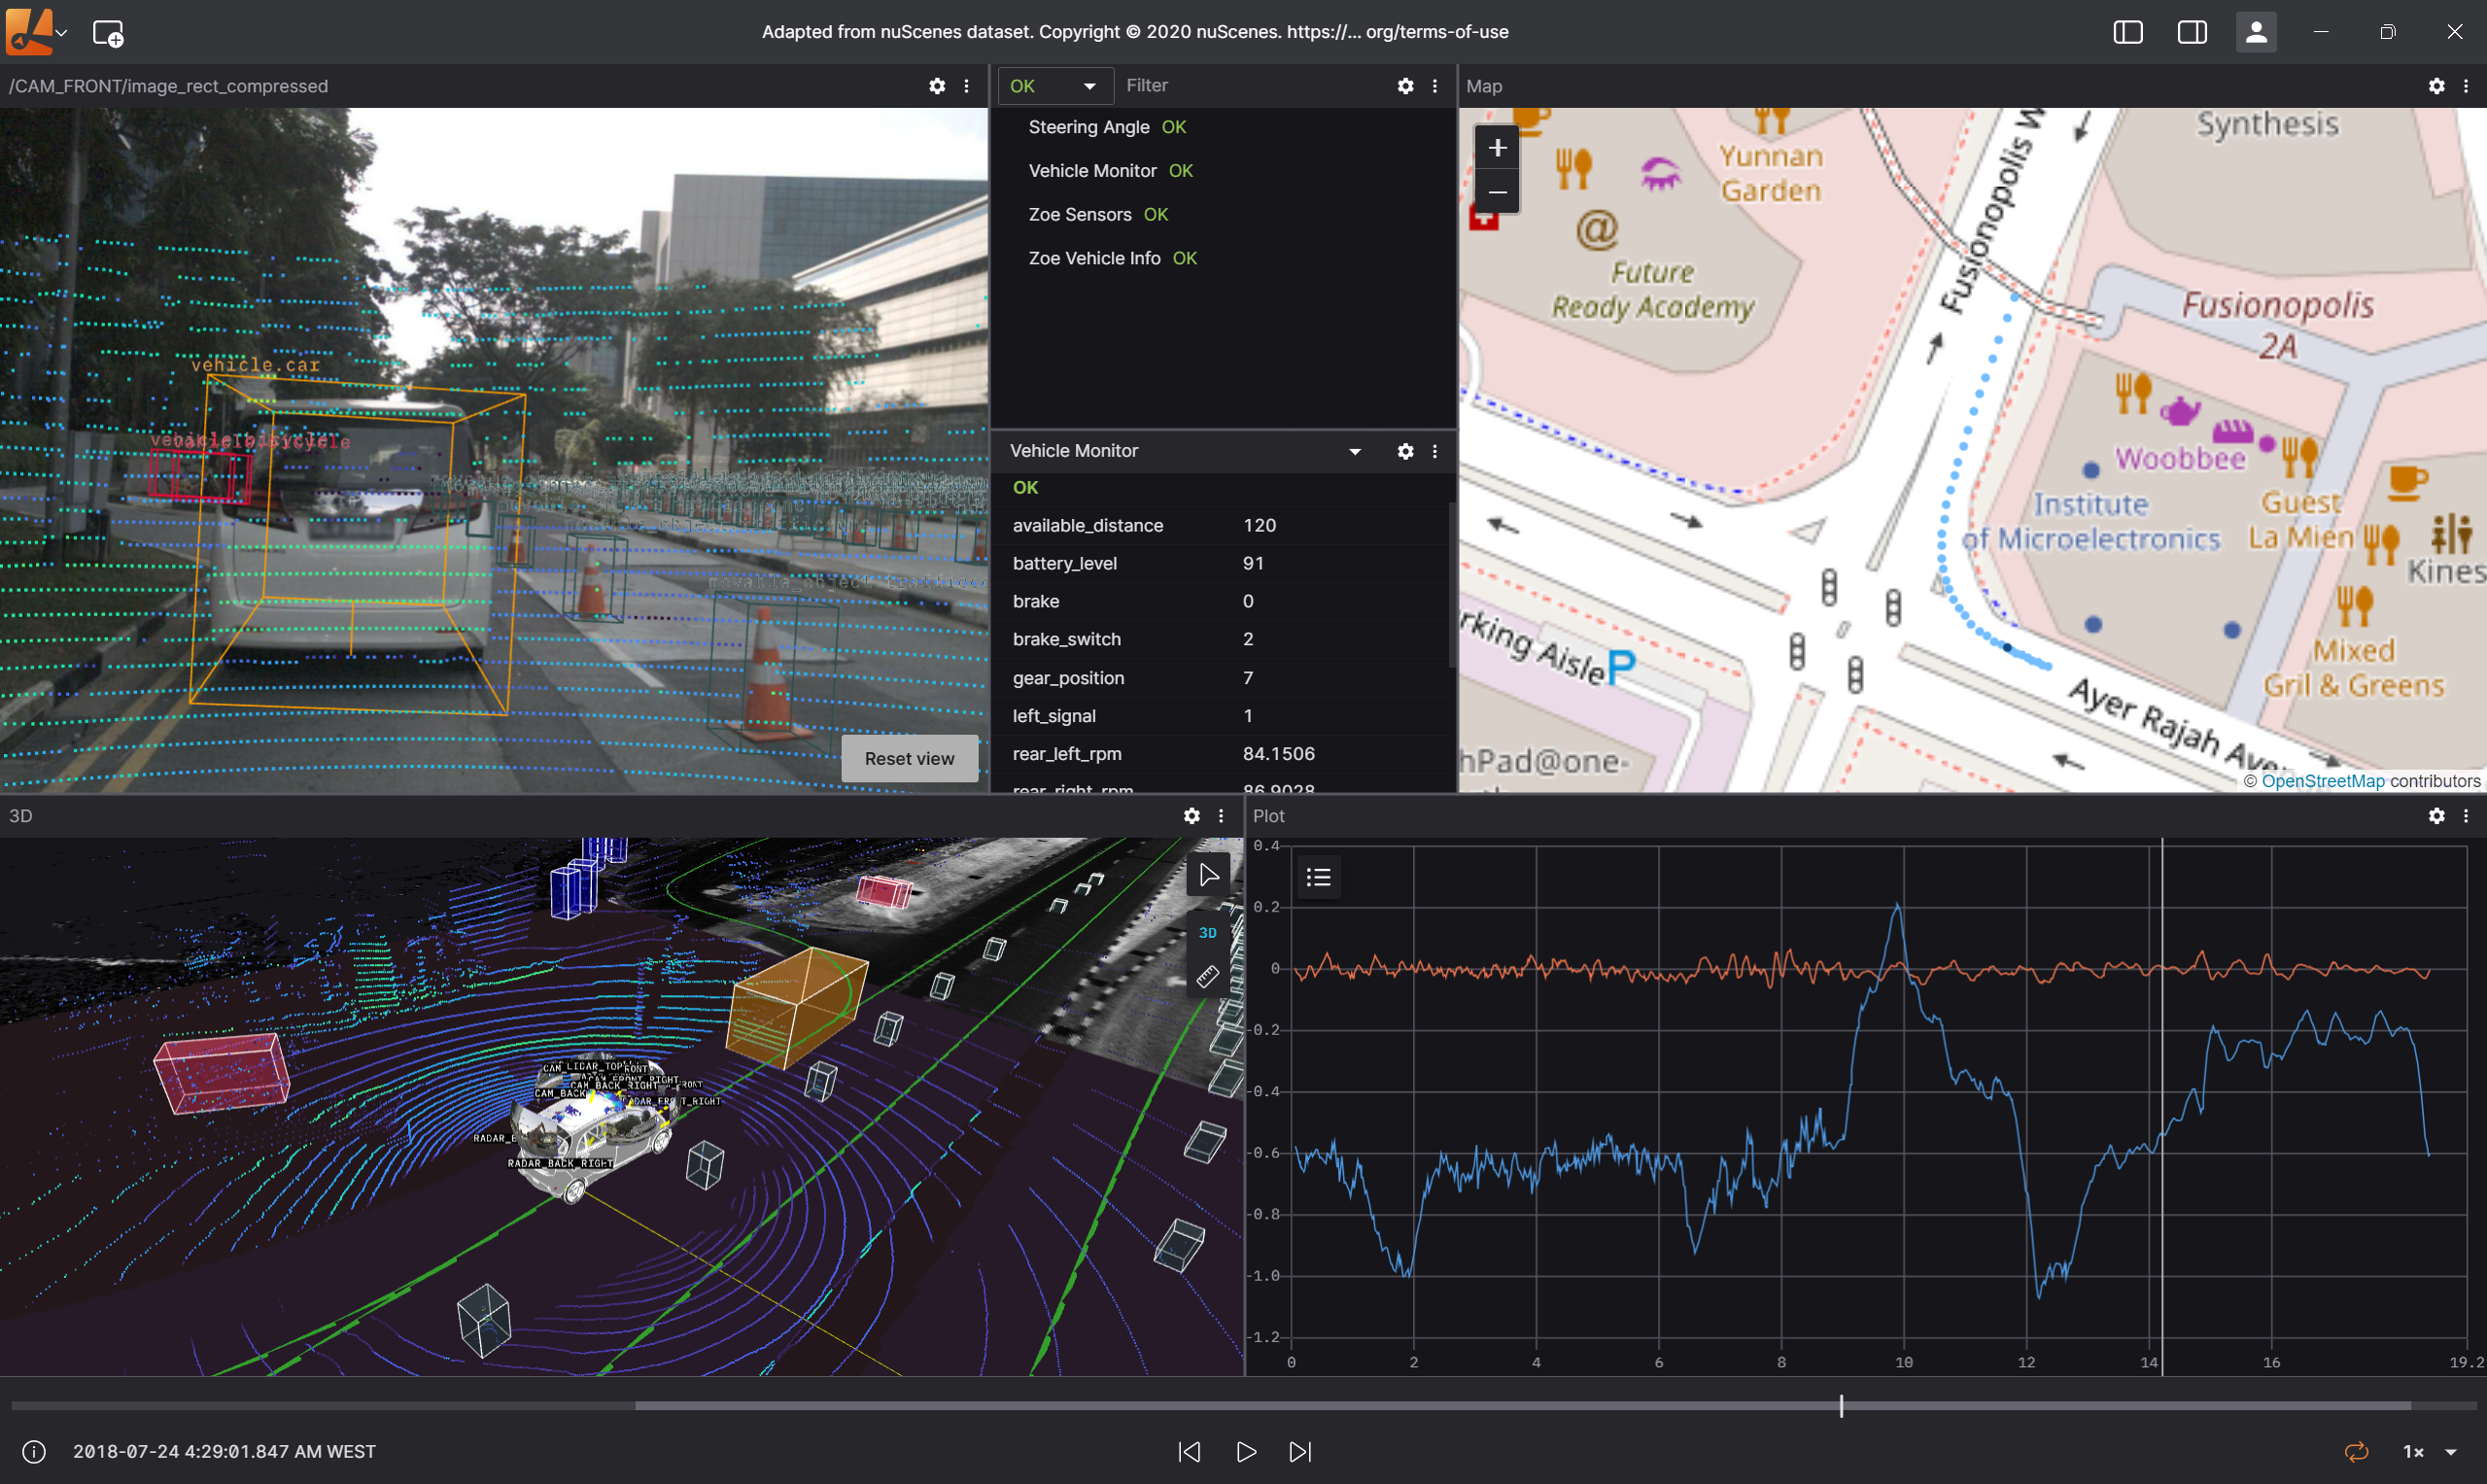
Visualization
Lichtblick offers a comprehensive suite of visualization tools to help you analyze and interpret your robotics data effectively.
Getting Started
To begin visualizing your data, connect to a data source and open a panel.
Open Data Source:
- Click "Open data source" in the left-hand menu.
- Choose from available options: live data or local file.
Opening a Panel:
- Click "Add panel" in the dashboard or left-hand menu.
- Select the desired panel type (e.g., 3D, Raw Message, Image).

Desktop-only features
Connecting to data
- open a native ROS 1 connection
- connect to a Velodyne LIDAR hardware
Extensions
- Install via registry
Interface Overview
Lichtblick's interface is designed for intuitive navigation:
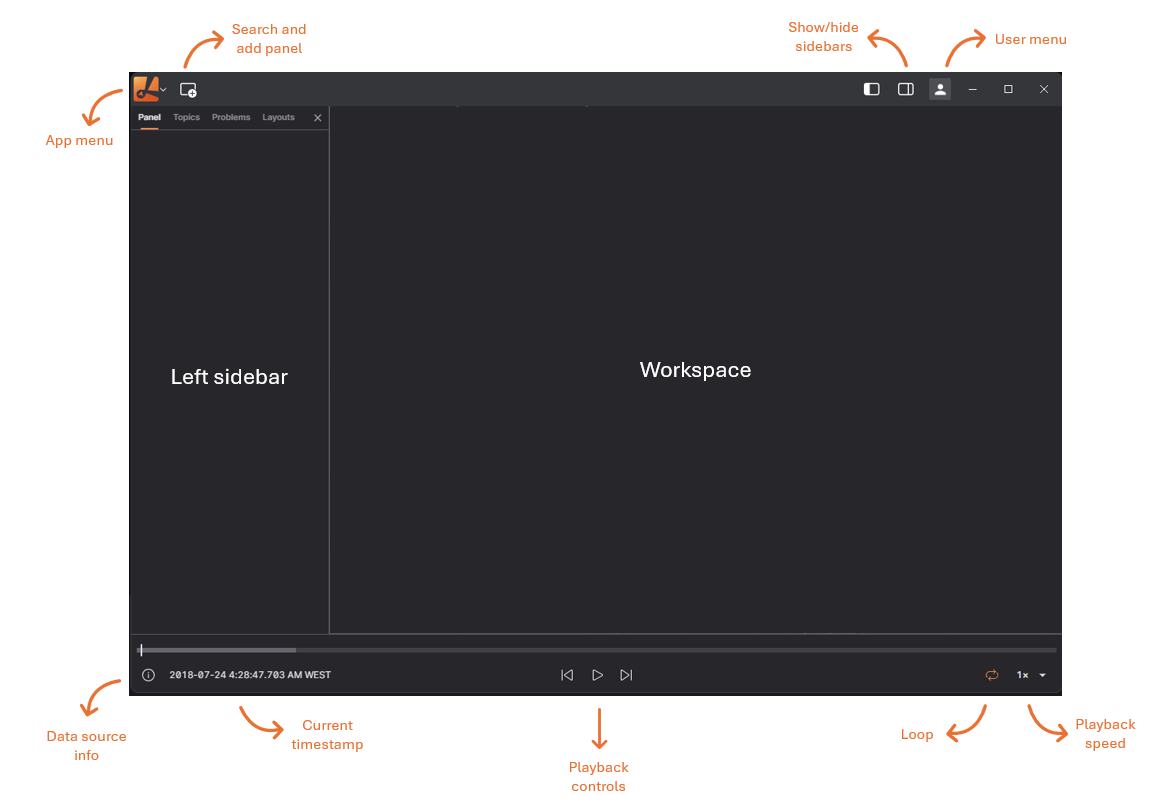
App Menu: Connect to a data source, toggle sidebars, or access resources.
Users Menu: Go to app settings, extensions catalog, experimental features, licenses, and version.
Add Panel: Add a new panel to your current layout.
Layout Menu: Save your workspace view as a layout and share it with teammates.
Left Sidebar: Edit panel settings, view data source topics, and troubleshoot connection issues.
Right Sidebar: Set layout-wide variables, view playback metrics.
Sidebars
Panel sidebar
Edit settings for any selected panel
Topics sidebar
View all topics available in the data source, along with their data types and message rates
Problems sidebar
See a list of playback errors to troubleshoot
Variables sidebar
Set layout-wide variables that can be used in different panels with the message path syntax
System Requirements
Lichtblick supports Windows, macOS, and Linux on both web and desktop platforms.
For the web application, use Chrome v111 or later.
For the desktop application, download the latest version for your operating system - check our latest release here: Lichtblick Releases
Playback
Lichtblick enables seamless navigation through both local and remote datasets using its playback controls.

Message Sequencing
Messages within Lichtblick are arranged and played in order of their log timestamps. The log timestamp typically represents the moment a message was captured but can be adjusted to reflect the most relevant time context for your analysis. Selecting an appropriate timestamp is crucial, as external factors such as network delays, buffering, or batch processing can introduce time discrepancies.
In robotics, messages often carry multiple timestamps beyond the log time. Lichtblick’s Plot and State Transitions panels allow users to organize data using alternative timestamps:
| Timestamp | Source | Description |
|---|---|---|
| Header Stamp | ROS 1, ROS 2, custom messages | The header.stamp field contains separate sec and nsec values representing the recorded time. |
| Publish Time | MCAP | A specialized MCAP field that optionally records the time a message was published. |
Message Handling and Optimization
Lichtblick is designed to efficiently manage large-scale robotics data, ensuring smooth navigation and playback.
Retrospective Message Fetching
When seeking a specific point in the data stream, it is unlikely that every subscribed topic has a message at the exact timestamp selected. To maintain data consistency across panels, Lichtblick implements a retrospective search for the most recent message on each topic. This ensures that when navigating to arbitrary time points, all active panels retain relevant and contextually accurate data.
Persistent Data for Latched Topics
By default, Lichtblick retains the latest received messages for all topics when handling ROS 1 .bag files, MCAP files, or direct Lichtblick data streams. When navigating through time, Lichtblick retrieves and displays the most recent messages from all topics, even if they were recorded minutes before the selected timestamp. This feature allows panels to visualize infrequently published data reliably, ensuring continuity even when reviewing sparse datasets.
Data Preloading for Enhanced Visualization
Certain Lichtblick panels, such as the Plot and Map panels, benefit from accessing data spanning the entire recording duration. Preloading enables these panels to analyze complete historical trends, detect anomalies, and observe long-term behavioral patterns in robotic systems.
Even panels that primarily display the latest data, such as the 3D panel, take advantage of preloaded data for precise rendering. For example, the 3D visualization panel preloads transformation messages to correctly position objects in a unified coordinate frame. In robotics, multiple reference frames (e.g., robotic arm joints, autonomous vehicle sensors) must be aligned for accurate visualization. Preloading ensures that Lichtblick has access to all necessary transform data, preventing inconsistencies in rendering dynamic robotic systems.
Shortcuts
Space - pause or play
shift + ⬅️ - seek backward 10ms
shift + ➡️ - seek forward 10 ms
⬅️ - seek backward 100ms
➡️ - seek forward 100ms
Alt + ⬅️ - seek backward 500ms
Alt + ➡️ - seek forward 500ms
Message Schemas
Lichtblick relies on structured message formats to ensure accurate data visualization and processing. By adhering to Lichtblick's schema standards, users can leverage the platform's robust visualization tools effectively.
In some parts of the documentation and codebase, you may still encounter references to Foxglove or Foxglove packages. These references are remnants of Lichtblick's origins as a fork of the Foxglove project. While Lichtblick is actively working to remove dependencies on Foxglove code and replace these references, this effort is still ongoing.
We appreciate your patience as we continue to refine and align the platform with Lichtblick's independent development goals. If you have any questions or encounter issues related to these references, please reach out to our support team for assistance.
Supported Schema Formats
Lichtblick supports a variety of message formats, enabling seamless integration with diverse data sources. The supported formats include:
- Protobuf
- JSON Schema
- ROS 1
- ROS 2
- TypeScript
- FlatBuffers
If your existing message formats differ from these, Lichtblick provides tools to convert them into compatible schemas using a message conversion extension.
Working with Protobuf and JSON Schema
To use Protobuf or JSON Schema with Lichtblick, follow these steps:
- Protobuf: Include the necessary
.protofiles in your project. These files can be used to publish data via a WebSocket connection or log data into an MCAP file. - JSON Schema: Similarly, copy the required
.jsonschema files into your project.
Note on Protobuf Time Formats: When using google.protobuf.Timestamp or google.protobuf.Duration, Lichtblick represents time values with sec and nsec fields (instead of seconds and nanos). This ensures consistency across time and duration formats in user scripts, message converters, and other platform components.
For JSON Schema integration, you can import schemas directly using the @foxglove/schemas npm package:
import { CompressedImage } from "@foxglove/schemas/jsonschema";
Lichtblick also offers WebSocket libraries for real-time data handling in Python, JavaScript, and C++, as well as MCAP writers for logging pre-recorded datasets. For a practical example, refer to our blog post on Recording Robotic Data with MCAP, which demonstrates how to use the MCAP C++ writer to log Protobuf data.
Schemaless JSON Support
Lichtblick supports schemaless JSON messages through MCAP. To send JSON data without a schema:
- Set the channel's message encoding to
json. - Assign the schema ID as
0to indicate no associated schema.
For more details, consult the MCAP Specification on Channels.
ROS Integration
Lichtblick provides dedicated ROS message packages for both ROS 1 and ROS 2. To integrate:
-
Install the foxglove_msgs package:
-
Install the appropriate package for your ROS version:
sudo apt install ros-noetic-foxglove-msgs # For ROS 1
sudo apt install ros-galactic-foxglove-msgs # For ROS 2
- Import the necessary schemas into your ROS project to begin publishing data:
from foxglove_msgs.msg import Vector2

...
msg = Vector2()
msg.x = 0.5
msg.y = 0.7
TypeScript Integration
Lichtblick schemas can be imported as TypeScript types, enabling type-checking and message validation. Here’s how to use them:
- In TypeScript Projects: Import types directly from the
@foxglove/schemasnpm package:
import { Point2 } from "@foxglove/schemas";

const myImage: Point2 = { x: 1, y: 2 };
These types are compatible with JavaScript WebSocket or MCAP projects and can be used when writing custom data transformation scripts within Lichtblick's User Scripts panel.
ArrowPrimitive
Represents a visual arrow used to indicate direction or orientation in 3D space.
Panel support
ArrowPrimitive can be displayed in the following panels: 3D.
Schema
| Field | Type | Description |
|---|---|---|
pose | Pose | Defines the tail position and direction of the arrow. A neutral rotation points it along the +X axis. |
shaft_length | float64 | Total length of the arrow's shaft segment. |
shaft_diameter | float64 | Diameter of the cylindrical shaft section. |
head_length | float64 | Length of the arrowhead portion. |
head_diameter | float64 | Diameter of the arrowhead base. |
color | Color | Single color applied to the entire arrow, including shaft and head. |
Reference implementations
Foxglove schemas are designed to be cross-platform and are compatible with multiple encoding formats. Use the exact schema names listed below to ensure compatibility:
| Encoding | Schema |
|---|---|
| ROS 1 | foxglove_msgs/ArrowPrimitive |
| ROS 2 | foxglove_msgs/msg/ArrowPrimitive |
| JSON | foxglove.ArrowPrimitive |
| Protobuf | foxglove.ArrowPrimitive |
| FlatBuffers | foxglove.ArrowPrimitive |
| OMG IDL | foxglove::ArrowPrimitive |
Built-in types
Primitive types are the building blocks of Foxglove's supported message schemas.
Each field in a message schema has a type. This type can be another message schema, an enum, or one of the primitive types documented below:
boolean
Either true or false.
bytes
Raw binary data, represented as a Uint8Array in JavaScript.
enum
Number that serves as a key in a set of named constants.
float64
64-bit floating-point number.
string
String value encoded as UTF-8.
time
| Field | Type | Required | Description |
|---|---|---|---|
| sec | uint32 | ✓ | Seconds since epoch |
| nsec | uint32 | ✓ | Additional nanoseconds since epoch |
Note: Foxglove's Protobuf schemas represent time values with
google.protobuf.Timestamp, which usessecondsandnanosfields. However, in user scripts, message converters, and the rest of Foxglove, the values will appear assecandnsecfields, for consistency with other data formats.
duration
| Field | Type | Required | Description |
|---|---|---|---|
| sec | int32 | ✓ | Seconds offset |
| nsec | uint32 | ✓ | Nanoseconds offset (positive direction) |
Note: Foxglove's Protobuf schemas represent duration values with
google.protobuf.Duration, which usessecondsandnanosfields. However, in user scripts, message converters, and the rest of Foxglove, the values will appear assecandnsecfields, for consistency with other data formats.
uint32
Non-negative integer value between 0 and 2³²−1.
int32
Integer value between −2³¹ and 2³¹−1.
CameraCalibration
Contains intrinsic and extrinsic calibration parameters for a camera.
Panel support
CameraCalibration is supported in the following panels: 3D and Image.
Schema
| Field | Type | Description |
|---|---|---|
timestamp | time | Time at which the calibration parameters are valid. |
frame_id | string | Reference frame of the camera. The origin is the optical center. +X points right, +Y points down, and +Z points into the image plane. |
width | uint32 | Image width in pixels. |
height | uint32 | Image height in pixels. |
distortion_model | string | Distortion model used for the camera lens. |
D | float64[] | Distortion coefficients, format depends on the chosen model. |
K | float64[9] | Intrinsic matrix of the raw (distorted) image, in 3x3 row-major format. |
R | float64[9] | Rectification matrix for stereo configurations, 3x3 row-major format. |
P | float64[12] | Projection matrix of the rectified image, 3x4 row-major format. |
Distortion models
The following distortion models are supported:
plumb_bob: k1, k2, p1, p2, k3rational_polynomial: k1, k2, p1, p2, k3, k4, k5, k6kannala_brandt: k1, k2, k3, k4
The plumb_bob and rational_polynomial models are based on OpenCV’s pinhole model.
The kannala_brandt model corresponds to OpenCV’s fisheye model.
K — Intrinsic matrix
A 3x3 matrix used to project 3D camera coordinates to 2D pixel coordinates:
[fx  0  cx]
[ 0 fy  cy]
[ 0  0   1]
Where fx, fy are the focal lengths, and cx, cy are the optical center.
R — Rectification matrix
Used to align the camera’s coordinate frame with a common stereo image plane, ensuring the epipolar lines are parallel in both images.
P — Projection matrix
[fx'  0  cx'  Tx]
[ 0  fy' cy'  Ty]
[ 0   0   1    0]
This matrix projects 3D points into rectified 2D image space using possibly updated intrinsics (fx', fy', cx', cy').
For monocular setups, Tx = Ty = 0.
In stereo configurations:
- The first (left) camera has
Tx = Ty = 0. - The second (right) camera usually has
Ty = 0, andTx = -fx' * B, whereBis the baseline distance.
Given a 3D point [X Y Z]', its projection [x y] on the image is computed as:
[u v w]' = P * [X Y Z 1]'
x = u / w
y = v / w
This applies to both images in a stereo pair.
Reference implementations
Foxglove schemas are implementation-independent and can be used with any of the supported message encodings:
| Encoding | Schema |
|---|---|
| ROS 1 | foxglove_msgs/CameraCalibration |
| ROS 2 | foxglove_msgs/msg/CameraCalibration |
| JSON | foxglove.CameraCalibration |
| Protobuf | foxglove.CameraCalibration |
| FlatBuffers | foxglove.CameraCalibration |
| OMG IDL | foxglove::CameraCalibration |
CircleAnnotation
A circle annotation on a 2D image.
Panel support
CircleAnnotation appears in the ImageAnnotations message schema.
Schema
| Field | Type | Description |
|---|---|---|
timestamp | time | Timestamp of the circle. |
position | Point2 | Center of the circle in 2D image coordinates (pixels). The origin is the top-left corner of the top-left pixel. |
diameter | float64 | Diameter of the circle in pixels. |
thickness | float64 | Line thickness in pixels. |
fill_color | Color | Fill color of the circle. |
outline_color | Color | Outline color of the circle. |
Reference implementations
Foxglove schemas are framework-agnostic and can be implemented using any supported message encoding:
| Encoding | Schema |
|---|---|
| ROS 1 | foxglove_msgs/CircleAnnotation |
| ROS 2 | foxglove_msgs/msg/CircleAnnotation |
| JSON | foxglove.CircleAnnotation |
| Protobuf | foxglove.CircleAnnotation |
| FlatBuffers | foxglove.CircleAnnotation |
| OMG IDL | foxglove::CircleAnnotation |
Color
A color represented in RGBA format.
Panel support
Color is used in the 3D and Image panels.
Parent schemas
Color appears in the following message schemas:
ArrowPrimitive, CircleAnnotation, CubePrimitive, CylinderPrimitive, LinePrimitive, ModelPrimitive, PointsAnnotation, SpherePrimitive, TextAnnotation, TextPrimitive and TriangleListPrimitive.
Schema
| Field | Type | Description |
|---|---|---|
r | float64 | Red value between 0 and 1 |
g | float64 | Green value between 0 and 1 |
b | float64 | Blue value between 0 and 1 |
a | float64 | Alpha (opacity) value between 0 and 1 |
Reference implementations
Foxglove schemas are framework-agnostic and can be implemented using any supported message encoding:
| Encoding | Schema |
|---|---|
| ROS 1 | foxglove_msgs/Color |
| ROS 2 | foxglove_msgs/msg/Color |
| JSON | foxglove.Color |
| Protobuf | foxglove.Color |
| FlatBuffers | foxglove.Color |
| OMG IDL | foxglove::Color |
CompressedImage
A compressed image.
Panel support
CompressedImage is used in the 3D and Image panels.
Schema
| Field | Type | Description |
|---|---|---|
timestamp | time | Timestamp of the image. |
frame_id | string | Frame of reference for the image. The origin of the frame is the optical center of the camera. +X points right in the image, +Y points down, +Z points into the plane. |
data | bytes | Compressed image data. |
format | string | Image format. Supported values: jpeg, png, webp, avif. |
Note: A new ROS image format string will be accepted but not parsed or decoded by the viewer. Only the standard formats (
jpeg,png,webp,avif) will be recognized and decoded natively.
Other format strings will rely on JavaScript's Blob MIME type parsing, which does not support the ROS-specific format strings..
Reference implementations
Foxglove schemas are framework-agnostic and can be implemented using any supported message encoding:
| Encoding | Schema |
|---|---|
| ROS 1 | foxglove_msgs/CompressedImage |
| ROS 2 | foxglove_msgs/msg/CompressedImage |
| JSON | foxglove.CompressedImage |
| Protobuf | foxglove.CompressedImage |
| FlatBuffers | foxglove.CompressedImage |
| OMG IDL | foxglove::CompressedImage |
CompressedVideo
A single frame of a compressed video bitstream.
Panel support
CompressedVideo is used in the 3D and Image panels.
Schema
| Field | Type | Description |
|---|---|---|
timestamp | time | Timestamp of the video frame. |
frame_id | string | Frame of reference for the video. The origin is the optical center of the camera. +X points right, +Y points down, and +Z points into the plane. |
data | bytes | Compressed video frame data. For packet-based video codecs, this data must begin and end on packet boundaries (no partial packets), and must contain enough video packets to decode exactly one image (either a keyframe or delta frame). Note: Lichtblick does not support video streams that include B frames because they require lookahead. |
format | string | Video format. Supported value: h264. |
Format details for h264 (Annex B)
- Use Annex B formatted data.
- Each
CompressedVideomessage should contain enough NAL units to decode exactly one video frame. - Each message containing a key frame (IDR) must also include an SPS NAL unit.
Note: Compressed video support is subject to hardware limitations and patent licensing, so not all encodings may be supported on all platforms.
Reference implementations
Foxglove schemas are framework-agnostic and can be implemented using any supported message encoding:
| Encoding | Schema |
|---|---|
| ROS 1 | foxglove_msgs/CompressedVideo |
| ROS 2 | foxglove_msgs/msg/CompressedVideo |
| JSON | foxglove.CompressedVideo |
| Protobuf | foxglove.CompressedVideo |
| FlatBuffers | foxglove.CompressedVideo |
| OMG IDL | foxglove::CompressedVideo |
CubePrimitive
A primitive representing a cube or rectangular prism.
Parent schema
CubePrimitive appears in the SceneEntity message schema.
Schema
| Field | Type | Description |
|---|---|---|
pose | pose | Position of the center of the cube and its orientation. |
size | Vector3 | Size of the cube along each axis. |
color | Color | Color of the cube. |
Reference implementations
Foxglove schemas are framework-agnostic and can be implemented using any supported message encoding:
| Encoding | Schema |
|---|---|
| ROS 1 | foxglove_msgs/CubePrimitive |
| ROS 2 | foxglove_msgs/msg/CubePrimitive |
| JSON | foxglove.CubePrimitive |
| Protobuf | foxglove.CubePrimitive |
| FlatBuffers | foxglove.CubePrimitive |
| OMG IDL | foxglove::CubePrimitive |
CylinderPrimitive
A primitive representing a cylinder, elliptic cylinder, or truncated cone.
Parent schema
CylinderPrimitive appears in the SceneEntity message schema.
Schema
| Field | Type | Description |
|---|---|---|
pose | pose | Position of the center of the cylinder and its orientation. The flat face(s) are perpendicular to the z-axis. |
size | Vector3 | Size of the cylinder's bounding box. |
bottom_scale | float64 | Ratio (0-1) of the diameter of the cylinder's bottom face (min z) relative to the bounding box bottom. |
top_scale | float64 | Ratio (0-1) of the diameter of the cylinder's top face (max z) relative to the bounding box top. |
color | Color | Color of the cylinder. |
Reference implementations
Foxglove schemas are framework-agnostic and can be implemented using any supported message encoding:
| Encoding | Schema |
|---|---|
| ROS 1 | foxglove_msgs/CylinderPrimitive |
| ROS 2 | foxglove_msgs/msg/CylinderPrimitive |
| JSON | foxglove.CylinderPrimitive |
| Protobuf | foxglove.CylinderPrimitive |
| FlatBuffers | foxglove.CylinderPrimitive |
| OMG IDL | foxglove::CylinderPrimitive |
FrameTransform
A transform between two reference frames in 3D space.
Panel support
FrameTransform is used in the 3D and Image panels.
Parent schema
FrameTransform appears in the FrameTransforms message schema.
Schema
| Field | Type | Description |
|---|---|---|
timestamp | time | Timestamp of the transform. |
parent_frame_id | string | Name of the parent frame. |
child_frame_id | string | Name of the child frame. |
translation | Vector3 | Translation component of the transform. |
rotation | Quaternion | Rotation component of the transform. |
Reference implementations
Foxglove schemas are framework-agnostic and can be implemented using any supported message encoding:
| Encoding | Schema |
|---|---|
| ROS 1 | foxglove_msgs/FrameTransform |
| ROS 2 | foxglove_msgs/msg/FrameTransform |
| JSON | foxglove.FrameTransform |
| Protobuf | foxglove.FrameTransform |
| FlatBuffers | foxglove.FrameTransform |
| OMG IDL | foxglove::FrameTransform |
FrameTransforms
An array of FrameTransform messages.
Schema
| Field | Type | Description |
|---|---|---|
transforms | FrameTransform[] | Array of transforms. |
Reference implementations
Foxglove schemas are framework-agnostic and can be implemented using any supported message encoding:
| Encoding | Schema |
|---|---|
| ROS 1 | foxglove_msgs/FrameTransforms |
| ROS 2 | foxglove_msgs/msg/FrameTransforms |
| JSON | foxglove.FrameTransforms |
| Protobuf | foxglove.FrameTransforms |
| FlatBuffers | foxglove.FrameTransforms |
| OMG IDL | foxglove::FrameTransforms |
GeoJSON
GeoJSON data for annotating maps.
Panel support
GeoJSON is used in the Map panel.
Schema
| Field | Type | Description |
|---|---|---|
geojson | string | GeoJSON data encoded as a UTF-8 string. |
Reference implementations
Foxglove schemas are framework-agnostic and can be implemented using any supported message encoding:
| Encoding | Schema |
|---|---|
| ROS 1 | foxglove_msgs/GeoJSON |
| ROS 2 | foxglove_msgs/msg/GeoJSON |
| JSON | foxglove.GeoJSON |
| Protobuf | foxglove.GeoJSON |
| FlatBuffers | foxglove.GeoJSON |
| OMG IDL | foxglove::GeoJSON |
Grid
A 2D grid of data.
Panel support
Grid is used in the 3D and Image panels.
Schema
| Field | Type | Description |
|---|---|---|
timestamp | time | Timestamp of the grid. |
frame_id | string | Frame of reference. |
pose | pose | Origin of grid's corner relative to frame of reference; grid is positioned in the x-y plane relative to this origin. |
column_count | uint32 | Number of grid columns. |
cell_size | Vector2 | Size of a single grid cell along x and y axes, relative to pose. |
row_stride | uint32 | Number of bytes between rows in data. |
cell_stride | uint32 | Number of bytes between cells within a row in data. |
fields | PackedElementField[] | Fields in data. Red, green, blue, and alpha are optional for customizing the grid's color. |
data | bytes | Grid cell data, interpreted using fields, in row-major (y-major) order. |
Reference implementations
Foxglove schemas are framework-agnostic and can be implemented using any supported message encoding:
| Encoding | Schema |
|---|---|
| ROS 1 | foxglove_msgs/Grid |
| ROS 2 | foxglove_msgs/msg/Grid |
| JSON | foxglove.Grid |
| Protobuf | foxglove.Grid |
| FlatBuffers | foxglove.Grid |
| OMG IDL | foxglove::Grid |
ImageAnnotations
Array of annotations for a 2D image.
Panel support
ImageAnnotations is used in the Image panel.
Schema
| Field | Type | Description |
|---|---|---|
circles | CircleAnnotation[] | Circle annotations. |
points | PointsAnnotation[] | Points annotations. |
texts | TextAnnotation[] | Text annotations. |
Reference implementations
Foxglove schemas are framework-agnostic and can be implemented using any supported message encoding:
| Encoding | Schema |
|---|---|
| ROS 1 | foxglove_msgs/ImageAnnotations |
| ROS 2 | foxglove_msgs/msg/ImageAnnotations |
| JSON | foxglove.ImageAnnotations |
| Protobuf | foxglove.ImageAnnotations |
| FlatBuffers | foxglove.ImageAnnotations |
| OMG IDL | foxglove::ImageAnnotations |
KeyValuePair
A key with its associated value.
Parent schema
KeyValuePair appears in the SceneEntity message schema.
Schema
Reference implementations
Foxglove schemas are framework-agnostic and can be implemented using any supported message encoding:
| Encoding | Schema |
|---|---|
| ROS 1 | foxglove_msgs/KeyValuePair |
| ROS 2 | foxglove_msgs/msg/KeyValuePair |
| JSON | foxglove.KeyValuePair |
| Protobuf | foxglove.KeyValuePair |
| FlatBuffers | foxglove.KeyValuePair |
| OMG IDL | foxglove::KeyValuePair |
LaserScan
Single scan from a planar laser range-finder
Panel support
LaserScan can be used in the following panels: 3D and Image.
Schema
| Field | Type | Description |
|---|---|---|
type | LineType | Type of line primitive to draw. |
pose | Pose | The position and orientation of the line relative to the reference frame. |
thickness | float64 | Thickness of the line. |
scale_invariant | boolean | If true, thickness is fixed in screen pixels. If false, thickness scales with distance in world units. |
points | Point3[] | Points along the line |
color | Color | Single color applied to the entire line. Either this or colors must be provided. |
colors | Color[] | Per-point colors along the line. If specified, must match the number of points. Either this or Color must be provided. |
indices | uint32[] | Optional index list into the points and colors arrays to reuse points and avoid duplication. |
Reference implementations
Foxglove schemas are independent of any specific framework and can be used with any supported message encoding. The schema names should be specified as seen below:
| Encoding | Schema |
|---|---|
| ROS 1 | foxglove_msgs/LaserScan |
| ROS 2 | foxglove_msgs/msg/LaserScan |
| JSON | foxglove.LaserScan |
| Protobuf | foxglove.LaserScan |
| FlatBuffers | foxglove.LaserScan |
| OMG IDL | foxglove::LaserScan |
LinePrimitive
A primitive representing a series of points connected by lines.
Parent schema
LinePrimitive appears in the SceneEntity message schema.
Schema
| Field | Type | Description |
|---|---|---|
timestamp | time | Timestamp of scan. |
frame_id | string | Frame of reference. |
pose | Pose | The scan origin is defined relative to the frame of reference. Point positions are specified in the x-y plane with respect to this origin. Angles are measured as counterclockwise rotations around the z-axis, with 0 radians aligned with the positive x-axis. |
start_angle | float64 | Bearing of first point, in radians. |
end_angle | float64 | Bearing of last point, in radians. |
ranges | float64[] | Distances of detections from the origin, assumed to be measured at equally spaced angles between the start angle and end angle. |
intensities | float64[] | Intensity of detections. |
Reference implementations
Foxglove schemas are independent of any specific framework and can be used with any supported message encoding. The schema names should be specified as seen below:
| Encoding | Schema |
|---|---|
| ROS 1 | foxglove_msgs/LinePrimitive |
| ROS 2 | foxglove_msgs/msg/LinePrimitive |
| JSON | foxglove.LinePrimitive |
| Protobuf | foxglove.LinePrimitive |
| FlatBuffers | foxglove.LinePrimitive |
| OMG IDL | foxglove::LinePrimitive |
LocationFix
A navigation satellite fix for any Global Navigation Satellite System
Panel support
LocationFix can be used in the following panels: Map.
Schema
| Field | Type | Description |
|---|---|---|
timestamp | time | Time when the message was recorded. |
frame_id | string | Reference frame for the sensor. Latitude and longitude are relative to the origin of this frame. |
latitude | float64 | Latitude in degrees. |
longitude | float64 | Longitude in degrees. |
altitude | float64 | Altitude in meters. |
position_covariance | float64[9] | Position covariance matrix (m²) relative to a tangential plane through the reported position. Components are ENU (East-North-Up) frame, stored in row-major order. |
position_covariance_type | PositionCovarianceType | If position_covariance is available, position_covariance_type must be set to indicate the type of covariance. |
Reference implementations
Foxglove schemas are independent of any specific framework and can be used with any supported message encoding. The schema names should be specified as seen below:
| Encoding | Schema |
|---|---|
| ROS 1 | foxglove_msgs/LocationFix |
| ROS 2 | foxglove_msgs/msg/LocationFix |
| JSON | foxglove.LocationFix |
| Protobuf | foxglove.LocationFix |
| FlatBuffers | foxglove.LocationFix |
| OMG IDL | foxglove::LocationFix |
Log
A log message
Panel support
Log can be used in the following panels: Log.
Schema
| Field | Type | Description |
|---|---|---|
timestamp | time | Time when the log message was recorded. |
level | LogLevel | Severity level of the log message (e.g., debug, info, warning, error). |
message | string | The log message content. |
name | string | Name of the process, node, or component that generated the log message. |
file | string | Source filename where the log entry originated. |
line | uint32 | Line number in the source file corresponding to the log event. |
Reference implementations
Foxglove schemas are independent of any specific framework and can be used with any supported message encoding. The schema names should be specified as seen below:
| Encoding | Schema |
|---|---|
| ROS 1 | foxglove_msgs/Log |
| ROS 2 | foxglove_msgs/msg/Log |
| JSON | foxglove.Log |
| Protobuf | foxglove.Log |
| FlatBuffers | foxglove.Log |
| OMG IDL | foxglove::Log |
ModelPrimitive
A primitive representing a 3D model file loaded from an external URL or embedded data.
Parent schema
ModelPrimitive appears in the SceneEntity message schema.
Schema
| Field | Type | Description |
|---|---|---|
pose | Pose | The position and orientation of the model relative to the reference frame. |
scale | Vector3 | Scale factor applied to the model along each axis. |
color | Color | Solid color applied to the entire model if override_color is set to true. |
override_color | boolean | If true, overrides the model's original material colors with the specified Color. |
url | string | URL linking to the external model file. One of url or data must be provided. |
media_type | string | MIME type of the embedded model (e.g., model/gltf-binary). Required if data is used instead of url. Overrides inferred type. |
data | bytes | Embedded model data. If provided, media_type must be specified. One of url or data must be provided. |
Reference implementations
Foxglove schemas are independent of any specific framework and can be used with any supported message encoding. The schema names should be specified as seen below:
| Encoding | Schema |
|---|---|
| ROS 1 | foxglove_msgs/ModelPrimitive |
| ROS 2 | foxglove_msgs/msg/ModelPrimitive |
| JSON | foxglove.ModelPrimitive |
| Protobuf | foxglove.ModelPrimitive |
| FlatBuffers | foxglove.ModelPrimitive |
| OMG IDL | foxglove::ModelPrimitive |
PackedElementField
A field present within each element in a byte array of packed elements.
Parent schema
PackedElementField appears in the following message schemas: Grid and PointCloud.
Schema
| Field | Type | Description |
|---|---|---|
pose | Pose | The position and orientation of the model relative to the reference frame. |
scale | Vector3 | Scale factor applied to the model along each axis. |
color | Color | Solid color applied to the entire model if override_color is set to true. |
override_color | boolean | If true, overrides the model's original material colors with the specified Color. |
url | string | URL linking to the external model file. One of url or data must be provided. |
media_type | string | MIME type of the embedded model (e.g., model/gltf-binary). Required if data is used instead of url. Overrides inferred type. |
data | bytes | Embedded model data. If provided, media_type must be specified. One of url or data must be provided. |
Reference implementations
Foxglove schemas are independent of any specific framework and can be used with any supported message encoding. The schema names should be specified as seen below:
| Encoding | Schema |
|---|---|
| ROS 1 | foxglove_msgs/PackedElementField |
| ROS 2 | foxglove_msgs/msg/PackedElementField |
| JSON | foxglove.PackedElementField |
| Protobuf | foxglove.PackedElementField |
| FlatBuffers | foxglove.PackedElementField |
| OMG IDL | foxglove::PackedElementField |
Point2
A point representing a position in 2D space.
Parent schema
Point2 appears in the following message schemas: CircleAnnotation, PointsAnnotation and TextAnnotation.
Schema
Reference implementations
Foxglove schemas are independent of any specific framework and can be used with any supported message encoding. The schema names should be specified as seen below:
| Encoding | Schema |
|---|---|
| ROS 1 | foxglove_msgs/Point2 |
| ROS 2 | foxglove_msgs/msg/Point2 |
| JSON | foxglove.Point2 |
| Protobuf | foxglove.Point2 |
| FlatBuffers | foxglove.Point2 |
| OMG IDL | foxglove::Point2 |
Point3
A point representing a position in 3D space.
Parent schema
Point3 appears in the following message schemas: LinePrimitive and TriangleListPrimitive.
Schema
| Field | Type | Description |
|---|---|---|
x | float64 | X coordinate position. |
y | float64 | Y coordinate position. |
z | float64 | Z coordinate position. |
Reference implementations
Foxglove schemas are independent of any specific framework and can be used with any supported message encoding. The schema names should be specified as seen below:
| Encoding | Schema |
|---|---|
| ROS 1 | foxglove_msgs/Point3 |
| ROS 2 | foxglove_msgs/msg/Point3 |
| JSON | foxglove.Point3 |
| Protobuf | foxglove.Point3 |
| FlatBuffers | foxglove.Point3 |
| OMG IDL | foxglove::Point3 |
PointCloud
A collection of N-dimensional points, which may contain additional fields with information like normals, intensity, etc.
Panel support
PointCloud can be used in the following panels: 3D and Image.
Schema
| Field | Type | Description |
|---|---|---|
timestamp | time | Time when the point cloud was captured. |
frame_id | string | Reference frame that the point cloud is positioned relative to. |
pose | Pose | Position of the point cloud origin relative to the reference frame. |
point_stride | uint32 | Number of bytes between points in the data. |
fields | PackedElementField[] | List of fields describing the data layout for each point. Requires at least two of x, y, or z for position. Optional fields like color (r, g, b, a) can be included. |
data | bytes | Point data, interpreted using fields |
Reference implementations
Foxglove schemas are independent of any specific framework and can be used with any supported message encoding. The schema names should be specified as seen below:
| Encoding | Schema |
|---|---|
| ROS 1 | foxglove_msgs/PointCloud |
| ROS 2 | foxglove_msgs/msg/PointCloud |
| JSON | foxglove.PointCloud |
| Protobuf | foxglove.PointCloud |
| FlatBuffers | foxglove.PointCloud |
| OMG IDL | foxglove::PointCloud |
PointsAnnotation
An array of points on a 2D image.
Parent schema
PointsAnnotation appears in the following message schemas: ImageAnnotations.
Schema
| Field | Type | Description |
|---|---|---|
timestamp | time | Time when the annotation was created. |
type | PointsAnnotationType | Type of points annotation to render. |
points | Point2[] | List of 2D points in image coordinates (pixels). |
outline_color | Color | Color used for the outline of points or lines. |
outline_colors | Color[] | Per-point outline colors (if type is POINTS) or per-segment stroke colors (if type is LINE_LIST, LINE_STRIP, or LINE_LOOP). |
fill_color | Color | Fill color for points. |
thickness | float64 | Stroke thickness in pixels for outlines or lines. |
Reference implementations
Foxglove schemas are independent of any specific framework and can be used with any supported message encoding. The schema names should be specified as seen below:
| Encoding | Schema |
|---|---|
| ROS 1 | foxglove_msgs/PointsAnnotation |
| ROS 2 | foxglove_msgs/msg/PointsAnnotation |
| JSON | foxglove.PointsAnnotation |
| Protobuf | foxglove.PointsAnnotation |
| FlatBuffers | foxglove.PointsAnnotation |
| OMG IDL | foxglove::PointsAnnotation |
Pose
A position and orientation for an object or reference frame in 3D space.
Parent schema
Pose appears in the following message schemas: ArrowPrimitive, CubePrimitive, CylinderPrimitive, Grid, LaserScan, LinePrimitive, ModelPrimitive, PointCloud, PoseInFrame, PosesInFrame, SpherePrimitive, TextPrimitive, and TriangleListPrimitive.
Schema
| Field | Type | Description |
|---|---|---|
position | Vector3 | 3D point representing the position in space. |
orientation | Quaternion | Quaternion representing the orientation in space. |
Reference implementations
Foxglove schemas are independent of any specific framework and can be used with any supported message encoding. The schema names should be specified as seen below:
| Encoding | Schema |
|---|---|
| ROS 1 | foxglove_msgs/Pose |
| ROS 2 | foxglove_msgs/msg/Pose |
| JSON | foxglove.Pose |
| Protobuf | foxglove.Pose |
| FlatBuffers | foxglove.Pose |
| OMG IDL | foxglove::Pose |
PoseInFrame
A position and orientation for an object or reference frame in 3D space.
Panel support
PoseInFrame can be used in the following panels: 3D and Image.
Schema
| Field | Type | Description |
|---|---|---|
timestamp | time | Timestamp indicating when the pose was recorded. |
frame_id | string | Name of the coordinate frame that the pose is relative to. |
pose | Pose | The position and orientation in 3D space. |
Reference implementations
Foxglove schemas are independent of any specific framework and can be used with any supported message encoding. The schema names should be specified as seen below:
| Encoding | Schema |
|---|---|
| ROS 1 | foxglove_msgs/PoseInFrame |
| ROS 2 | foxglove_msgs/msg/PoseInFrame |
| JSON | foxglove.PoseInFrame |
| Protobuf | foxglove.PoseInFrame |
| FlatBuffers | foxglove.PoseInFrame |
| OMG IDL | foxglove::PoseInFrame |
PosesInFrame
An array of timestamped poses for an object or reference frame in 3D space.
Panel support
PosesInFrame can be used in the following panels: 3D and Image.
Schema
| Field | Type | Description |
|---|---|---|
timestamp | time | Timestamp indicating when the pose was recorded. |
frame_id | string | Name of the coordinate frame that the pose is relative to. |
pose | Pose[] | The position and orientation in 3D space. |
Reference implementations
Foxglove schemas are independent of any specific framework and can be used with any supported message encoding. The schema names should be specified as seen below:
| Encoding | Schema |
|---|---|
| ROS 1 | foxglove_msgs/PosesInFrame |
| ROS 2 | foxglove_msgs/msg/PosesInFrame |
| JSON | foxglove.PosesInFrame |
| Protobuf | foxglove.PosesInFrame |
| FlatBuffers | foxglove.PosesInFrame |
| OMG IDL | foxglove::PosesInFrame |
Quaternion
A quaternion representing a rotation in 3D.
Parent schema
Quaternion appears in the following message schemas: FrameTransform and Pose.
Schema
| Field | Type | Description |
|---|---|---|
x | float64 | X component of the quaternion. |
y | float64 | Y component of the quaternion. |
z | float64 | Z component of the quaternion. |
w | float64 | W component of the quaternion. |
Reference implementations
Foxglove schemas are independent of any specific framework and can be used with any supported message encoding. The schema names should be specified as seen below:
| Encoding | Schema |
|---|---|
| ROS 1 | foxglove_msgs/Quaternion |
| ROS 2 | foxglove_msgs/msg/Quaternion |
| JSON | foxglove.Quaternion |
| Protobuf | foxglove.Quaternion |
| FlatBuffers | foxglove.Quaternion |
| OMG IDL | foxglove::Quaternion |
RawImage
A raw image.
Panel support
RawImage can be used in the following panels: 3D and Image.
Schema
| Field | Type | Description |
|---|---|---|
timestamp | time | Timestamp indicating when the image was captured. |
frame_id | string | Frame of reference for the image. The origin of the frame is the optical center of the camera. +x points to the right, +y points down, and +z points into the plane of the image. |
width | uint32 | Width of the image. |
height | uint32 | Height of the image. |
encoding | string | Encoding of the raw image data. |
step | uint32 | Length in bytes of a single row of the image. |
data | bytes | Raw image data buffer. The content depends on the encoding and includes all pixel data row-wise. |
Supported values:
8UC1, 8UC3, 16UC1 (little endian), 32FC1 (little endian), bayer_bggr8, bayer_gbrg8, bayer_grbg8, bayer_rggb8, bgr8, bgra8, mono8, mono16, rgb8, rgba8, uyvy or yuv422, yuyv or yuv422_yuy2
Reference implementations
Foxglove schemas are independent of any specific framework and can be used with any supported message encoding. The schema names should be specified as seen below:
| Encoding | Schema |
|---|---|
| ROS 1 | foxglove_msgs/RawImage |
| ROS 2 | foxglove_msgs/msg/RawImage |
| JSON | foxglove.RawImage |
| Protobuf | foxglove.RawImage |
| FlatBuffers | foxglove.RawImage |
| OMG IDL | foxglove::RawImage |
SceneEntity
A visual element in a 3D scene. An entity may be composed of multiple primitives which all share the same frame of reference.
Parent schema
SceneEntity appears in the SceneUpdate message schema.
Schema
| Field | Type | Description |
|---|---|---|
timestamp | time | Timestamp of the entity. |
frame_id | string | Frame of reference. |
id | string | Identifier for the entity. An entity will replace any prior entity on the same topic with the same id. |
lifetime | duration | Length of time (relative to timestamp) after which the entity should be automatically removed. Zero means it remains visible until replaced or deleted. |
frame_locked | boolean | Whether the entity should keep its location in the fixed frame (false) or follow the frame specified in frame_id as it moves relative to the fixed frame (true). |
metadata | KeyValuePair[] | Additional user-provided metadata associated with the entity. Keys must be unique. |
arrows | ArrowPrimitive[] | Arrow primitives. |
cubes | CubePrimitive[] | Cube primitives. |
spheres | SpherePrimitive[] | Sphere primitives. |
cylinders | CylinderPrimitive[] | Cylinder primitives. |
lines | LinePrimitive[] | Line primitives. |
triangles | TriangleListPrimitive[] | Triangle list primitives. |
texts | TextPrimitive[] | Text primitives. |
models | ModelPrimitive[] | Model primitives. |
Reference implementations
Foxglove schemas are framework-agnostic and can be implemented using any supported message encoding:
| Encoding | Schema |
|---|---|
| ROS 1 | foxglove_msgs/SceneEntity |
| ROS 2 | foxglove_msgs/msg/SceneEntity |
| JSON | foxglove.SceneEntity |
| Protobuf | foxglove.SceneEntity |
| FlatBuffers | foxglove.SceneEntity |
| OMG IDL | foxglove::SceneEntity |
SceneEntityDeletion
Command to remove previously published entities.
Parent schema
SceneEntityDeletion appears in the SceneUpdate message schema.
Schema
| Field | Type | Description |
|---|---|---|
timestamp | time | Timestamp of the deletion. Only matching entities earlier than this timestamp will be deleted. |
type | SceneEntityDeletionType | Type of deletion action to perform. |
id | string | Identifier which must match if type is MATCHING_ID. |
Reference implementations
Foxglove schemas are framework-agnostic and can be implemented using any supported message encoding:
| Encoding | Schema |
|---|---|
| ROS 1 | foxglove_msgs/SceneEntityDeletion |
| ROS 2 | foxglove_msgs/msg/SceneEntityDeletion |
| JSON | foxglove.SceneEntityDeletion |
| Protobuf | foxglove.SceneEntityDeletion |
| FlatBuffers | foxglove.SceneEntityDeletion |
| OMG IDL | foxglove::SceneEntityDeletion |
SceneUpdate
An update to the entities displayed in a 3D scene.
Panel support
SceneUpdate is used in the 3D and Image panels.
Schema
| Field | Type | Description |
|---|---|---|
deletions | SceneEntityDeletion[] | Scene entities to delete. |
entities | SceneEntity[] | Scene entities to add or replace. |
Reference implementations
Foxglove schemas are framework-agnostic and can be implemented using any supported message encoding:
| Encoding | Schema |
|---|---|
| ROS 1 | foxglove_msgs/SceneUpdate |
| ROS 2 | foxglove_msgs/msg/SceneUpdate |
| JSON | foxglove.SceneUpdate |
| Protobuf | foxglove.SceneUpdate |
| FlatBuffers | foxglove.SceneUpdate |
| OMG IDL | foxglove::SceneUpdate |
SpherePrimitive
A primitive representing a sphere or ellipsoid.
Parent schema
SpherePrimitive appears in the SceneEntity message schema.
Schema
| Field | Type | Description |
|---|---|---|
pose | pose | Position of the center of the sphere and its orientation. |
size | Vector3 | Size (diameter) of the sphere along each axis. |
color | Color | Color of the sphere. |
Reference implementations
Foxglove schemas are framework-agnostic and can be implemented using any supported message encoding:
| Encoding | Schema |
|---|---|
| ROS 1 | foxglove_msgs/SpherePrimitive |
| ROS 2 | foxglove_msgs/msg/SpherePrimitive |
| JSON | foxglove.SpherePrimitive |
| Protobuf | foxglove.SpherePrimitive |
| FlatBuffers | foxglove.SpherePrimitive |
| OMG IDL | foxglove::SpherePrimitive |
TextAnnotation
A text label on a 2D image.
Parent schema
TextAnnotation appears in the ImageAnnotations message schema.
Schema
| Field | Type | Description |
|---|---|---|
timestamp | time | Timestamp of annotation. |
position | Point2 | Bottom-left origin of the text label in 2D image coordinates (pixels). |
text | string | Text to display. |
font_size | float64 | Font size in pixels. |
text_color | Color | Text color. |
background_color | Color | Background fill color. |
Position
The coordinate uses the top-left corner of the top-left pixel of the image as the origin.
Reference implementations
Foxglove schemas are framework-agnostic and can be implemented using any supported message encoding:
| Encoding | Schema |
|---|---|
| ROS 1 | foxglove_msgs/TextAnnotation |
| ROS 2 | foxglove_msgs/msg/TextAnnotation |
| JSON | foxglove.TextAnnotation |
| Protobuf | foxglove.TextAnnotation |
| FlatBuffers | foxglove.TextAnnotation |
| OMG IDL | foxglove::TextAnnotation |
TextPrimitive
A primitive representing a text label.
Parent schema
TextPrimitive appears in the SceneEntity message schema.
Schema
| Field | Type | Description |
|---|---|---|
pose | pose | Position of the center of the text box and orientation of the text. Identity orientation means the text is oriented in the xy-plane and flows from -x to +x. |
billboard | boolean | Whether the text should respect pose.orientation (false) or always face the camera (true). |
font_size | float64 | Font size (height of one line of text). |
scale_invariant | boolean | Indicates whether font_size is a fixed size in screen pixels (true), or specified in world coordinates and scales with distance from the camera (false). |
color | Color | Color of the text. |
text | string | Text content. |
Reference implementations
Foxglove schemas are framework-agnostic and can be implemented using any supported message encoding:
| Encoding | Schema |
|---|---|
| ROS 1 | foxglove_msgs/TextPrimitive |
| ROS 2 | foxglove_msgs/msg/TextPrimitive |
| JSON | foxglove.TextPrimitive |
| Protobuf | foxglove.TextPrimitive |
| FlatBuffers | foxglove.TextPrimitive |
| OMG IDL | foxglove::TextPrimitive |
TriangleListPrimitive
A primitive representing a set of triangles or a surface tiled by triangles.
Parent schema
TriangleListPrimitive appears in the SceneEntity message schema.
Schema
| Field | Type | Description |
|---|---|---|
pose | Pose | Origin of triangles relative to reference frame. |
points | Point3[] | Vertices to use for triangles, interpreted as a list of triples (0-1-2, 3-4-5, ...). |
color | Color | Solid color to use for the whole shape. One of Color or colors must be provided. |
colors | Color[] | Per-vertex colors (if specified, must have the same length as points). One of Color or colors must be provided. |
indices | uint32[] | Indices into the points and colors arrays, which can be used to avoid duplicating attribute data. |
indices
If omitted or empty, indexing will not be used. This default behavior is equivalent to specifying [0, 1, ..., N-1] for the indices (where N is the number of points provided).
Reference implementations
Foxglove schemas are framework-agnostic and can be implemented using any supported message encoding:
| Encoding | Schema |
|---|---|
| ROS 1 | foxglove_msgs/TriangleListPrimitive |
| ROS 2 | foxglove_msgs/msg/TriangleListPrimitive |
| JSON | foxglove.TriangleListPrimitive |
| Protobuf | foxglove.TriangleListPrimitive |
| FlatBuffers | foxglove.TriangleListPrimitive |
| OMG IDL | foxglove::TriangleListPrimitive |
Vector2
A vector in 2D space that represents a direction only.
Parent schema
Vector2 appears in the Grid message schema.
Schema
Reference implementations
Foxglove schemas are framework-agnostic and can be implemented using any supported message encoding:
| Encoding | Schema |
|---|---|
| ROS 1 | foxglove_msgs/Vector2 |
| ROS 2 | foxglove_msgs/msg/Vector2 |
| JSON | foxglove.Vector2 |
| Protobuf | foxglove.Vector2 |
| FlatBuffers | foxglove.Vector2 |
| OMG IDL | foxglove::Vector2 |
Vector3
A vector in 3D space that represents a direction only.
Parent schemas
Vector3 appears in the CubePrimitive, CylinderPrimitive, FrameTransform, ModelPrimitive, Pose, and SpherePrimitive message schemas.
Schema
| Field | Type | Description |
|---|---|---|
x | float64 | x coordinate length |
y | float64 | y coordinate length |
z | float64 | z coordinate length |
Reference implementations
Foxglove schemas are framework-agnostic and can be implemented using any supported message encoding:
| Encoding | Schema |
|---|---|
| ROS 1 | geometry_msgs/Vector3 |
| ROS 2 | geometry_msgs/msg/Vector3 |
| JSON | foxglove.Vector3 |
| Protobuf | foxglove.Vector3 |
| FlatBuffers | foxglove.Vector3 |
| OMG IDL | foxglove::Vector3 |
LineType
An enumeration indicating how input points should be interpreted to create lines.
Parent type
LineType appears in the LinePrimitive message schema.
Values
| Name | Value | Description |
|---|---|---|
LINE_STRIP | 0 | Connected line segments: 0-1, 1-2, ..., (n-1)-n |
LINE_LOOP | 1 | Closed polygon: 0-1, 1-2, ..., (n-1)-n, n-0 |
LINE_LIST | 2 | Individual line segments: 0-1, 2-3, 4-5, ... |
LogLevel
Log level.
Parent type
LogLevel appears in the Log message schema.
Values
| Name | Value | Description |
|---|---|---|
UNKNOWN | 0 | Unknown log level |
DEBUG | 1 | Debug log level |
INFO | 2 | Info log level |
WARNING | 3 | Warning log level |
ERROR | 4 | Error log level |
FATAL | 5 | Fatal log level |
NumericType
Numeric type.
Parent type
NumericType appears in the PackedElementField message schema.
Values
| Name | Value | Description |
|---|---|---|
UNKNOWN | 0 | Unknown numeric type |
UINT8 | 1 | Unsigned 8-bit integer |
INT8 | 2 | Signed 8-bit integer |
UINT16 | 3 | Unsigned 16-bit integer |
INT16 | 4 | Signed 16-bit integer |
uint32 | 5 | Unsigned 32-bit integer |
INT32 | 6 | Signed 32-bit integer |
FLOAT32 | 7 | 32-bit floating-point number |
float64 | 8 | 64-bit floating-point number |
PointsAnnotationType
Type of points annotation.
Parent type
PointsAnnotationType appears in the PointsAnnotation message schema.
Values
| Name | Value | Description |
|---|---|---|
UNKNOWN | 0 | Unknown points annotation type |
POINTS | 1 | Individual points: 0, 1, 2, ... |
LINE_LOOP | 2 | Closed polygon: 0-1, 1-2, ..., (n-1)-n, n-0 |
LINE_STRIP | 3 | Connected line segments: 0-1, 1-2, ..., (n-1)-n |
LINE_LIST | 4 | Individual line segments: 0-1, 2-3, 4-5, ... |
PositionCovarianceType
Type of position covariance.
Parent type
PositionCovarianceType appears in the LocationFix message schema.
Values
| Name | Value | Description |
|---|---|---|
UNKNOWN | 0 | Unknown position covariance type |
APPROXIMATED | 1 | Position covariance is approximated |
DIAGONAL_KNOWN | 2 | Position covariance is per-axis, so put it along the diagonal |
KNOWN | 3 | Position covariance of the fix is known |
SceneEntityDeletionType
An enumeration indicating which entities should match a SceneEntityDeletion command.
Parent type
SceneEntityDeletionType appears in the SceneEntityDeletion message schema.
Values
| Name | Value | Description |
|---|---|---|
MATCHING_ID | 0 | Delete the existing entity on the same topic that has the provided id |
ALL | 1 | Delete all existing entities on the same topic |
Layouts
Lichtblick layouts enable users to design and save customized workspaces tailored to specific tasks or workflows. These layouts can be reused for recurring projects or shared with team members working on similar challenges.
Use Cases for Layouts
Layouts are highly versatile and can be adapted to various engineering and development scenarios. For instance:
- Perception Engineers: Create layouts for sensor calibration tasks.
- Planning Engineers: Design layouts to visualize and analyze routing algorithm outputs.
- Controls Engineers: Configure layouts to monitor and debug robot kinematics.
The Layouts menu provides all the tools needed to create, modify, and share layouts, ensuring a streamlined workflow.
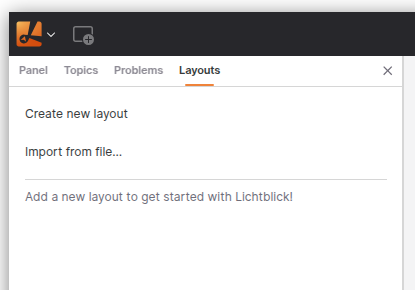
Layouts Menu Overview
Creating a Layout
To create a new custom workspace:
- Navigate to the Layouts menu.
- Select Create new layout.
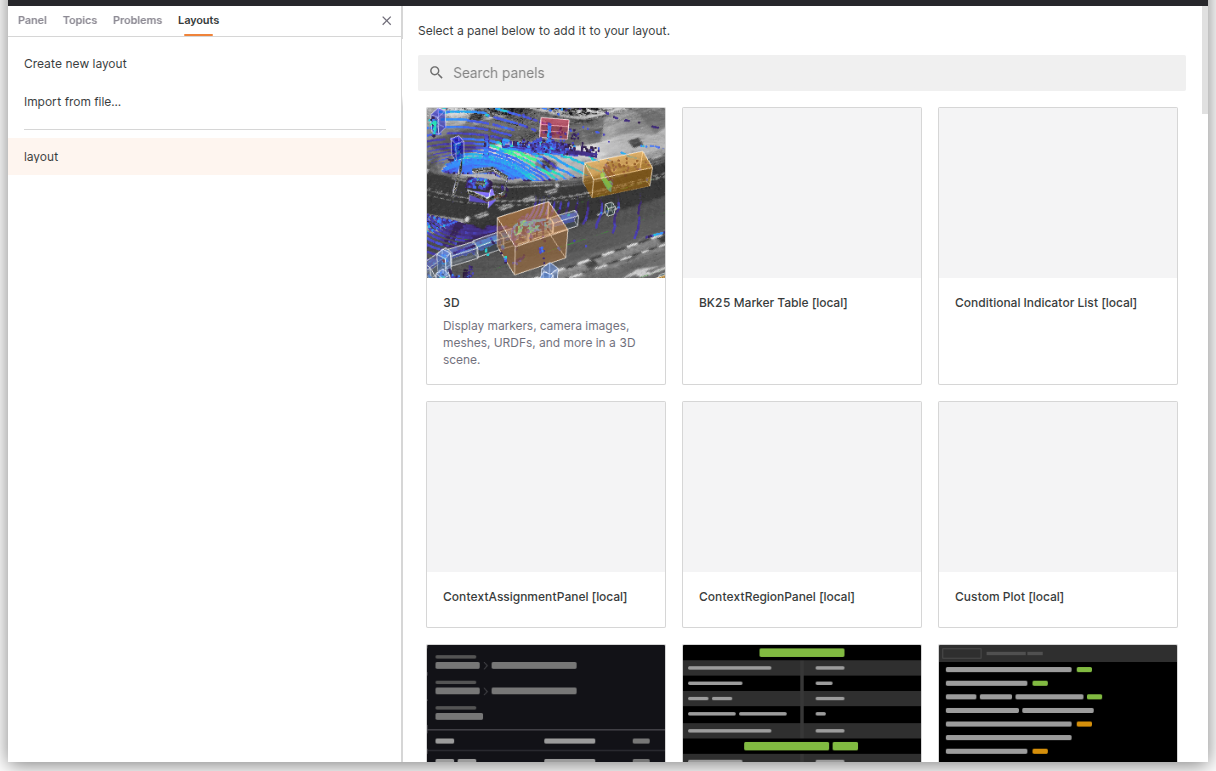
Customization Options:
- Add and arrange panels: Organize panels to suit your workflow.
- Adjust panel settings: Configure individual panel properties.
- Configure playback settings: Tailor playback behavior for your data.
- Set and manage variable values: Define and control variables within the layout.
Editing Layouts
When switching layouts after making changes to your current workspace, you will be prompted with the following options:
- Save changes: Save your modifications to the layout.
- Revert: Discard changes and restore the last saved version.
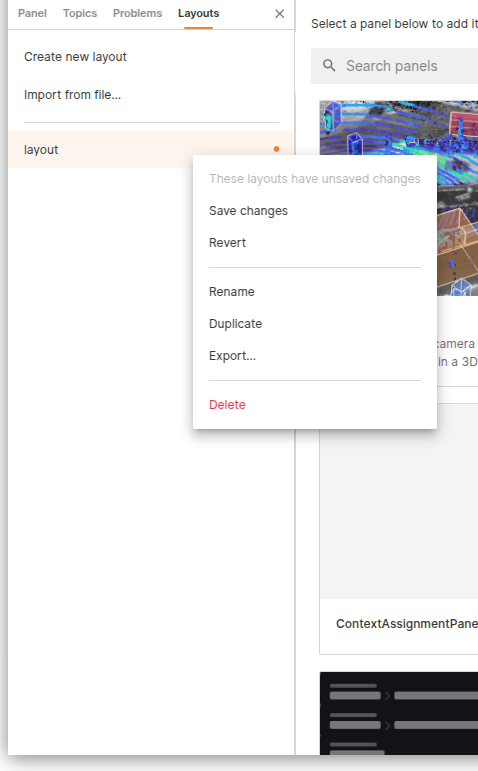
Web Version Considerations
For users accessing Lichtblick via the web version, it’s important to note that layouts are stored in IndexedDB, a client-side NoSQL database. Since browser data, including IndexedDB, can be cleared during cache or history deletion, it is recommended to export and save your layouts as JSON files to prevent data loss.
To ensure your layouts are preserved:
- Export your layout as a JSON file using the Export... option in the layout’s context menu.
- Store the exported file securely for future use or re-import it as needed.
This practice ensures that your custom layouts remain accessible even if browser data is cleared.
Importing and Exporting Layouts
Exporting a Layout
To export a layout as a JSON file:
- Open the layout’s context menu.
- Select Export....
Alternatively, you can access this option through the View submenu in the app menu (Export layout to file...).
Importing a Layout
To import a previously exported layout:
- Navigate to the Layouts menu.
- Select Import from file....
This option is also available in the View submenu in the app menu (Import layout from file...).
Additional Layout Actions
Each layout includes a Details menu, which provides options to:
- Rename: Change the layout’s name.
- Duplicate: Create a copy of the layout.
- Delete: Remove the layout permanently.
Batch Actions
To perform actions on multiple layouts simultaneously:
- Use Cmd (Mac) or Ctrl (Windows/Linux) to select multiple individual layouts.
- Use Shift to select a contiguous range of layouts.
- Right-click any selected layout and use the context menu to apply batch actions.
Open Lichtblick via CLI with a Layout Parameter
Desktop only
Once you have created and saved a layout, it can be referenced as a parameter when launching Litchblick via CLI.
lichtblick --defaultLayout="layout_example"
Automatically loading layouts from user directory
Desktop only
Lichtblick supports automatically importing layout files from a predefined user directory. This allows users to preload layouts on startup, making it easier to maintain a consistent workspace configuration across sessions or machines.
How It Works
When Lichtblick starts, it checks the user directory for layout files with the .json extension. These must be valid Lichtblick layout files. If a layout from the directory is not already present in your saved layouts, it will be imported automatically.
This mechanism is particularly useful for scenarios where:
- Teams want to distribute a standard set of layouts.
- Users frequently open Lichtblick on different systems or in new environments.
- Layouts need to be preloaded when launching via CLI or automation scripts.
Directory Path
| Platform | Path |
|---|---|
| MacOS & Linux | ~/.lichtblick-suite/layouts |
| Windows | C:\Users\<USER>\.lichtblick-suite\layouts |
*You can navigate to these paths and place your exported .json layout files directly into the folder.
Behavior and Characteristics
- Layout files are imported in alphabetical order.
- If no layout was previously selected, the first layout (by alphabetical order) will be automatically activated on startup.
- Layouts are identified by name:
- If a layout already exists with the same name, it will not be re-imported.
- If the layout is renamed, it will be treated as a new layout and imported again.
- If you want to force an update to a layout, delete the existing one before restarting Lichtblick or rename the updated file.
This automatic import system ensures that your custom layouts can be effortlessly reused, even in fresh environments or shared workstations.
By leveraging Lichtblick's layout features, you can create efficient, reusable workspaces tailored to your specific needs, enhancing productivity and collaboration.
Panels
Overview
Panels in Lichtblick are flexible, modular elements that allow you to visualize and interact with data. You can customize and organize these panels within your layout. To add a panel, use the "Add Panel" menu to select a new panel, or drag and drop the panel directly into your layout.
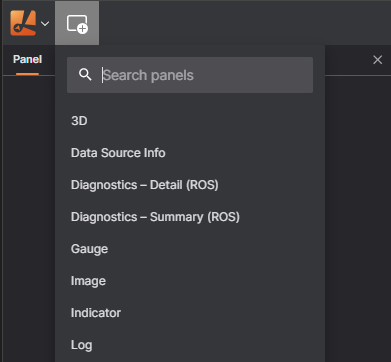
Once added, you can easily move panels around by dragging their top bar.
Each panel's top bar has quick access to:
- Menu (represented by 3 dots) for common actions like panel splitting or changing the panel type
- Settings accessed through the cog icon to adjust the panel's configuration
Customizing Panels
To edit a panel, click on the cog icon on its top bar to open the settings in the left sidebar. Each panel will be highlighted with a colored border when selected.
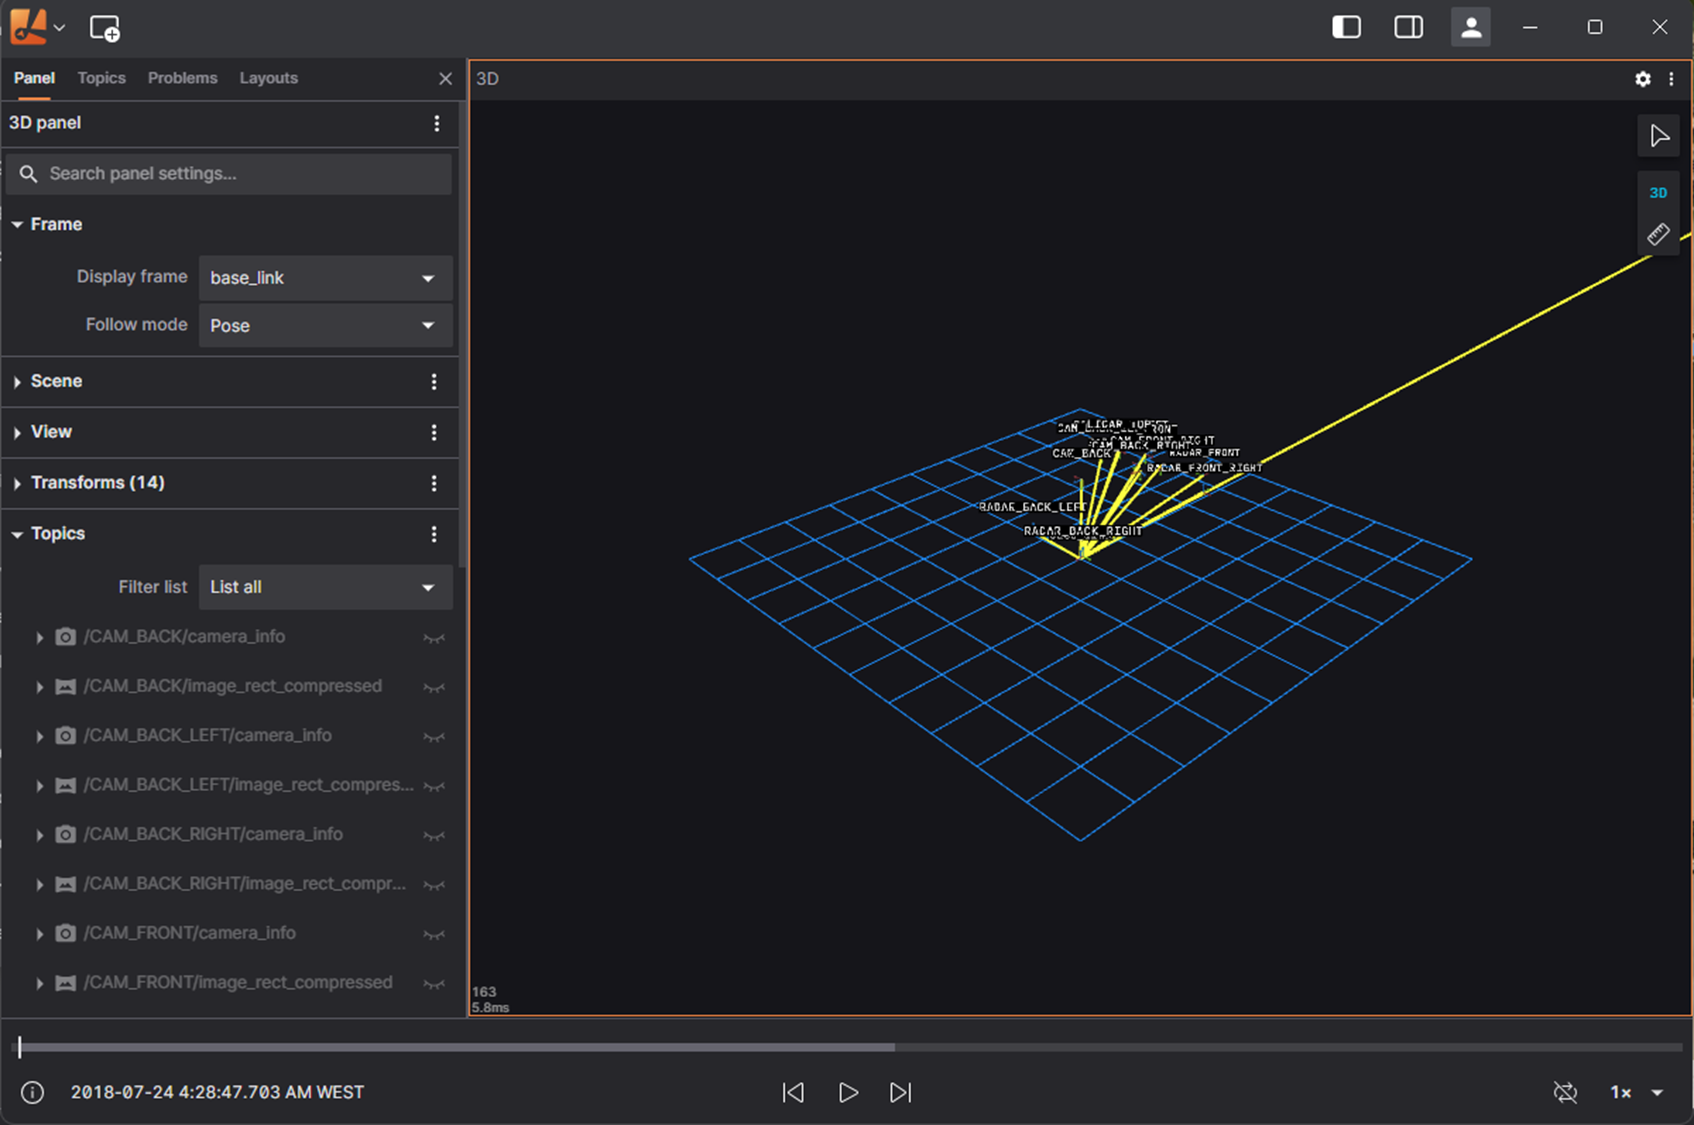
The sidebar allows you to filter the topics from your data source, and you can drang and drop topic results into panels for quick visualization.
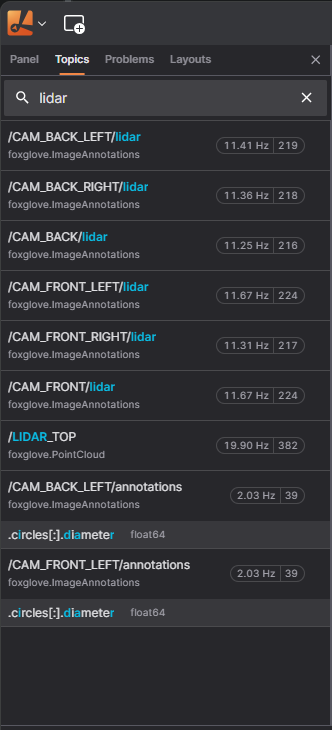
Topics can be mapped to specific panel types like:
- Raw messages and table panel for detailed message views
- Image panel for visual topics
- Plot and State Transiton panel for message path with graph-related data.
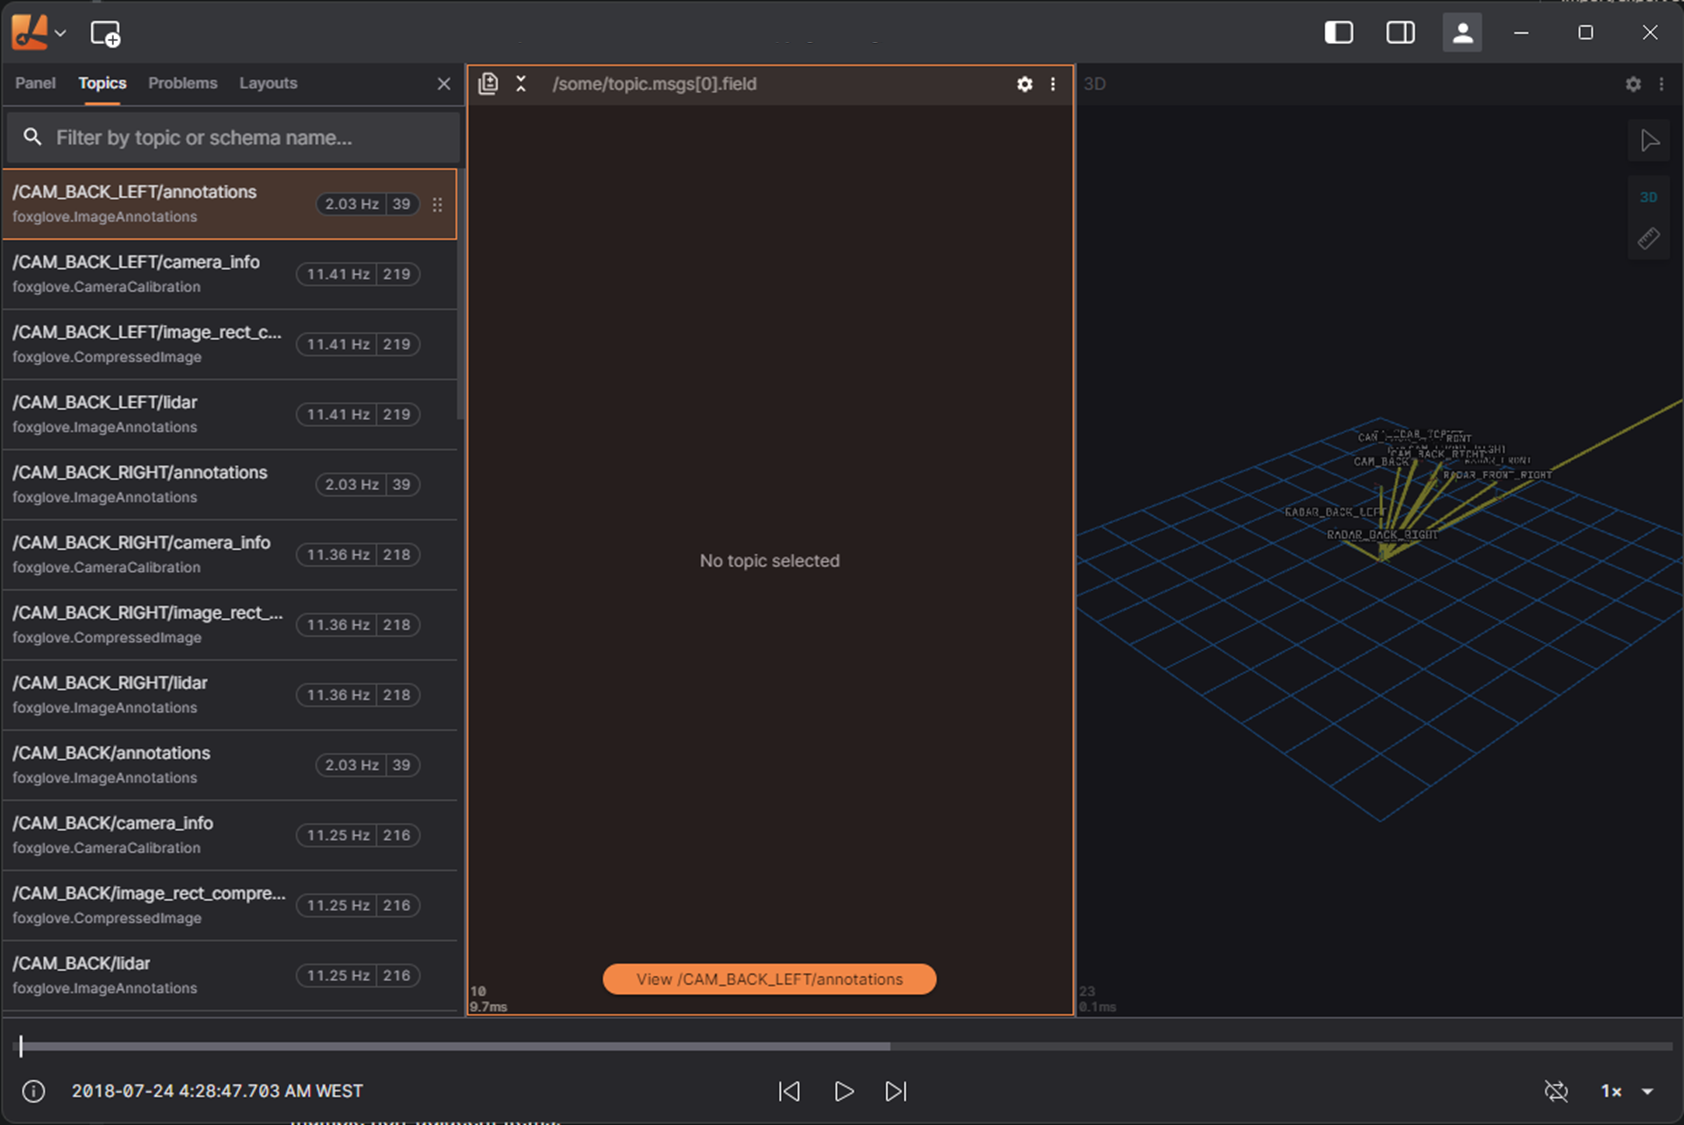
For selecting multiple message paths, hold shift for a range, or Ctrl (or Cmd on macOS) for multiple non-adjacent items.
Plot
The Plot Panel in Lichtblick is a user interface component designed to facilitate the visualization and control of plotting data. It allows to view, modify, and export graphical representations of datasets or modeling results.
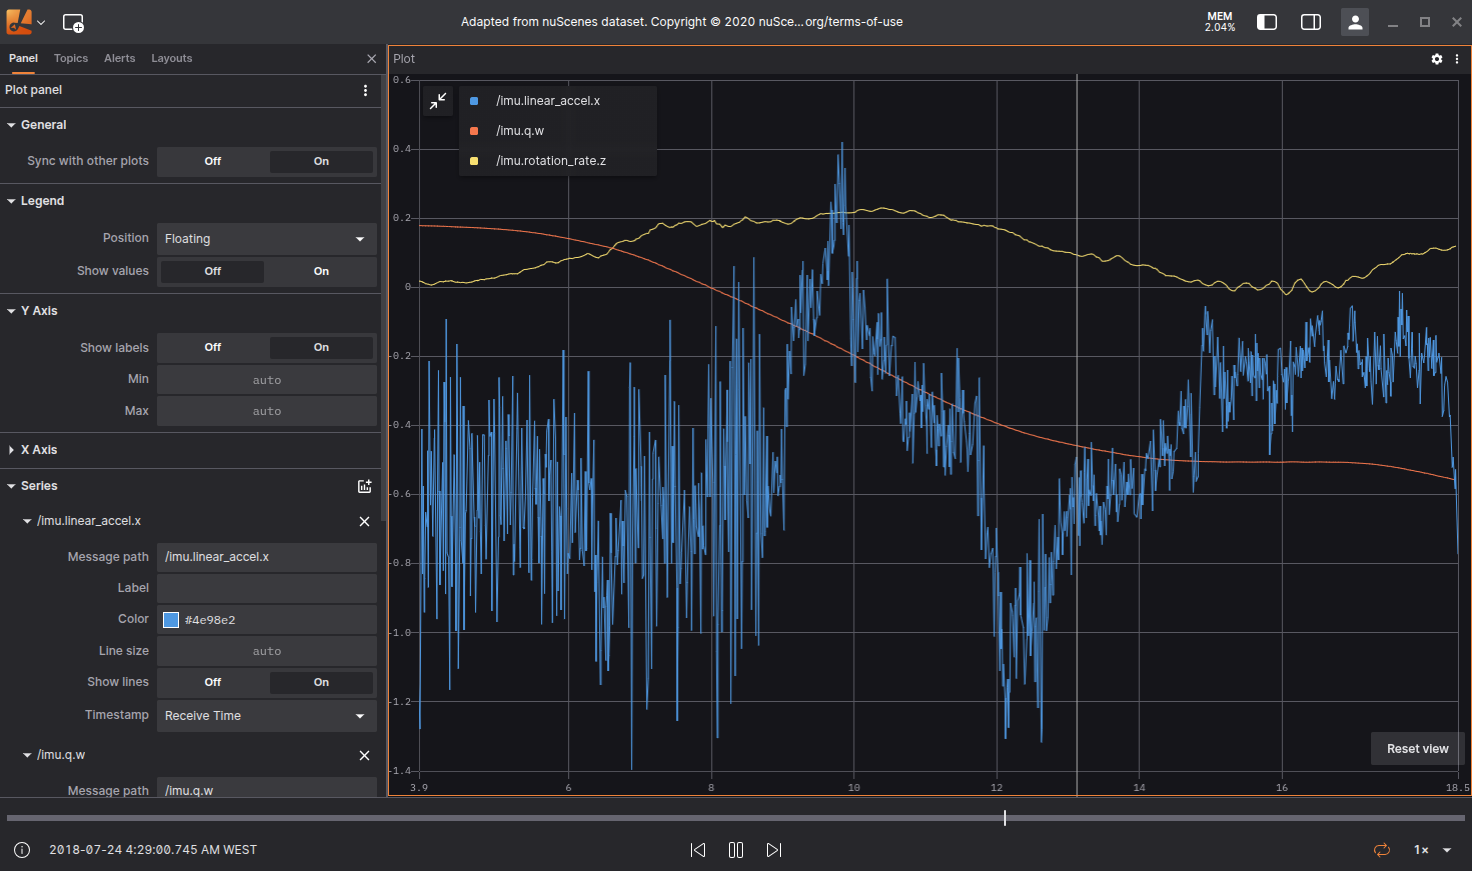
Settings
General
| Field | Descripiton |
|---|---|
| Sync with other plots | Sync timeline to other plots |
Legend
| Field | Descripiton |
|---|---|
| Dislpay Legend | To display or hide the legend use the icon on the top left of the Plot |
| Position | Allows the user to select the position of the legend relative to the plot:
|
| Show Values | Shows the current y-axis value to the corresponding series in the legend |
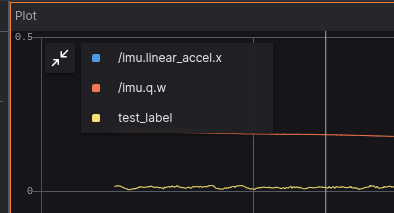
Plot series legend.
Y Axis
| Field | Descripiton |
|---|---|
| Show labels | Option to select if the values are shown, or not, near the y-axis |
| Min | Minimum value for y-axis |
| Max | Maximum value for y-axis |
X Axis
| Field | Descripiton |
|---|---|
| Default Value | Selects the default value for x-axis. Can also be defined individually for each series |
| Show labels | Option to select if the values are shown, or not, near the y-axis |
| Min | Minimum value for y-axis |
| Max | Maximum value for y-axis |
| Range (seconds) | For time series data, selects the time interval of data that will be shown after the current playback point |
Series
| Field | Descripiton |
|---|---|
| Message path | Message path containing x-axis values for the series. Will override default x-axis values if set |
| Label | Label that can be given to the series |
| Color | Color used on the series |
| Line size | Width of line connecting data points |
| Show lines | Show lines connecting data points. Active by default |
| Timestamp | For time serie plots, selects the time information used for message ordening: |
To remove a series from the Panel you use the x, next to each data series, like it's shown below.
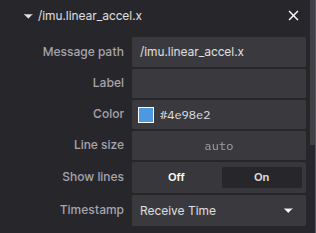
To enter the data you wanna plot use the message path syntax, Lichtblick will also show suggestions that exits on the topics available.
You can also hover the plot to see the details in a tooltip. A vertical bar will appear, as well as a yellow marker on the playback timeline. If clicked the playback will jump to that point on the timeline.
Download CSV data
With right click mouse button an option to download the plotted as .csv will appear.
Raw Messages
The Raw Messages panel in Lichtblick is a powerful debugging and inspection tool that enables users to visualize raw ROS or MCAP messages in a structured and interactive JSON format. It is particularly useful for understanding message structures, tracking state changes over time, and drilling into specific message fields for advanced diagnostics or visualizations.
As new messages are received for a specific path, the panel tree will show just the last message. It's also possible to expand and collapse keys, and that will persist across playback
Features
1. Diff mode
Compares messages showing additions (green), deletions (red), and changes (yellow) to their fields across 2 categories:
previous message- Compare the immediately previous message on the same message path;custom- Compare different topic messages in the same timestamp;

2. Advanced Filtering
Users can define custom filters using logical expressions to isolate specific parts of the message. Supported features include:
- Array filtering, e.g.,
signals[0] - Logical operators, e.g.,
fields[:]{offset<5} - Global variables, such as
$last,$index, or other runtime context helpers
Filters are written in a JavaScript-like syntax, parsed and validated in real time.
3. Hyperlinks to message schmemas documentation
A link to documentation about the selected schema is available at the top.

4. Contextual Actions (Right-click or Click)
Hovering over a field provides contextual actions, such as:
- Plot this variable

- Open state transition visualization
- Copy full path to field
- Set as filter base
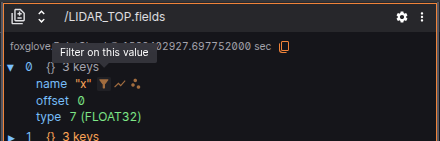
This improves usability when exploring complex or unfamiliar messages.
5. Structured JSON Message View
Each message is displayed as a JSON object, preserving full structural fidelity. The panel supports:
- Primitive types (string, number, boolean)
- Arrays, with collapsible sections
- Objects, with recursive expansion
- Enumerations, shown with both label and numeric value (e.g.,
"state": "RUNNING (1)")
Settings
| Field | Descripiton |
|---|---|
| Font size | Font size for text displayed on the panel |
Best Practices
- Use filters to reduce noise when debugging high-frequency topics.
- Combine drag-and-drop with plots for rapid visualization of numerical data.
- Enable diff mode to track how actuator or decision variables evolve.
- Use contextual actions for quicker navigation between panels.
Playback Performance Panel
Overview
The Playback Performance panel provides a real-time visualization of playback performance metrics during the execution of a playback session. It displays four primary metrics over a sliding time window:
- Playback Speed relative to real-time (× realtime)
- Frame Rate (fps)
- Bag Frame Duration (ms bag frame)
- Bandwidth Usage (Mbps)
These metrics are useful for diagnosing playback behavior and ensuring performance meets system expectations.
Features
🔄 Real-time updates as playback state changes
📈 Sparkline graphs for each metric over the past 5 seconds
🧠 Smoothed display using averages to help detect trends
🎯 Compact and interactive UI, integrated with existing Suite UI components
Metrics Explained
| Metric | Description | Units | Max Displayed Value |
|---|---|---|---|
× realtime | Ratio of player time progression to wall-clock time | multiplier | 1.6 |
fps | Approximate playback frame rate (based on render intervals) | frames/sec | 30 |
ms bag frame | How much player time advanced in each render frame | milliseconds | 300 |
Mbps | Incoming data rate during playback | megabits/s | 100 |
Note that the MaxDisplayedValue only affects the vertical axis range of the sparkline, so values above 30 will still be calculated and shown, but they'll clip in the sparkline view. It does not limit the actual data values nor enforce any cap.
User Scripts Panel
User Scripts enable you to create synthetic topics in Lichtblick by processing and reshaping existing messages. These scripts are especially useful for extracting insights, generating visualization-friendly data, or filtering out irrelevant noise from playback or full-range messages.
This chapter walks you through the process of writing and debugging your own scripts in TypeScript, with examples and tips to help you get started.
What Are User Scripts?
User Scripts are custom functions written in TypeScript that run inside Lichtblick and allow you to:
- Filter messages (e.g., only show error logs).
- Aggregate values across multiple messages (e.g., average sensor readings).
- Transform messages into visualizations (e.g., markers or state transitions).
- Synthesize new topics from multiple inputs.
Scripts can process two types of data:
- Playback messages – Live, frame-by-frame data streamed into panels like Raw Messages or 3D.
- Range-loaded messages – Complete data over a playback range, used in panels like Plots or State Transitions.
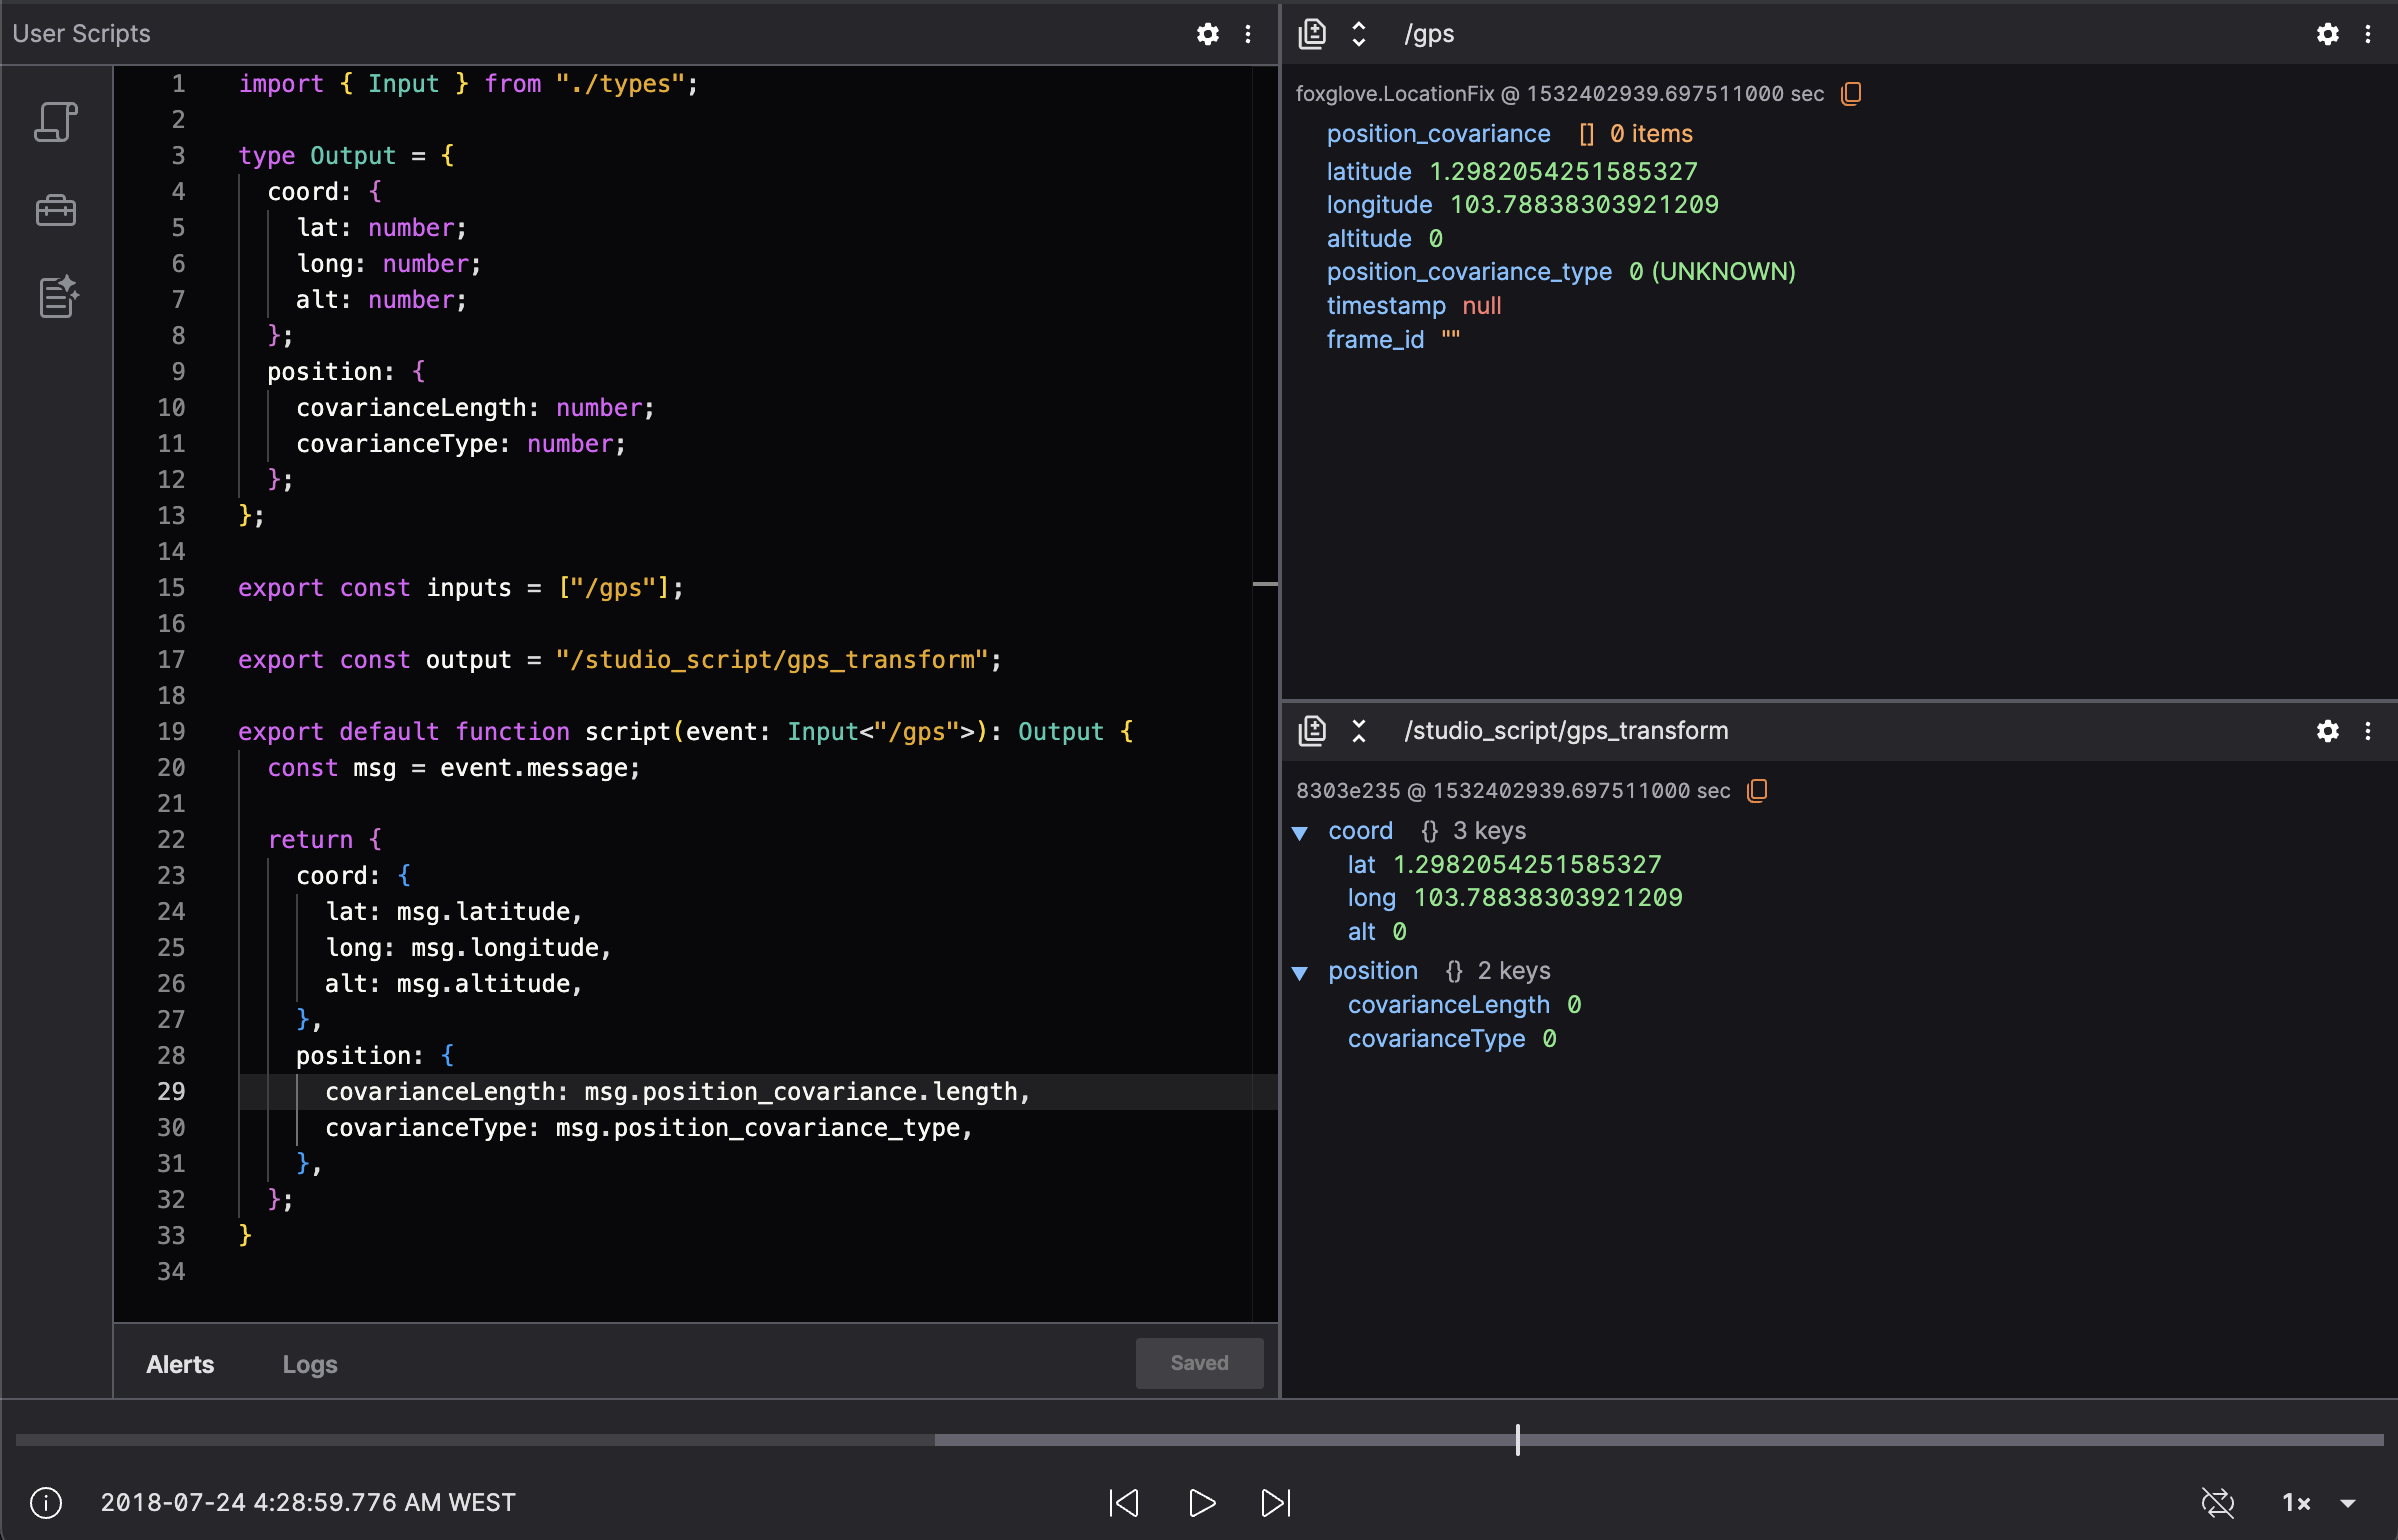
How User Scripts Work
Each script requires three parts:
- Input topics – Topics you want to consume.
- Output topic – A synthetic topic where transformed messages are published.
- Script function – The transformation logic.
Here’s a basic script that simply republishes every /diagnostics message under a new topic:
import { Input, Message } from "./types";

export const inputs = ["/diagnostics"];
export const output = "/custom_script/diagnostics_mirror";

export default function script(
  event: Input<"/diagnostics">
): Message<"diagnostic_msgs/DiagnosticArray"> {
  return event.message;
}
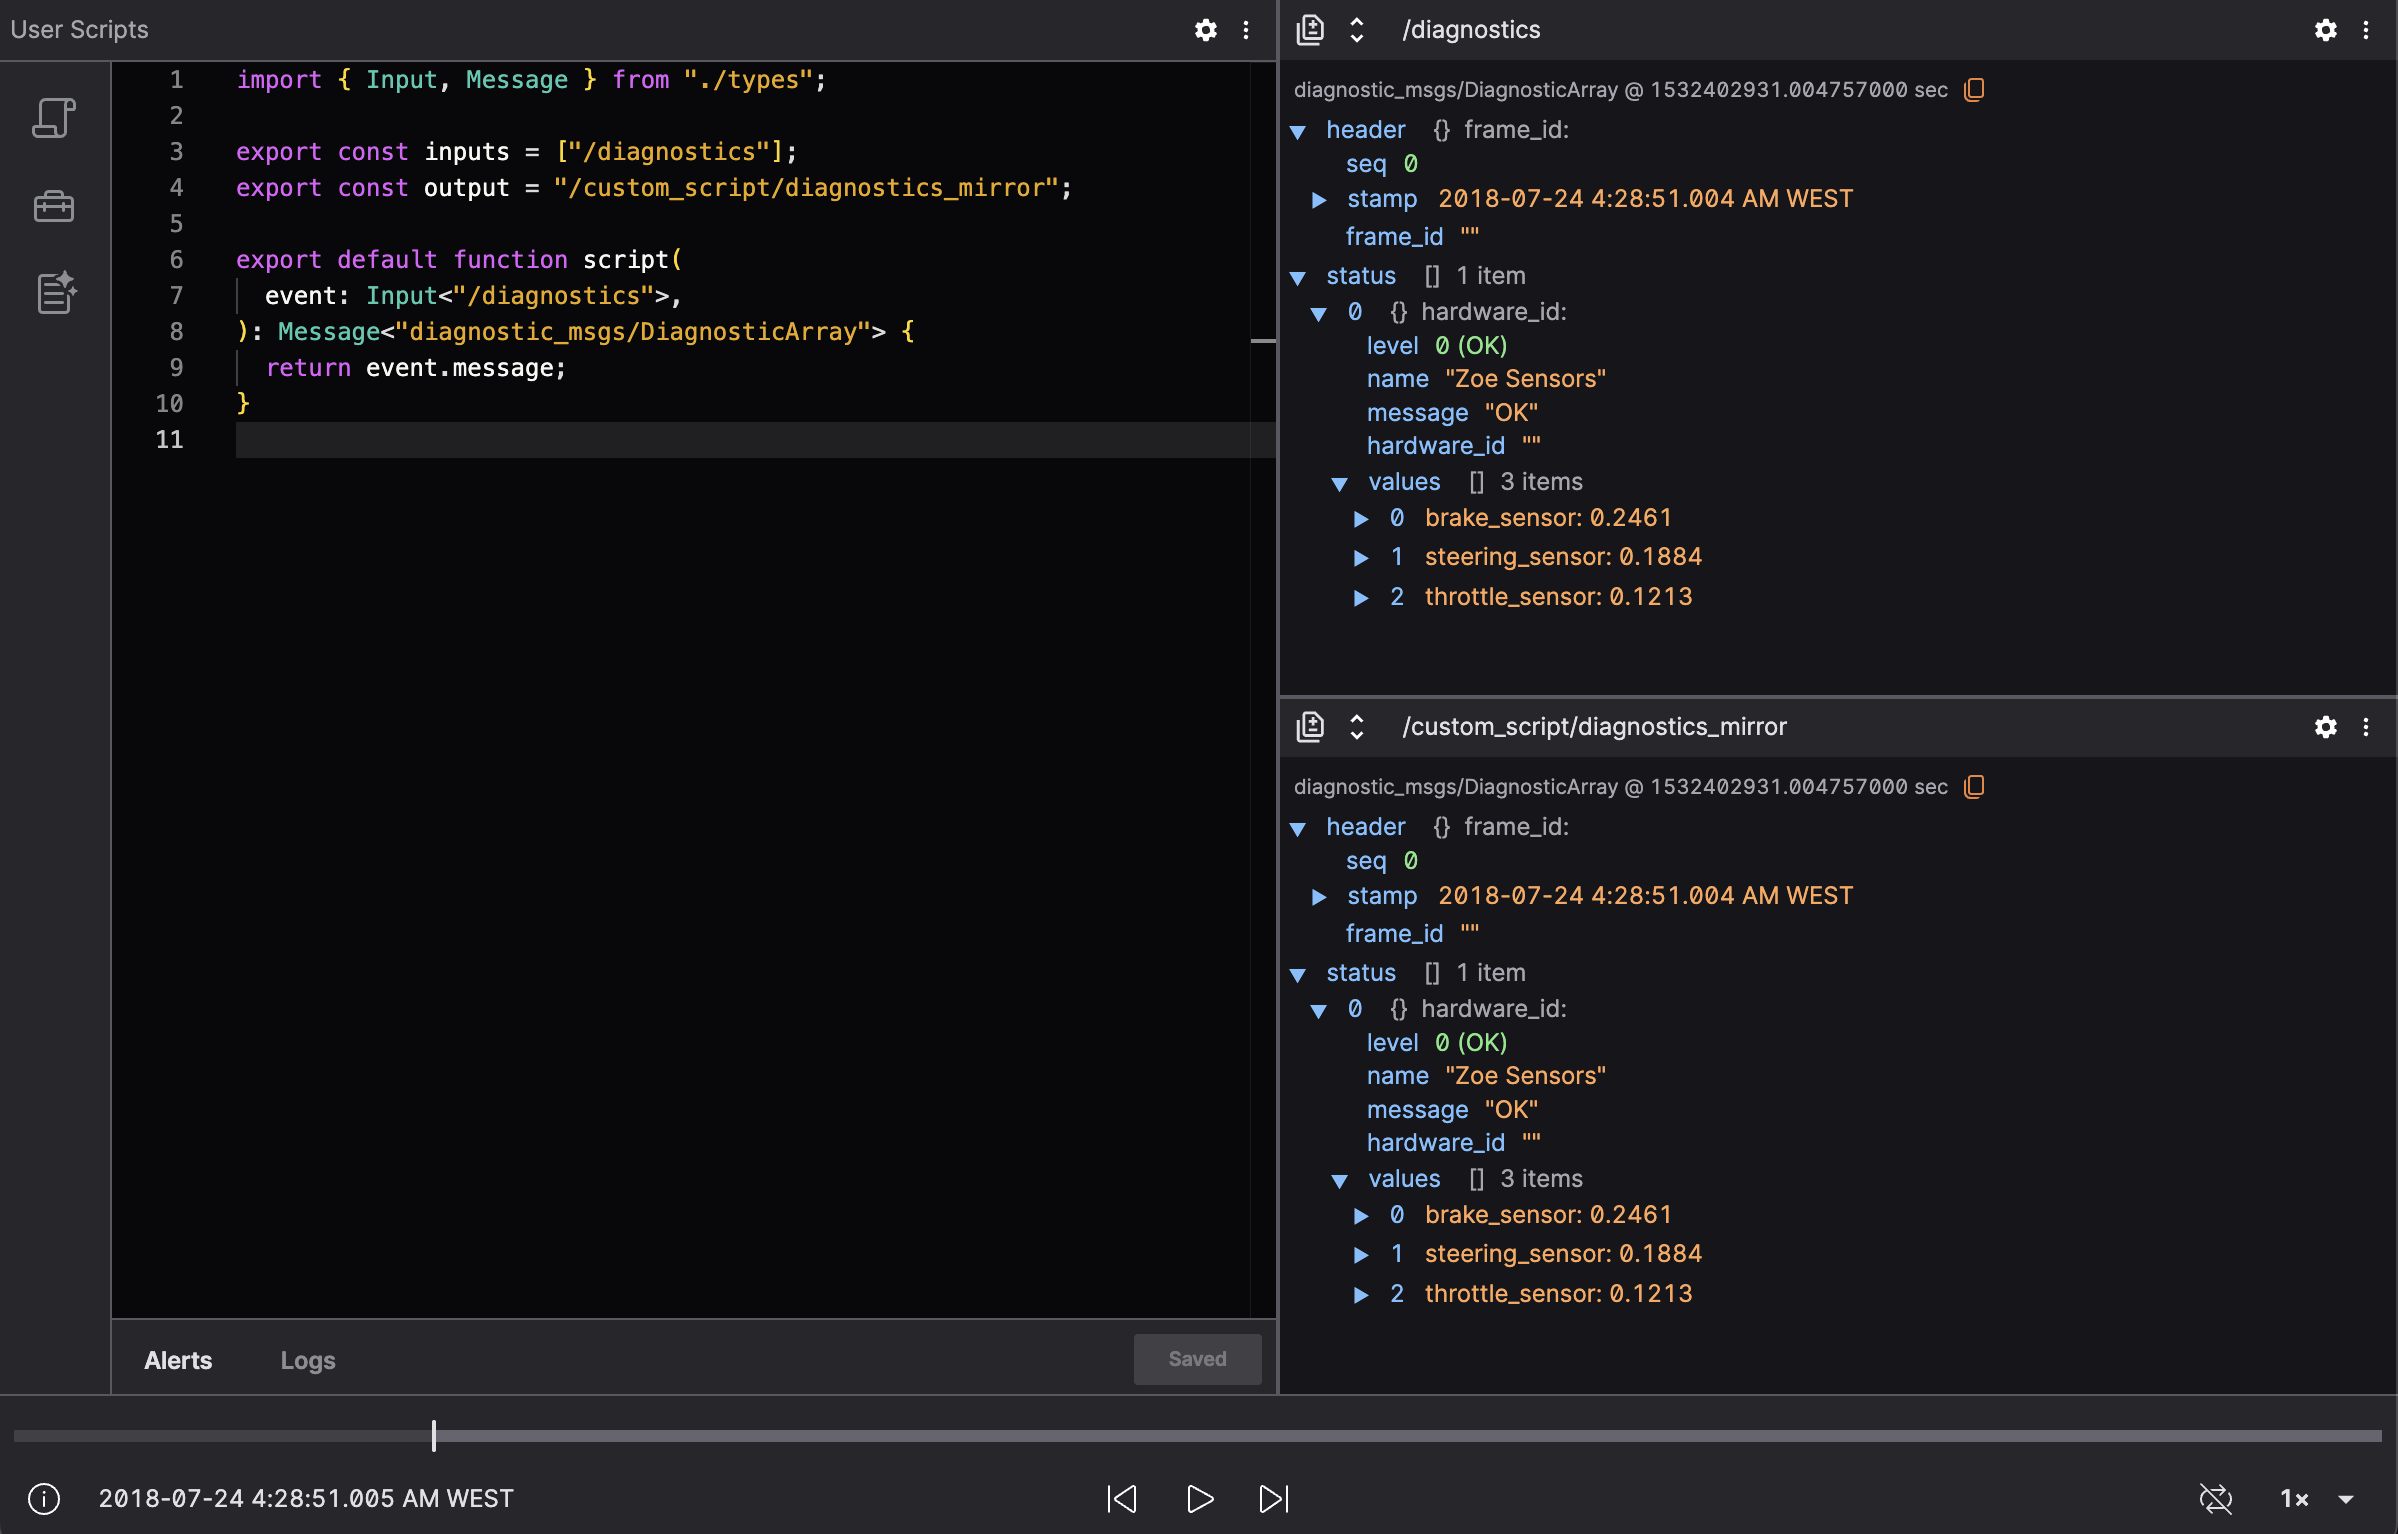
Creating Your First Transformation
Let’s say you want to highlight high-temperature readings from a sensor topic. Here's how you could write that:
import { Input } from "./types";

type Output = {
  timestamp: number;
  temperatureC: number;
  alert: boolean;
};

export const inputs = ["/sensors/temperature"];
export const output = "/custom_script/high_temp_alerts";

export default function script(
  event: Input<"/sensors/temperature">
): Output | undefined {
  const { temperatureC, timestamp } = event.message;

  if (temperatureC < 70) return; // Don't publish normal readings

  return {
    timestamp,
    temperatureC,
    alert: true,
  };
}
This script suppresses normal messages and only publishes when temperatures are 70°C or higher.
Using Multiple Input Topics
To combine data from different topics—say, GPS and IMU—you can use a union type:
import { Input, Message } from "./types";

export const inputs = ["/gps", "/imu"];
export const output = "/custom_script/combined_pose";

type UnionGPSandIMUOutput = {
  lat: number;
  lon: number;
  orientation: number[];
};

let latestGPS: Message<"foxglove.LocationFix"> | undefined;
let latestIMU: Message<"IMU"> | undefined;

export default function script(
  event: Input<"/gps"> | Input<"/imu">
): UnionGPSandIMUOutput | undefined {
  if (event.topic === "/gps") {
    latestGPS = event.message;
  } else {
    latestIMU = event.message;
  }

  if (!latestGPS || !latestIMU) return;

  return {
    lat: latestGPS.latitude,
    lon: latestGPS.longitude,
    orientation: [latestIMU.q.w, latestIMU.q.x, latestIMU.q.y, latestIMU.q.z],
  };
}
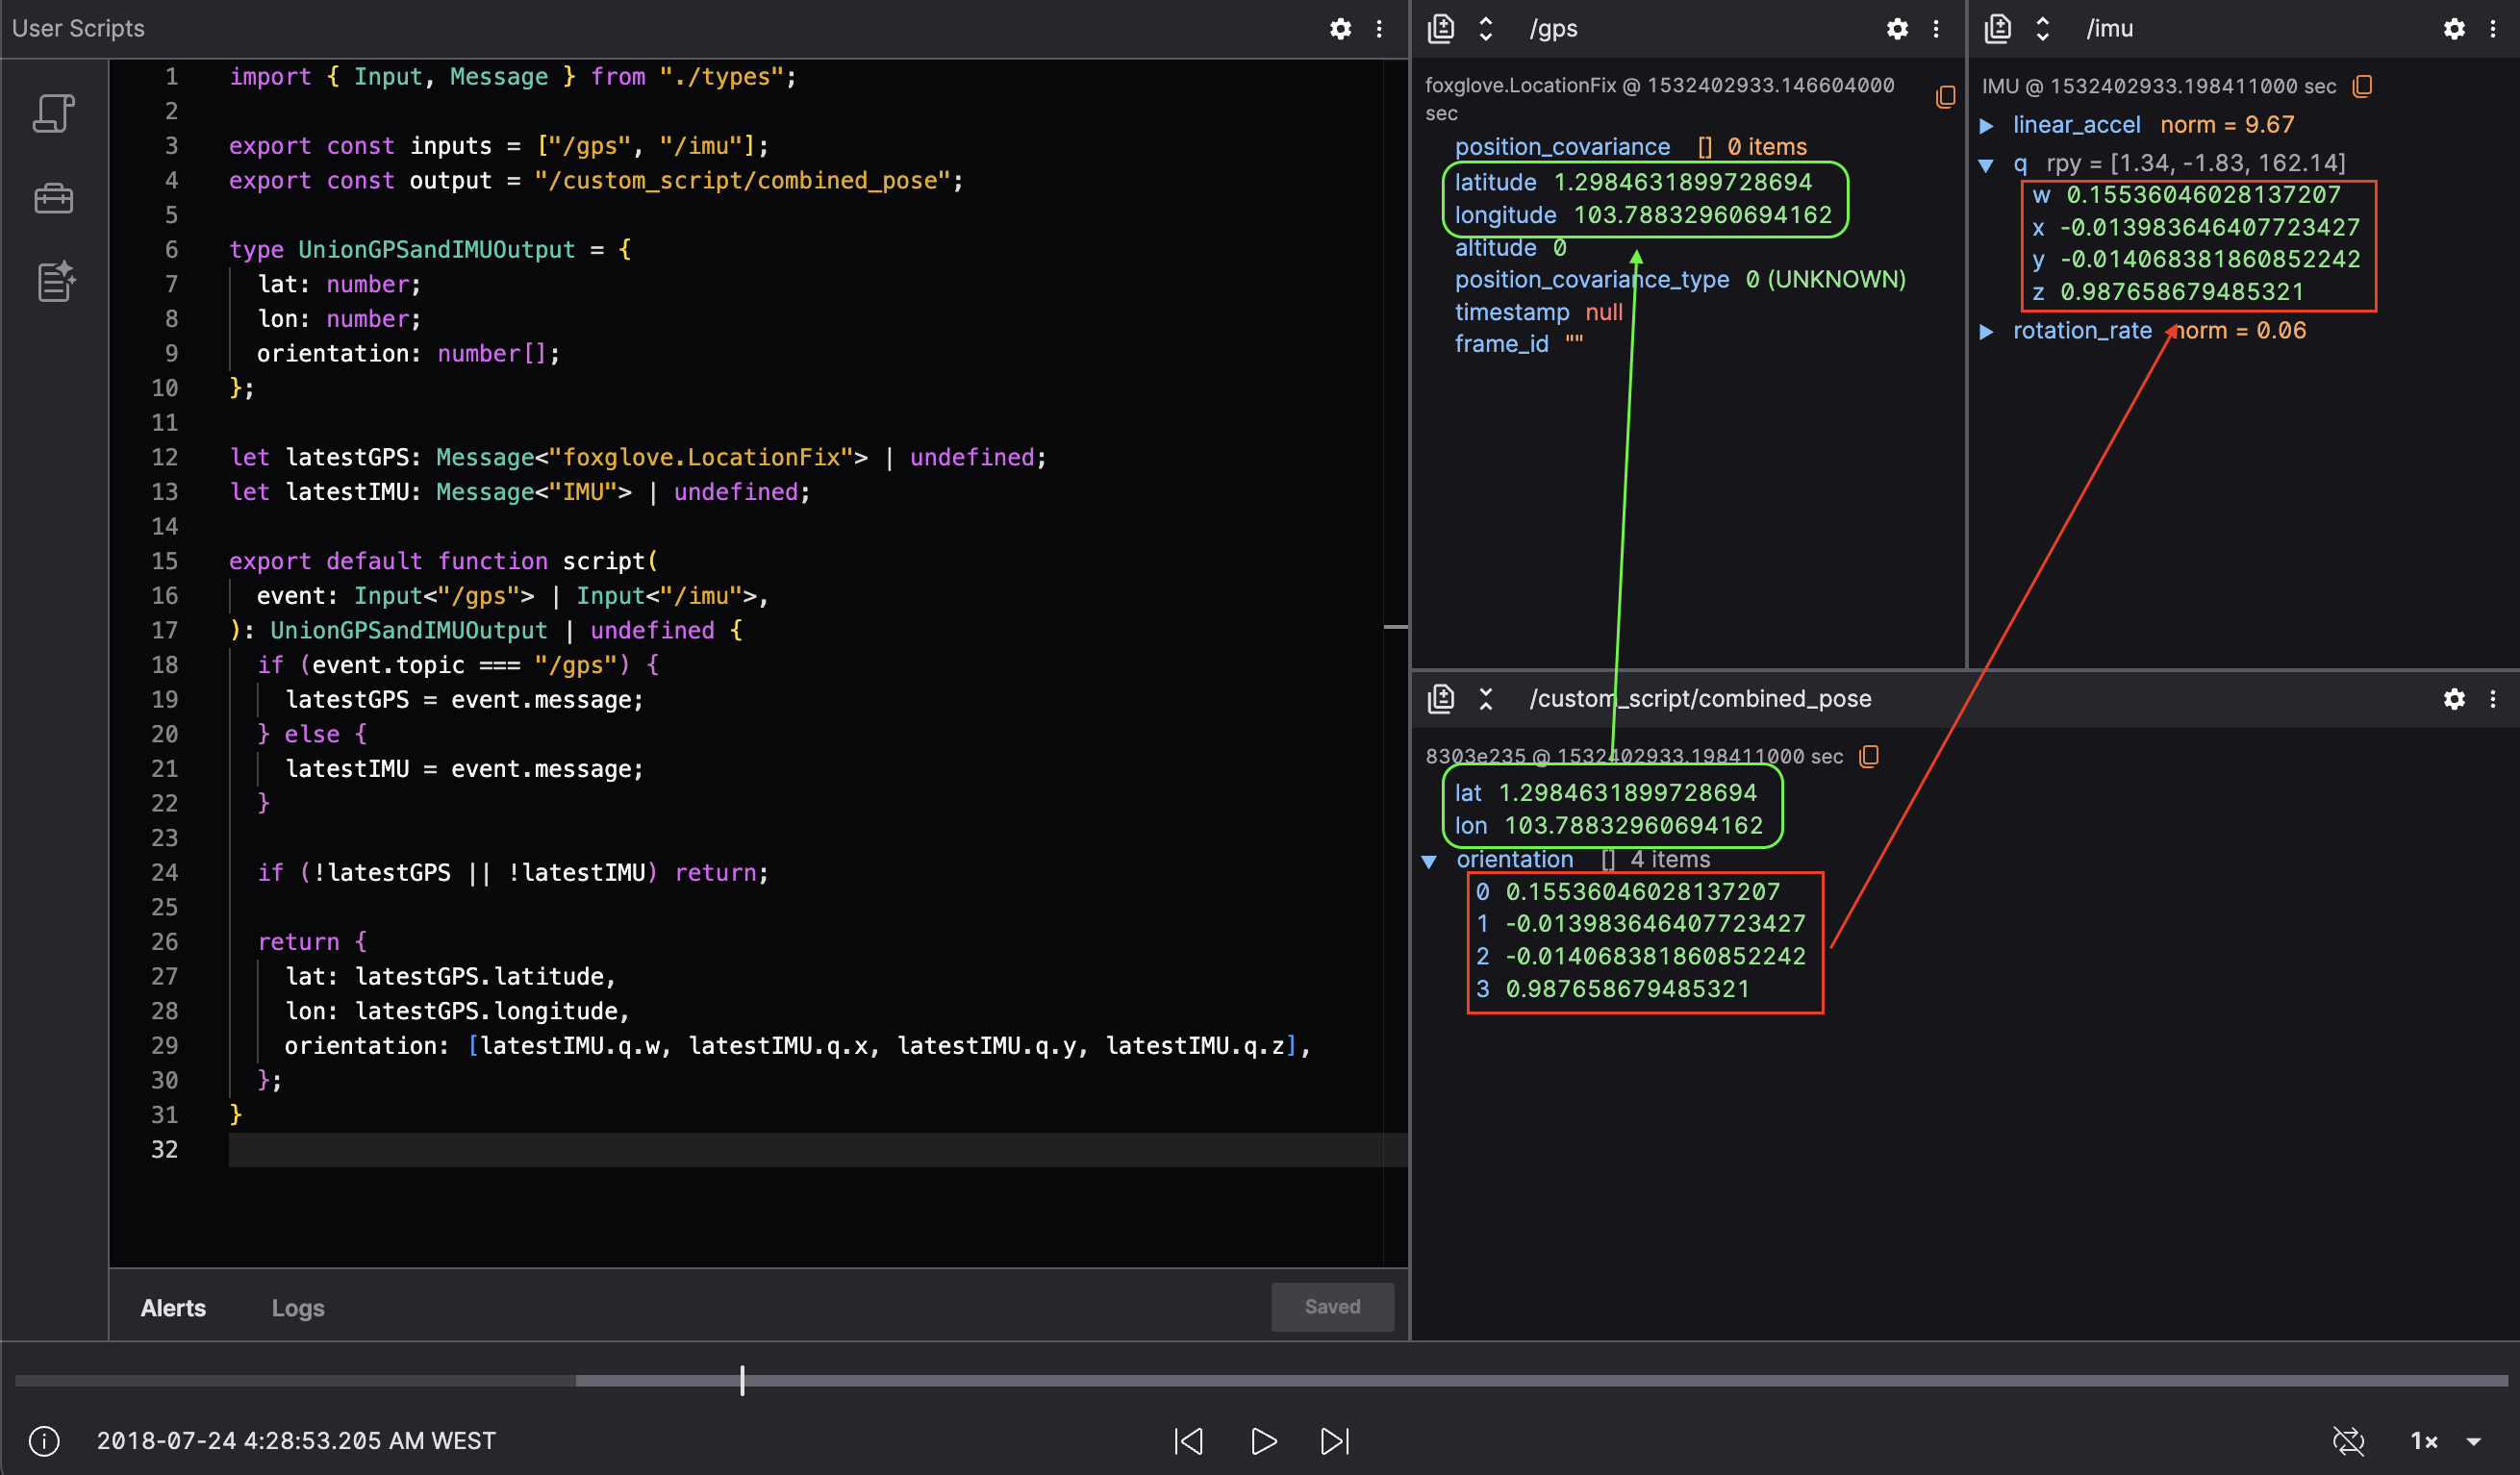
Type Safety and Message Types
User Scripts are written in TypeScript for type safety. This ensures that your script matches the structure of each message and catches schema mistakes early.
You can use known ROS message types by wrapping them in the Message<"type_name"> utility:
import { Input, Message } from "./types";

export default function script(
  event: Input<"/cmd_vel">
): Message<"geometry_msgs/Twist"> {
  return event.message;
}
If you're unsure of the message format, check the types.ts utility file in your script environment. This file is auto-generated and contains all known message types in your dataset.
Skipping Messages
You can simply return undefined when a message shouldn't be published. This is useful for filtering:
export default function script(
  event: Input<"/status">
): { error: boolean } | undefined {
  if (event.message.status !== "ERROR") return;

  return { error: true };
}
Logging for Debugging
Add log(...) calls in your script to inspect values during execution:
log(event.message.temperatureC, "Temperature received");

return {
  // your transformed output
};
Avoid logging functions or very frequent values in high-rate topics, as this can degrade performance.
Using Global Variables
Global variables can be used across invocations of your script, allowing you to create very dinamyc scripts. Those variables are placed as the second parameter of the script function and are read-only on user scripts.
import { Input, Message } from "./types";

export const inputs = ["/odom"];
export const output = "/custom_script/odom_z_global_variable";

type Output = {
  odom_accel_z: number;
  odom_accel_z_fixed: number;
};

type GlobalVariables = { multiplier: number };

export default function script(
  event: Input<"/odom">,
  globalVariables: GlobalVariables
): Output {
  const { accel } = event.message;
  const { multiplier } = globalVariables;
  return {
    odom_accel_z: accel.z,
    odom_accel_z_fixed: accel.z * multiplier,
  };
}
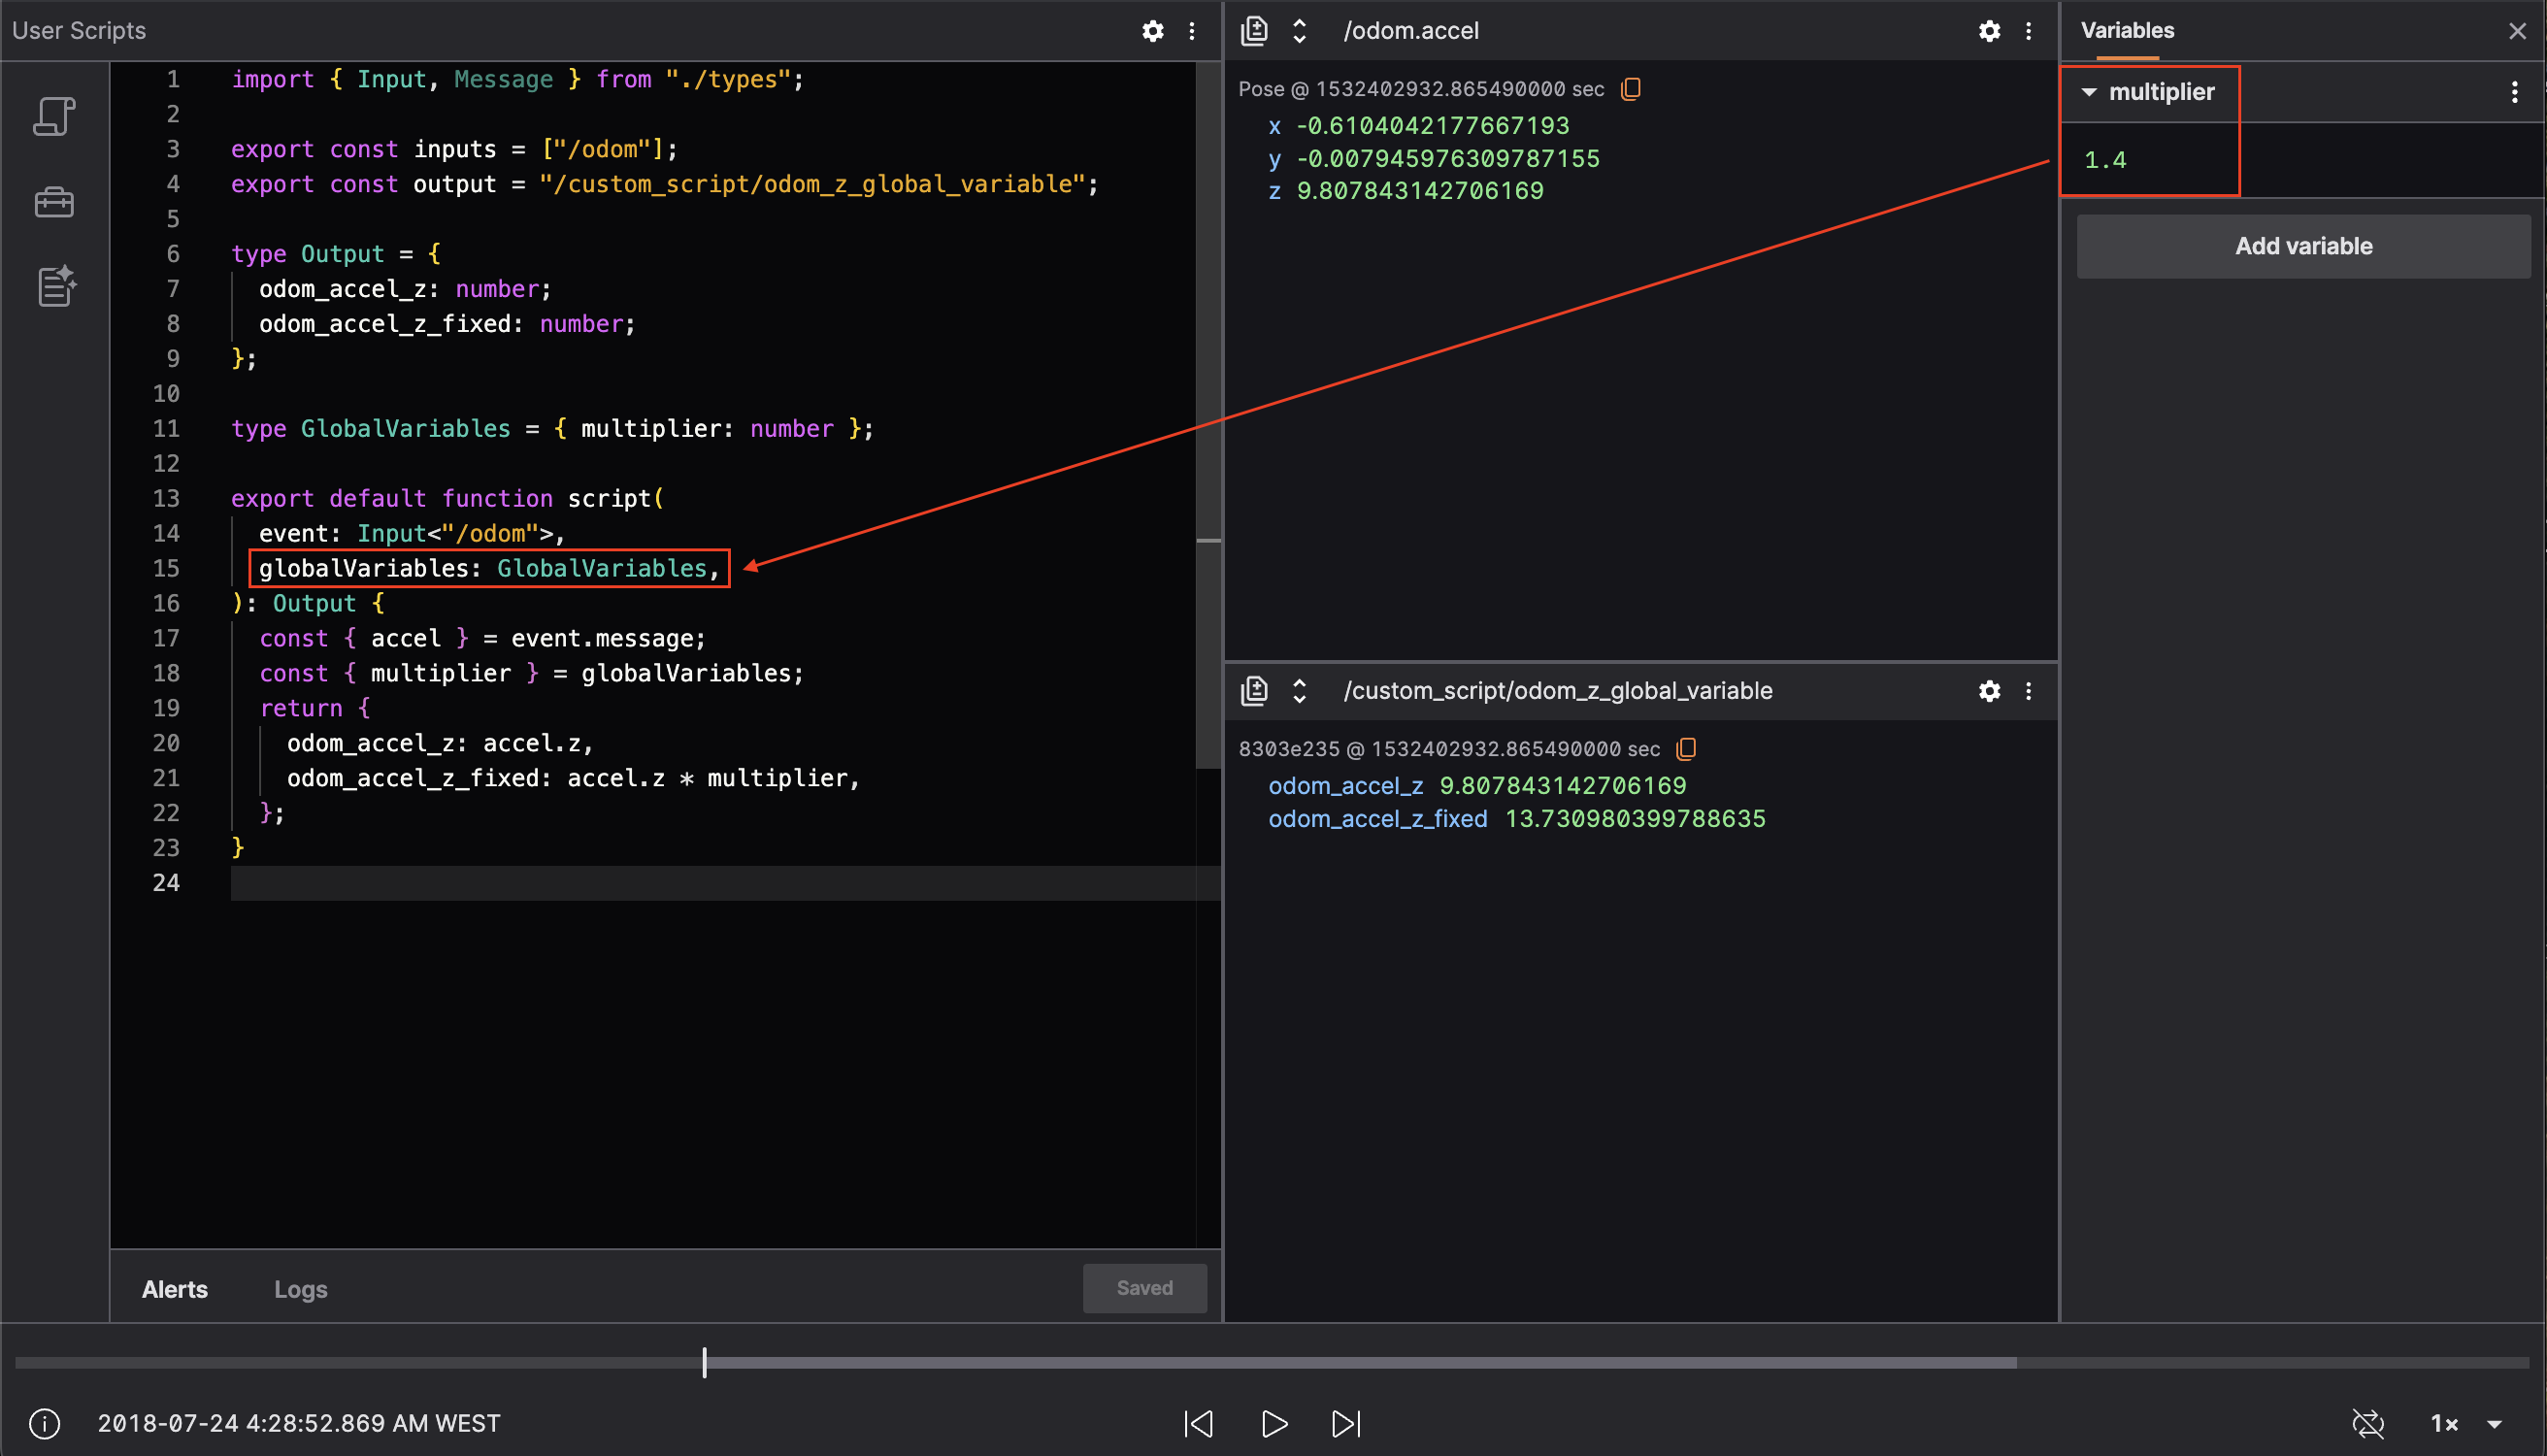
Using @foxglove/schemas Types
Lichtblick enables to use a library of known types that can be imported directly for structured output. While Lichtblick is still migrating its secondary dependencies, Foxglove schemas can be used as following:
import { Input } from "./types";
import { Color, Pose } from "@foxglove/schemas";

export default function script(event: Input<"/pose">): {
  pose: Pose;
  color: Color;
} {
  return {
    pose: event.message.pose,
    color: { r: 0, g: 1, b: 0, a: 1 },
  };
}
Useful Panels for Scripting
| Panel | Use case |
|---|---|
| Raw Messages | Inspect both input and script output messages in real time |
| Plot | Visualize numeric values over time |
| State Transitions | Track message states and derived transitions |
| 3D | Visualize position, orientation, and markers |
Teleoperation Panel
The Teleoperation Panel allows you to remotely control your robot by sending geometry_msgs/Twist or geometry_msgs/msg/Twist messages directly to your active ROS system.
Using the Teleoperation Panel:
To remotely maneuver your robot using the directional control interface, ensure you are actively connected via either a native ROS connection or through Rosbridge.
General Settings
- Message Frequency: Determines how frequently geometry_msgs/Twist or geometry_msgs/msg/Twist messages are published.
- ROS Topic: Specifies the ROS topic where geometry_msgs/Twist or geometry_msgs/msg/Twist messages will be published.
- Up Control: Choose the parameter (linear/angular: x, y, or z) and define the value sent when the Up arrow is activated.
- Down Control: Select the parameter (linear/angular: x, y, or z) and define the value sent when the Down arrow is pressed.
- Left Control: Assign the parameter (linear/angular: x, y, or z) and specify the value sent when pressing the Left arrow.
- Right Control: Set the parameter (linear/angular: x, y, or z) and input the value sent when activating the Right arrow.
Supported Message Types:
Ensure your connection provides messages matching one of these compatible message types to utilize this panel effectively.
Variables
Variables in Lichtblick allow users to define global values that can be reused across multiple panels within a layout. This feature simplifies updates and ensures consistency throughout your workspace. Variables can store primitive data types such as strings, numbers, or booleans. They can also be structured as arrays (e.g., ["x", 2, false]) or maps (e.g., { "x": 2, "y": false }).
To manage variables, access the Variables tab in the sidebar, where you can view, add, and modify them.
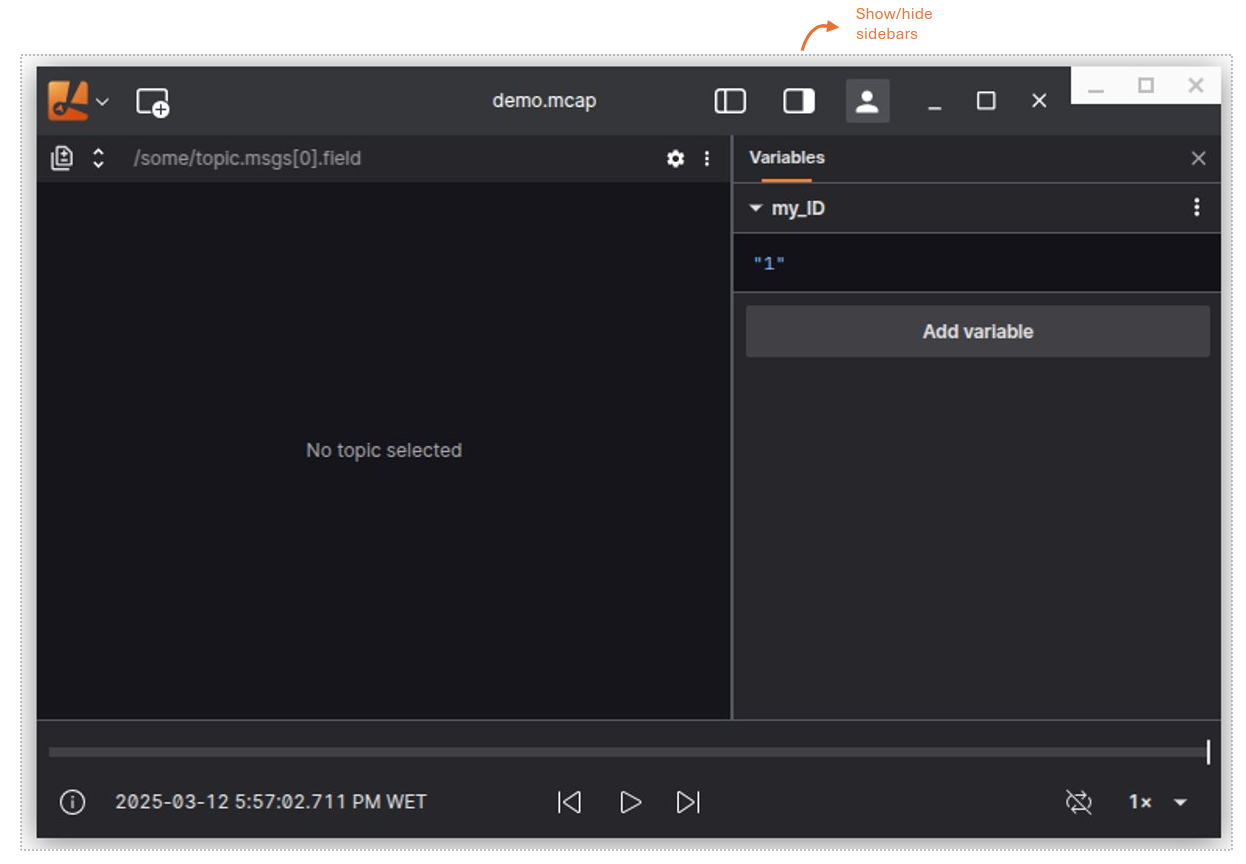
Using Variables
Variables are referenced using the $ prefix. For example, a variable named my_global_var is accessed as $my_global_var.
In Message Paths
Panels that support message path syntax—such as Raw Messages, Indicator, Plot, and State Transitions—can leverage variables to dynamically filter or slice data. This enables flexible and interactive data visualization.
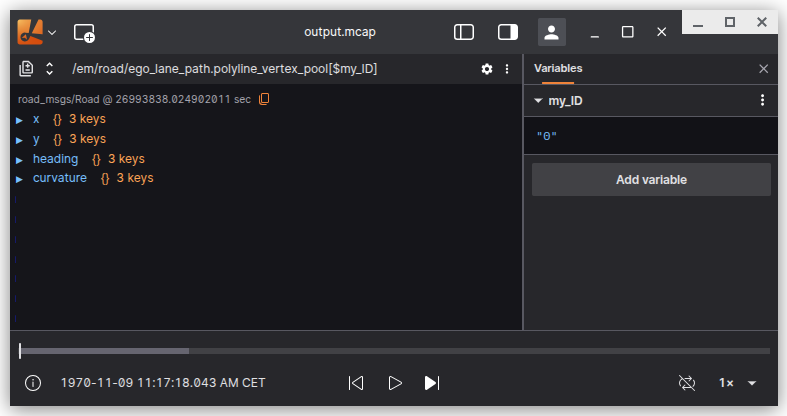
Example Workflow:
- Create a variable named
my_IDin the Variables tab and set its value to101. - In a Raw Messages panel, use the path
/my_objects.objects[:]{id==$my_ID}to inspect the object withid == 101. - In a Plot panel, add
/my_objects.objects[:]{id==$my_ID}.velocityas the y-axis value to plot the velocity of the selected object.
In User Scripts
User scripts can reference variables but cannot modify them. When a script is executed, it receives all variables as an object, allowing for dynamic data processing.
Accessing and Modifying Variables in Extensions
Custom extension panels can interact with variables in two ways:
-
Accessing Variables:
Extensions can access variables using the extension API RenderState. This allows panels to seamlessly integrate with user-defined values, enabling dynamic and context-aware visualizations. -
Modifying Variables:
Extensions can also create and modify variables programmatically using the extension API PanelExtensionContext. This capability is useful for updating variables based on user interactions or data processing within the extension.
For example, a custom panel could update a variable to reflect the current state of a simulation or user input, ensuring that the layout remains responsive and interactive.
Updating Variables
Variables can be updated in two ways:
- Manually: Edit variable values directly in the Variables tab.
- Dynamically: Use interactive elements in the 3D panel or Variable Slider panel to adjust variable values in real time.
Keyboard Shortcuts
- Press
]to toggle the visibility of the right sidebar. - Use input +
↑to increment numeric variable values. - Use input +
↓to decrement numeric variable values.
By utilizing variables, you can create dynamic and interactive layouts in Lichtblick, streamlining your workflow and enhancing data analysis capabilities.
Extensions
Lichtblick’s extensibility allows you to tailor the platform to your team’s unique workflows. By developing custom extensions, you can create specialized panels, convert custom message schemas into Lichtblick-supported formats, and alias topic names for seamless integration and visualization.
Once your extension is built and installed, you can manage it through the app settings, where all available and installed extensions are listed.
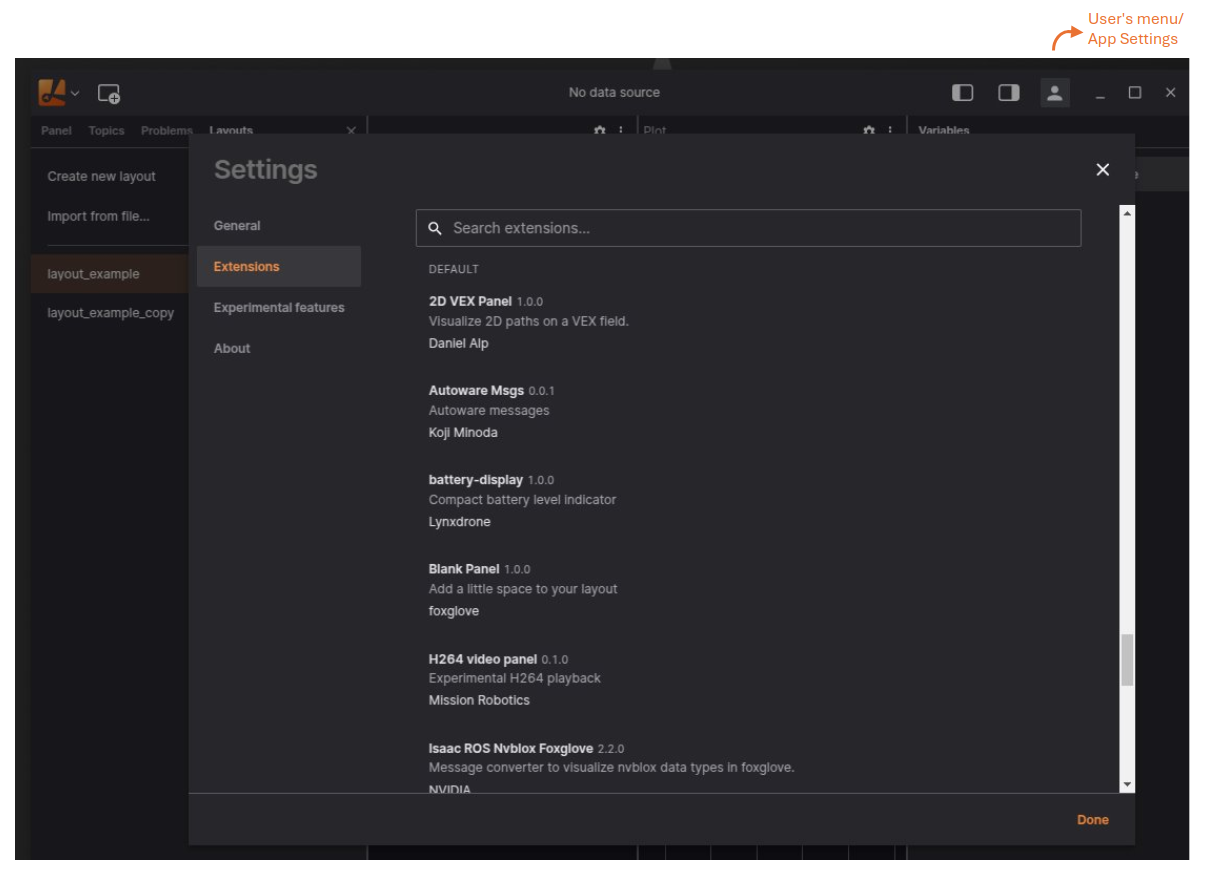
Custom Panels
While Lichtblick offers a robust set of built-in panels for robotics data visualization and debugging, custom panel extensions enable you to create domain-specific solutions tailored to your needs. These panels can:
- Subscribe to messages from various topics.
- Publish data.
- Display information in a way that aligns with your workflow.
Custom panels are ideal when your visualization or interaction requirements go beyond the capabilities of the built-in panels.
Example: Custom Panel
export function activate(extensionContext: ExtensionContext) {
  // Register a new panel
  extensionContext.registerPanel({
    name: "example-panel",
    initPanel: initExamplePanel,
  });
}
Custom Camera Models
Custom camera model extensions enable support for specialized lens distortion or projection models beyond Lichtblick’s built-in camera model. By registering a custom camera model, you can ensure that camera images with unique distortion (e.g. fisheye or other wide-angle lenses) are interpreted correctly in Lichtblick’s Image panel. This allows the Images panel to accurately render images using your custom projection logic, just as it does for the standard pinhole camera model.
Example: Custom Camera Model
import { CylinderCameraModel } from "./CylinderCameraModel";
import { ExtendedExtensionContext, CameraInfo } from "./lichtblick-suite.types";

export function activate(extensionContext: ExtensionContext): void {
  extensionContext.registerCameraModel({
    name: "CylinderCameraModel",
    modelBuilder: (cameraInfo: CameraInfo) => new CylinderCameraModel(cameraInfo),
  });
}
You can find out more details about Custom Camera Models and its usage on this page: Custom Camera Models
Message Converters
Message converter extensions allow you to transform messages from one schema to another, making them compatible with Lichtblick’s built-in visualization tools. For example, you can convert custom GPS messages into lichtblick.LocationFix messages for visualization in the Map panel.
Note: Message converters run on-demand when a panel subscribes to a topic.
Example: Message Converter
export function activate(extensionContext: ExtensionContext) {
  // Register a new message converter
  extensionContext.registerMessageConverter({
    fromSchemaName: "sensors.MyGps",
    toSchemaName: "lichtblick.LocationFix",
    converter: (inputMessage) => {
      // Logic to convert sensors.MyGps messages into lichtblick.LocationFix messages
    },
  });
}
Topic Aliases
Topic alias extensions enable you to rename topics in your data source to new names. Lichtblick panels can subscribe to both the original and aliased topics, providing flexibility in how you organize and visualize your data.
Example: Topic Aliases
The registerTopicAliases function maps original topics to new names based on the current layout’s global variables. It automatically re-executes when the data source’s topics or global variables change.
import { ExtensionContext } from "@lichtblick/extension";

export function activate(extensionContext: ExtensionContext): void {
  // Register a topic alias function
  extensionContext.registerTopicAliases((args) => {
    const { globalVariables } = args;
    // Use the current value of the `camera` global variable
    const camera = globalVariables["camera"] ?? "FRONT";
    return [
      {
        sourceTopicName: `/CAM_${camera}/image_rect_compressed`,
        name: `/selected_camera_image`,
      },
      { sourceTopicName: "/imu", name: "/aliased_imu" },
      { sourceTopicName: "/odom", name: "/aliased_odom" },
    ];
  });
}
Writing an Extension
Extensions can be developed in JavaScript or TypeScript and packaged as .foxe files. These files can be shared privately within your organization or distributed publicly via the Lichtblick extension registry. The desktop app supports installing extensions directly from the registry. A single extension can include multiple panels, converters, or aliases.
Lichtblick provides starter templates and commands in the create-lichtblick-extension package to simplify the development process.
Requirements:
- Node.js 14+
To set up an extension project, follow the instruction from the GitHub repository.
By leveraging Lichtblick’s extensibility, you can create powerful, customized solutions that enhance your team’s productivity and data visualization capabilities.
Settings API
The Panel Settings API allows users to link settings to message converters based on panel types.
PanelSettings Interface
The PanelSettings<ExtensionSettings> interface defines the structure for managing custom settings associated with message converters and panels. It allows users to define settings that can be dynamically applied to specific topics or schemas, enabling flexible configuration of message processing behavior.
Generic Type Parameter
ExtensionSettings: Represents the type of the custom settings object. This is user-defined and should match the structure of the settings you want to configure.
Properties
settings
settings: (config?: ExtensionSettings) => SettingsTreeNode;
-
Purpose: Defines how the settings should be rendered in the settings UI.
-
Parameters:
config: An optional object containing the current configuration values. Its type is inferred from thedefaultConfigproperty.
-
Returns: A
SettingsTreeNodethat describes the structure of the settings UI. This node will be merged with the settings tree for the associated topic (under the path["topics", "__topic_name__"]). -
Example:
settings: (config) => ({
  fields: {
    threshold: {
      input: "number",
      value: config?.threshold,
      label: "Threshold Value",
    },
  },
}),
handler
handler: (action: SettingsTreeAction, config?: ExtensionSettings) => void;
-
Purpose: Handles changes to the settings made by the user in the UI.
-
Parameters:
action: ASettingsTreeActionobject describing the user's action (e.g., updating a field).config: A mutable object representing the current configuration. Modifying this object updates the state.
-
Behavior:
- This function is called after the default settings handler.
- It allows you to validate or transform the settings before they are applied.
-
Example:
handler: (action, config) => {
  if (action.action === "update" && action.payload.path[1] === "threshold") {
    // Ensure threshold is within valid range
    config.threshold = Math.max(0, Math.min(1, action.payload.value));
  }
},
defaultConfig
defaultConfig?: ExtensionSettings;
-
Purpose: Provides default values for the settings. These values are used when no configuration is explicitly set.
-
Type: Must match the
ExtensionSettingstype. -
Example:
defaultConfig: {
  threshold: 0.5,
  enableFeature: true,
},
Expected Behavior
When implementing this interface:
- Settings UI: The
settingsfunction defines how the settings are displayed in the UI. It creates a settings tree node that is merged into the topic's settings. - Configuration Management: The
handlerfunction processes user interactions with the settings UI, allowing you to validate or transform the configuration. - Defaults: The
defaultConfigprovides initial values for the settings, ensuring the panel or converter has a valid configuration even if the user hasn't customized it.
Possible Outcomes
-
Dynamic Settings UI:
- The
settingsdefined in the settings function will appear in the UI under the associated topic. - Users can modify these settings, and changes will be handled by the
handlerfunction.
- The
-
Custom Configuration:
- The
handlerfunction allows you to enforce constraints or transform values before they are applied. - For example, you can ensure a threshold value stays within a valid range.
- The
-
Default Behavior:
- If no custom configuration is provided, the
defaultConfigvalues are used. - This ensures the panel or converter works out of the box without requiring user input.
- If no custom configuration is provided, the
Example Implementation:
type Schema1Schema = {
  value: number;
}

type Schema2Schema = {
  value: number;
}

// Define the configuration type
type Config = { threshold: number };

// Helper function to cast PanelSettings to the correct type
const generatePanelSettings = <T>(obj: PanelSettings<T>) =>
  obj as PanelSettings<unknown>;

export function activate(extensionContext: ExtensionContext): void {

  // Register the message converter
  extensionContext.registerMessageConverter({
    fromSchemaName: "schema1",
    toSchemaName: "schema2",

    converter: (msg: Schema1Schema, event): Schema2Schema | undefined => {

      // Access the threshold setting for the current topic
      const config = event.topicConfig as Config | undefined;
      const threshold = config?.threshold;

      // Filter messages based on the threshold
      if (threshold && msg.value > threshold) {
        return { value: msg.value }; // Forward the message if it exceeds the threshold
      }

      return undefined; // Ignore the message if it doesn't meet the threshold
    },
    // Define the settings for the threshold
    panelSettings: {
      ThresholdPanel: generatePanelSettings({
        settings: (config) => ({
          fields: {
            threshold: {
              label: "Threshold Value",
              input: "number",
              value: config?.threshold,
              placeholder: "Enter a threshold value",
            },
          },
        }),

        handler: (action, config) => {
          if (config == undefined) {
            return;
          }

          // Update the threshold setting when the user changes it in the UI
          if (
            action.action === "update" &&
            action.payload.path[2] === "threshold"
          ) {
            config.threshold = action.payload.value as number;
          }
        },
        defaultConfig: {
          threshold: 0.5, // Default threshold value
        },
      }),
    },
  });
}
Use Case
This interface is typically used when registering a message converter:
extensionContext.registerMessageConverter({
  fromSchemaName: "schema1",
  toSchemaName: "schema2",

  converter: (msg: Schema1Schema, event): Schema2Schema | undefined => {

      // Access the threshold setting for the current topic
      const config = event.topicConfig as Config | undefined;
      const threshold = config?.threshold;

      // Filter messages based on the threshold
      if (msg.value > threshold) {
        return { value: msg.value }; // Forward the message if it exceeds the threshold
      }

      return undefined; // Ignore the message if it doesn't meet the threshold
},
Summary
The PanelSettings<ExtensionSettings> interface provides a structured way to:
- Define custom settings for panels or message converters.
- Render these settings in the UI.
- Handle user interactions with the settings.
- Provide default values for the settings.
By implementing this interface, you enable users to configure their panel or converter dynamically, making it more flexible and adaptable to different use cases.
Custom Camera Models
Custom camera model extensions enable support for specialized lens distortion or projection models beyond Lichtblick’s built-in camera model. By registering a custom camera model, you can ensure that camera images with unique distortion (e.g. fisheye or other wide-angle lenses) are interpreted correctly in Lichtblick’s Image panel. This allows the Images panel to accurately render images using your custom projection logic, just as it does for the standard pinhole camera model.
To register a custom camera model, use the extensionContext.registerCameraModel API in your extension’s activate function. This function ties a distortion model name (string) to a CameraModelBuilder – a function that takes a CameraInfo object (containing the camera’s calibration parameters like intrinsics and distortion coefficients) and returns an implementation of your camera model. The CameraInfo type represents the incoming calibration message (similar to ROS CameraInfo with fields such as K, D, etc.), and your CameraModelBuilder should use this data to construct a model with the necessary projection/unprojection logic. Once registered, Lichtblick will automatically use your model whenever it encounters a CameraInfo whose distortion_model matches the name you provided.
Note: Distortion model name matching is case-sensitive. Ensure that the distortion_model string in your incoming CameraInfo messages exactly matches the name you register. The Images panel will seamlessly switch to your custom model for any camera stream with that distortion model, without additional user configuration.
Example: To create a custom camera model, first implement a class that encapsulates your distortion model (for example, a CylinderCameraModel class implementing the necessary camera projection interface). Then, in your extension’s entry point (the activate function), register the new camera model using the extensionContext.registerCameraModel.
For example, the code below registers a camera model named "CylinderCameraModel" and supplies a builder function that instantiates a CylinderCameraModel with the provided calibration data:
import { ExtensionContext, CameraInfo } from "@lichtblick/suite";
import { CylinderCameraModel } from "./CylinderCameraModel";

export function activate(extensionContext: ExtensionContext): void {
  extensionContext.registerCameraModel({
    name: "CylinderCameraModel",
    modelBuilder: (cameraInfo: CameraInfo) =>
      new CylinderCameraModel(cameraInfo),
  });
}
In the code above, the string "CylinderCameraModel" is the unique name of your distortion model. This name should exactly match the distortion_model field in any camera calibration messages (camera info) that you want to be handled by your custom model. When Lichtblick encounters a camera calibration with distortion_model: "CylinderCameraModel", it will call the provided builder function to create an instance of your CylinderCameraModel class for processing that camera’s data.
Testing a Custom Camera Model in the User Scripts Panel
After registering your custom camera model, you can quickly test it using the User Scripts panel. A user script can intercept an existing camera calibration message, alter its distortion_model to your custom model’s name, and publish the modified message on a new topic. This allows you to feed an image through your custom distortion model and verify its behavior in real time.
For example, suppose you have a camera info topic /CAM_FRONT/camera_info from a front camera. You can create a user script to output a new camera info on /camera_info_custom with the same calibration data but the distortion_model set to "CylinderCameraModel". An image panel subscribed to the new calibration topic (and the corresponding image topic) will then apply your custom distortion logic. Below is a sample user script that accomplishes this:
Note: Ensure that the /camera_info_custom (output) topic is not already in use to avoid conflicts.
import { Input } from "./types";
import { CameraCalibration } from "@foxglove/schemas";

export const DISTORTION_MODEL = "CylinderCameraModel";

export const inputs = ["/CAM_FRONT/camera_info"];
export const output = "/camera_info_custom";

export default function script(
  event: Input<"/CAM_FRONT/camera_info">
): CameraCalibration {
  return {
    ...event.message,
    distortion_model: DISTORTION_MODEL,
  };
}
In this script, we listen to the original camera info message on /CAM_FRONT/camera_info, copy its contents, and override the distortion_model field to "CylinderCameraModel". The modified camera calibration is emitted on the /camera_info_custom topic. By opening the User Scripts panel in Lichtblick and running this script, you can then point an Image panel to use the /camera_info_custom calibration (along with the camera’s image topic). This setup will route the camera’s data through your custom distortion model, allowing you to verify that your CylinderCameraModel is functioning correctly in the visualization.
Message Path Syntax
In Lichtblick, message path syntax is utilized to precisely access specific data within your messages.
Topics and Fields
Consider a message published on the /my_models topic:
{
  "total": 4,
  "objects": [
    { "width": 10, "height": 20 },
    { "width": 15, "height": 30 },
    { "width": 20, "height": 40 },
    { "width": 25, "height": 50 }
  ]
}
To display all messages for this topic, simply use the topic name:
/my_models =>
{
  total: 4,
  objects: [
    { width: 10, height: 20 },
    { width: 15, height: 30 },
    { width: 20, height: 40 },
    { width: 25, height: 50 }
  ]
}
To access nested fields, append the field name using dot notation:
/my_models.total => 4
When typing in a message path input field, a list of matching autocomplete options will appear, including any topics or nested fields that contain the input text.
Indexing into an Array
To access specific elements within an array, use bracket notation with the desired index:
/my_models.objects[1].width => 15
/my_models.objects[-1].width => 25
Slices
Consider a message on the /my_options topic:
{
  "colors": [
    { "r": 10, "g": 20, "b": 100 },
    { "r": 15, "g": 30, "b": 50 },
    { "r": 20, "g": 40, "b": 20 },
    { "r": 25, "g": 50, "b": 70 },
    { "r": 30, "g": 60, "b": 90 }
  ],
  "numbers": [3, 5, 7, 9, 10]
}
Slices allow you to retrieve a subset of values:
/my_options.colors[1:3] => [{ r: 15, g: 30, b: 50 }, { r: 20, g: 40, b: 20 }]
/my_options.numbers[-2:] => [9, 10]
When using dot notation after an array of objects, you can retrieve a specific field across all elements:
/my_options.colors[1:3].r => [15, 20, 25]
/my_options.colors[:].g => [20, 30, 40, 50, 60]
Using Variables in Slices
To slice based on variables, prefix the variable name with $. For example, defining start as 3 and end as 5:
/my_options.colors[$start:$end] => [{ r: 25, g: 50, b: 70 }, { r: 30, g: 60, b: 90 }]
/my_options.colors[$start:$end].b => [70, 90]
/my_options.numbers[$start:$end] => [9, 10]
Filters
Consider messages on the /my_books topic:
Message 1:
{
  "stats": {
    "pages": 100,
    "author": "Beatrice Potter"
  },
  "readers": [
    { "id": 1, "name": "John", "currentlyReading": true },
    { "id": 2, "name": "Mary", "currentlyReading": false },
    { "id": 3, "name": "Scott", "currentlyReading": true }
  ]
}
Message 2:
{
  "stats": {
    "pages": 210,
    "author": "Tommy \"Two Gun\" Simon"
  },
  "readers": [
    { "id": 4, "name": "Anna", "currentlyReading": true },
    { "id": 5, "name": "Patrick", "currentlyReading": false },
    { "id": 6, "name": "Richard", "currentlyReading": false }
  ]
}
To filter messages based on field values (booleans, numbers, or strings), use comparison operators like ==, !=, <, <=, >, and >=.
Apply filters within curly braces {} to select only matching messages:
/my_books{stats.pages>200} =>
{
  stats: {
    pages: 210,
    author: "Tommy \"Two Gun\" Simon"
  }
}
Filtering on Nested Fields
To filter messages using nested fields:
/my_books{stats.pages>200} =>
{
  stats: {
    pages: 210,
    author: "Tommy \"Two Gun\" Simon"
  }
}
Using Variables to Filter
Filters can be dynamic using variables. If minPages is set to 150:
/my_books{stats.pages>$minPages} =>
{
  stats: {
    pages: 210,
    author: "Tommy \"Two Gun\" Simon"
  }
}
Using Multiple Filters
You can apply multiple conditions at once:
/my_books.readers[:]{id==1}{isCurrentlyReading==true}.name =>
  "John" // message 1
  // No value returned for message 2

/my_books.readers[:]{id==1}{isCurrentlyReading==false}.name =>
  // No value returned for message 1
  // No value returned for message 2

/my_books.readers[:]{id==5}{isCurrentlyReading==false}.name =>
  // No value returned for message 1
  "Patrick" // message 2
Other Considerations
- If a filter references a field that does not exist, the message is ignored.
- Filters can be used to refine queries dynamically, improving data handling efficiency.
- Brackets
[ ]are used to reference specific elements in arrays while{ }applies conditions on message selection. - Quotation marks in strings are not escaped, but you can use either single or double quotes to represent most values:
/my_books{stats.author=='Tommy "Two Gun" Simon'}.readers[:].name =>
  // No value returned for message 1
  ["Dana", "Ethan", "Frank"] // message 2
- Variables are restricted to slicing and filtering within message paths and cannot be used elsewhere.
Open via CLI
Easily open local files using the command line by installing the Lichtblick desktop application. This allows you to quickly access .mcap files without manually navigating through the interface.
Local Files
Once the desktop application is installed, Lichtblick will automatically be set as the default handler for .mcap files. You can open files directly from the command line based on your operating system:
lichtblick /path/to/your/file.mcap

# Open multiple .mcap files simultaneously
lichtblick /path/to/your/file1.mcap /path/to/your/file2.mcap

# Open all .mcap files from a specific directory
lichtblick /path/to/your/files/*.mcap
Flags and Parameters
Lichtblick supports several command-line parameters to streamline your workflow by preloading specific configurations, eliminating the need for manual adjustments.
-
--defaultLayout: Loads a predefined layout upon opening Lichtblick. This does not upload or modify the layout—only selects an existing one.lichtblick --defaultLayout="my-custom-layout" -
--source: Opens one or multiple .mcap files, or an entire directory, directly upon launch.lichtblick --source="path/to/your/file.mcap" # For multiple mcaps lichtblick --source="path/to/your/file1.mcap,path/to/your/file2.mcap" # For a directory lichtblick --source="path/to/your/files/" -
--time: Opens Lichtblick player at a specific timestamp.# Specify the time as a UNIX timestamp (in seconds) lichtblick --time=1633046400 # Interpreted as 2021-10-01 12:00:00 AM UTC # Specify the time using a string format lichtblick --time="2024-12-02 11:45" lichtblick --time="2020-04-07 04:45:21 PM" lichtblick --time="2020-04-07 04:45:21 PM CET" # Lichtblick will attempt to convert this to the timezone used in the MCAP file -
--force-multiple-windows: Forces Lichtblick to open a new window instance while bypassing the default single-instance behavior. This flag ensures that files and deep links are handled independently in separate windows, preventing resource conflicts that can occur when multiple processes attempt to access the same locked resources.lichtblick --force-multiple-windowsNote: On Linux systems, process isolation typically allows multiple Lichtblick instances to run without conflicts. However, on macOS and Windows, the default single-instance architecture can cause resource contention and process conflicts. This flag is essential on these platforms when you need to run multiple independent Lichtblick sessions simultaneously.
These parameters help optimize the user experience by enabling quicker access to files and configurations without navigating through the UI manually.
Important Note
Multiple files are available only to .mcap files at the moment.
Shortcuts
Use keyboard shortcuts to efficiently navigate the Lichtblick visualization interface.
Playback Controls
| Shortcut | Action |
|---|---|
| Space | Pause or play |
| ← | Seek backward 100ms* |
| → | Seek forward 100ms* |
| Shift ← | Seek backward 10ms |
| Shift → | Seek forward 10ms |
| Alt ← ⌥← (macOS) | Seek backward 500ms |
| Alt → ⌥→ (macOS) | Seek forward 500ms |
*Note: The basic seek forward and backward actions (using only the arrow keys) can be customized in the Settings menu. It's also important to know that seek forward only works when the player is paused.
General
Panel Selection
| Shortcut | Action |
|---|---|
| Shift + Left-click | Select multiple panels in the current layout or tab |
| [ | show / hide left sidebar |
| ] | show / hide right sidebar |
| Ctrl + O ⌘O (macOS) | Open local file(s)... |
| Ctrl + Shift + O ⌘⇧O (macOS) | Open connection... |
Panel Settings
| Shortcut | Action |
|---|---|
| While inside input + ↑ | Increment numeric panel setting values |
| While inside input + ↓ | Decrement numeric panel setting values |
| Click input + Drag right | Increment numeric panel setting values |
| Click input + Drag left | Decrement numeric panel setting values |
Panels
3D Panel
| Shortcut | Action |
|---|---|
| W | Move camera forward |
| S | Move camera backward |
| A | Move camera to the left |
| D | Move camera to the right |
| Scroll | Zoom in and out both horizontally and vertically |
| Drag | Move camera parallel to the ground |
| Right-click + Drag horizontally | Rotate the camera around the world's z-axis |
| Right-click + Drag vertically | Pan the camera around the world's x- and y-axes |
Image Panel
| Shortcut | Action |
|---|---|
| Scroll | Zoom in and out both horizontally and vertically |
Plot Panel
| Shortcut | Action |
|---|---|
| Scroll | Zoom in and out horizontally |
| Scroll + V | Zoom in and out vertically |
Topic Graph
| Shortcut | Action |
|---|---|
| Scroll | Zoom in and out horizontally |
Annotating ROS Enum Fields
ROS messages do not natively support enumerations, but Lichtblick provides two ways to treat constant values as enums: using a separate enum message or applying inline annotations.
Using Separate Enum Messages
Traditionally, ROS messages define enums by declaring named constants within a message definition alongside a corresponding field of the same type. For example, the following PrimaryColor message defines constants for different colors:
# In color_msgs/PrimaryColor.msg

uint8 RED=1
uint8 YELLOW=2
uint8 BLUE=3

uint8 data
Another message can then reference PrimaryColor as a field:
# In color_msgs/Object.msg

color_msgs/PrimaryColor color
Lichtblick recognizes that PrimaryColor defines named constants (RED, YELLOW, BLUE) adjacent to the data field with a matching uint8 type. As a result, the platform displays these constant names alongside raw values in visualization panels such as Raw Messages and State Transitions.
Note:
Using separate enum messages requires accessing the value indirectly (e.g., .color.data). To simplify access, consider using inline annotations.
Using Inline Enum Annotations
Lichtblick allows you to annotate enum fields directly, eliminating the need for an intermediary message.
Steps:
- Convert the enum field to its primitive type (e.g.,
uint8). - Add an accompanying field with a
_lichtblick_enumsuffix that references the enum schema. Define this annotation on the line before the field declaration:
# In color_msgs/Object.msg

color_msgs/PrimaryColor color_lichtblick_enum
uint8 color
Double underscores (__lichtblick_enum) are also supported, though only valid in ROS 1.
Updating the Enum Message
With inline annotations, you can remove the data field from the enum message, making it an empty structure:
# In color_msgs/PrimaryColor.msg

uint8 RED=1
uint8 YELLOW=2
uint8 BLUE=3
- In ROS 1, an empty message does not affect serialization.
- In ROS 2, an empty message introduces an extra padding byte in serialization.
Now, the color value is stored directly in .color, rather than .color.data. Lichtblick will recognize the annotation and display the PrimaryColor constants in the Raw Messages and State Transitions panels.
Migrate from Other Tools
Lichtblick streamlines robotics development by integrating commonly used developer tools into modular panels—providing a unified development environment.
| Tool | Lichtblick Panel |
|---|---|
| ROS 1 | |
rosparam | Parameters |
rostopic | Data Source Info, Raw Messages |
rqt_console | Log |
rqt_graph | Topic Graph |
rqt_image_view | Image |
rqt_plot | Plot |
rqt_publisher | Publish |
rqt_runtime_monitor | Diagnostics |
rviz | 3D |
teleop_twist_keyboard | Teleop |
| ROS 2 | |
ros2 param | Parameters |
ros2 topic | Data Source Info, Raw Messages |
rqt_console | Log |
rqt_graph | Topic Graph |
rqt_image_view | Image |
rqt_plot | Plot |
rqt_publisher | Publish |
rqt_runtime_monitor | Diagnostics |
rviz | 3D |
teleop_twist_keyboard | Teleop |
| Other | |
urdf-loader demo | 3D |
Browser Support
Lichtblick is designed to work optimally on Chrome web browser. Below is the list of supported browsers and their minimum versions.
Officially Supported Browsers
| Browser | Minimum Version | Notes | Download |
|---|---|---|---|
| Chrome | 76+ | Recommended for best performance | Download Chrome |
Unsupported Browsers
- Any browser not listed in "Supported Browsers"
Best Practices
- Always use the latest stable version of your browser
Troubleshooting
If you experience issues:
- Clear your browser cache and cookies
Last updated: April 2025
Experimental Features
⚠️ Experimental features are not guaranteed to be stable
These features are made available for testing, evaluation, and feedback purposes.
What Are Experimental Features?
Lichtblick occasionally introduces early-stage features marked as experimental. These are functional but not yet finalized, and they may:
- Be unstable or incomplete.
- Change significantly in future versions.
- Be removed if no longer relevant or viable.
They are disabled by default and can be manually activated by the user.
Enabling these features helps the team validate ideas and receive valuable user feedback before they become officially supported.
How to Enable Experimental Features
- Open Lichtblick.
- Go to Settings > Visualization settings > Experimental features.
- Toggle on any experimental feature available.
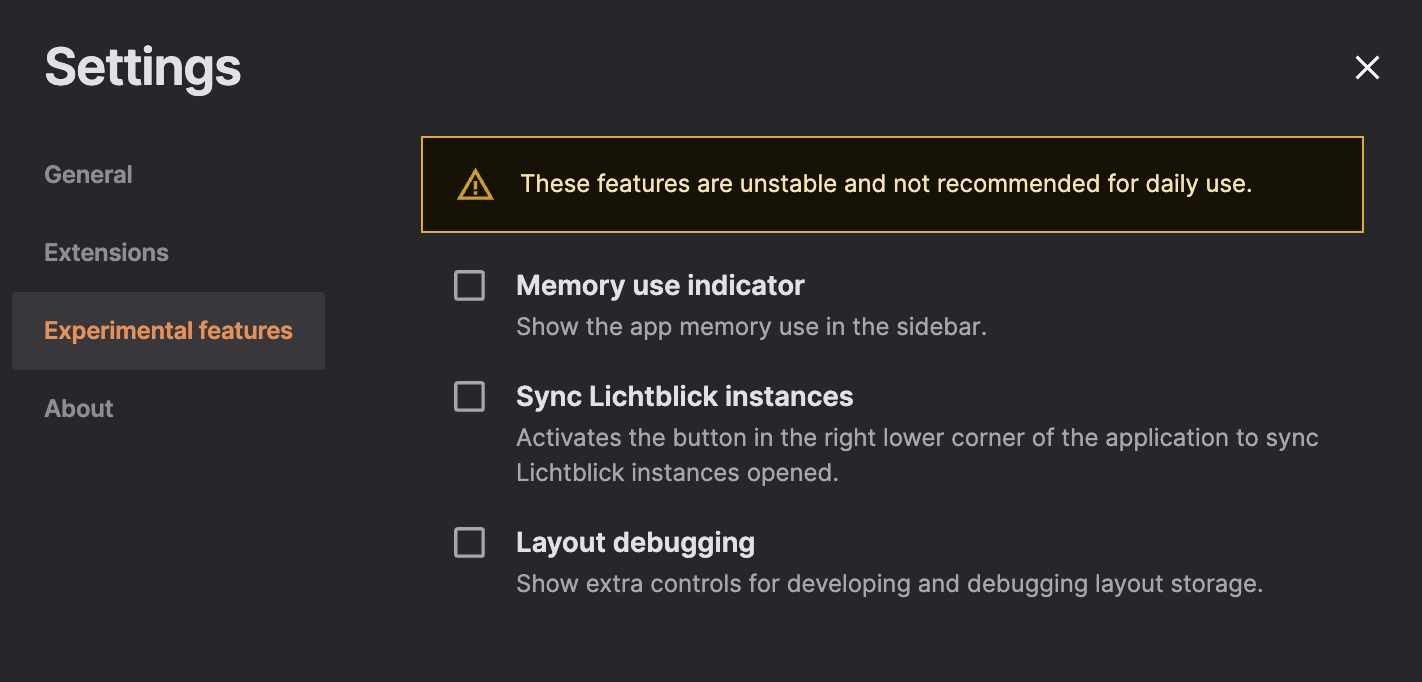
Once enabled, the corresponding feature becomes available immediately in the user interface or workflow.
Staying Updated
The list of experimental features is dynamic—it may change across releases.
To stay informed about new features, updates, or deprecations, we recommend to check:
- Release notes
- Documentation
- In-app announcements
Feedback Welcome
Have suggestions or found a bug in an experimental feature?
Your feedback is essential to improve these early capabilities.
→ Please submit your thoughts via the Lichtblick issue tracker or contribute directly via pull request.
Synchronizing Lichtblick Instances
⚠️ This feature is experimental
Synchronization between Lichtblick instances is an early feature under active development. Instabilities or limitations may occur.
Overview
The Lichtblick Sync feature allows users to synchronize playback actions—such as play, pause, seek, and play until—across multiple running instances of Lichtblick on the same platform (desktop-to-desktop or web-to-web). This is especially useful for users working on multi-window/multi-screen setups and comparing MCAPs.
Enabling the Feature
To activate the synchronization:
- Open Lichtblick.
- Go to Settings > Visualization settings > Experimental features.
- Toggle on Sync Lichtblick instances.
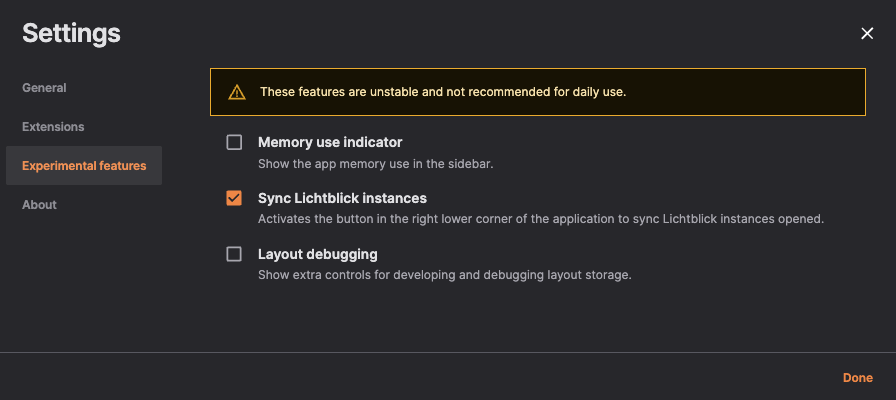
Once enabled, a small toggle button will appear in the bottom-right corner of the playback bar.
![]()
Using the Sync Feature
Once the feature is enabled and toggled on, the current instance will broadcast playback actions to other active instances running on the same platform.
Supported Broadcast Actions:
| Action | Description |
|---|---|
| Play | Triggers play on all synced instances, starting from the same time. |
| Pause | Pauses all synced instances at the same timestamp. |
| Seek | Seeks all synced instances to a specific point. |
| Play Until | Triggers conditional playback up to a given time across instances. |
🔁 Each instance independently process its own data, but reacts to common control commands.
Requirements and Best Practices
To ensure the feature works properly:
-
All instances must be:
- Open on the same platform: either all desktop or all web.
- Ideally running Lichtblick with the same file.
- Aligned on playback range: The files should cover the same time range.
Otherwise, syncing behavior may be inconsistent.
-
Ensure the "Sync" toggle is enabled in all relevant instances.
Limitations
-
Experimental Feature:
This feature is still under evaluation and subject to change. -
Platform isolation:
Synchronization only works between instances on the same platform:- Desktop-to-desktop ✅
- Web-to-web ✅
- Desktop-to-web ❌
-
Performance-sensitive behavior:
If one instance is under high load (e.g., parsing many topics), it might lag behind others.
Even though actions are synchronized via broadcast, visual synchronization accuracy may vary depending on system performance and buffering behavior. -
Timing offsets may occur:
Playback buffering is local to each instance. The sync mechanism sends time targets, but frame-perfect synchronization is not guaranteed.